
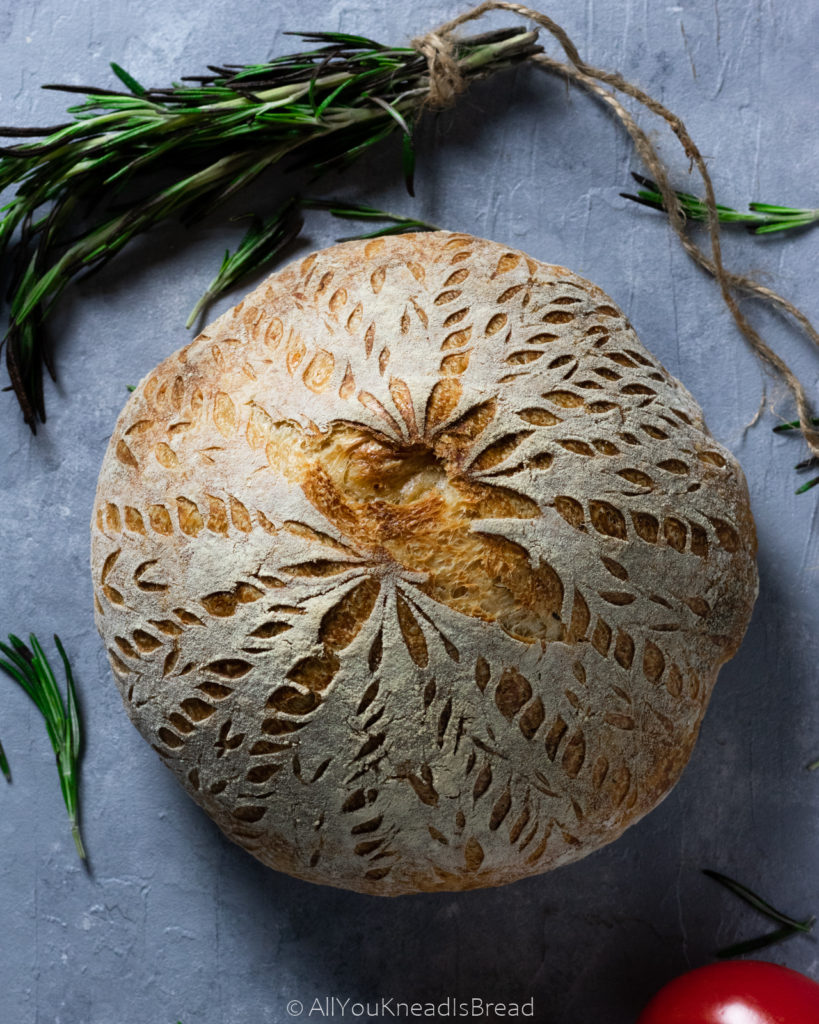
One of the most typical summer lazy dinners I used to grow with was “Pa amb tomàquet” (or commonly referred to as “pan tumaca”). It translates to “bread and tomato”. It is basically a toast with rubbed tomato and olive oil, I wanted to introduce my husband to this dish and that’s when I had an idea… What if… What if I add the tomato to the dough? And what if I add some other herbs? So I did… And that’s how this tomato and rosemary sourdough bread was born!
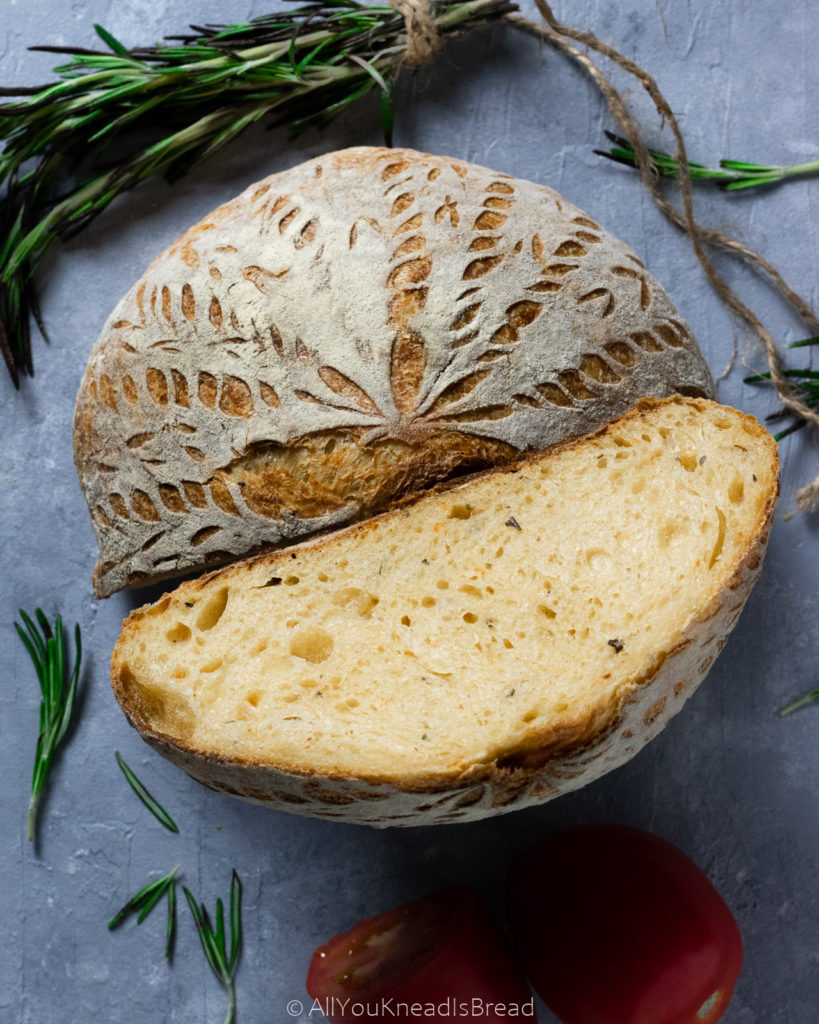
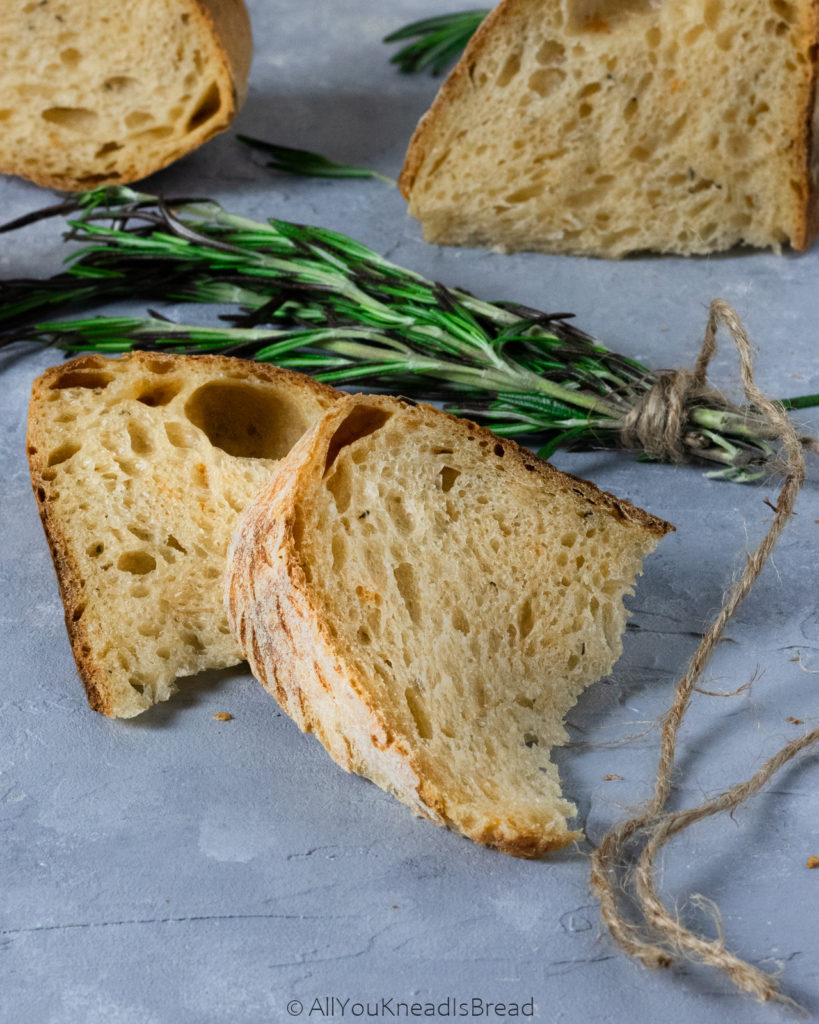
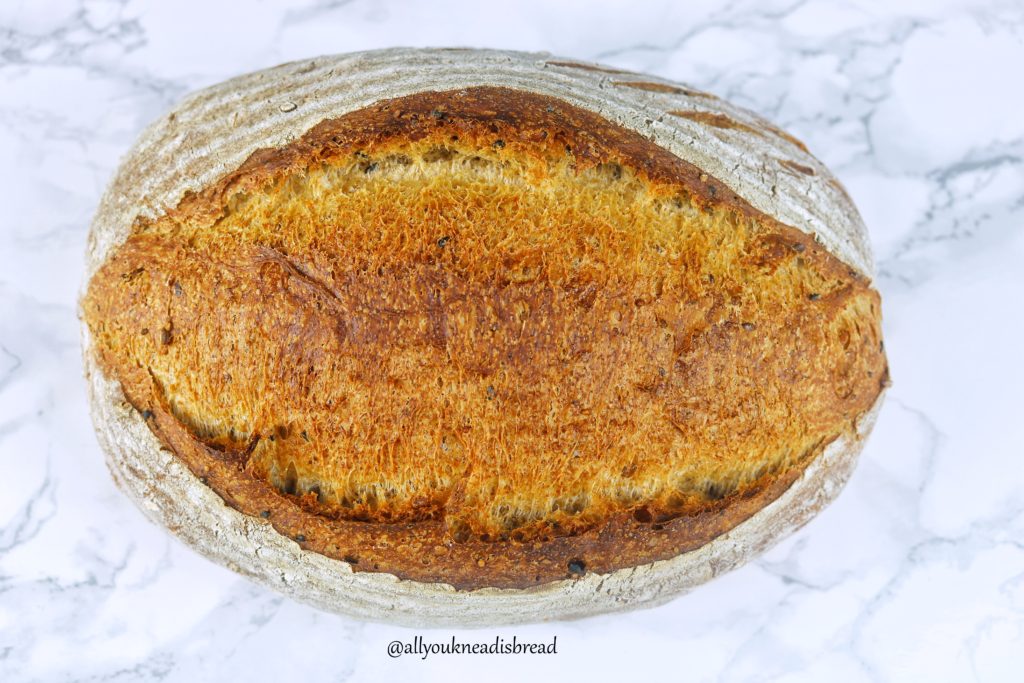
The result was amazing! This tomato and rosemary sourdough bread was so flavorful! The ingredients balanced each other perfectly and the loaf turned out super soft. The crumb was very soft and delicate.
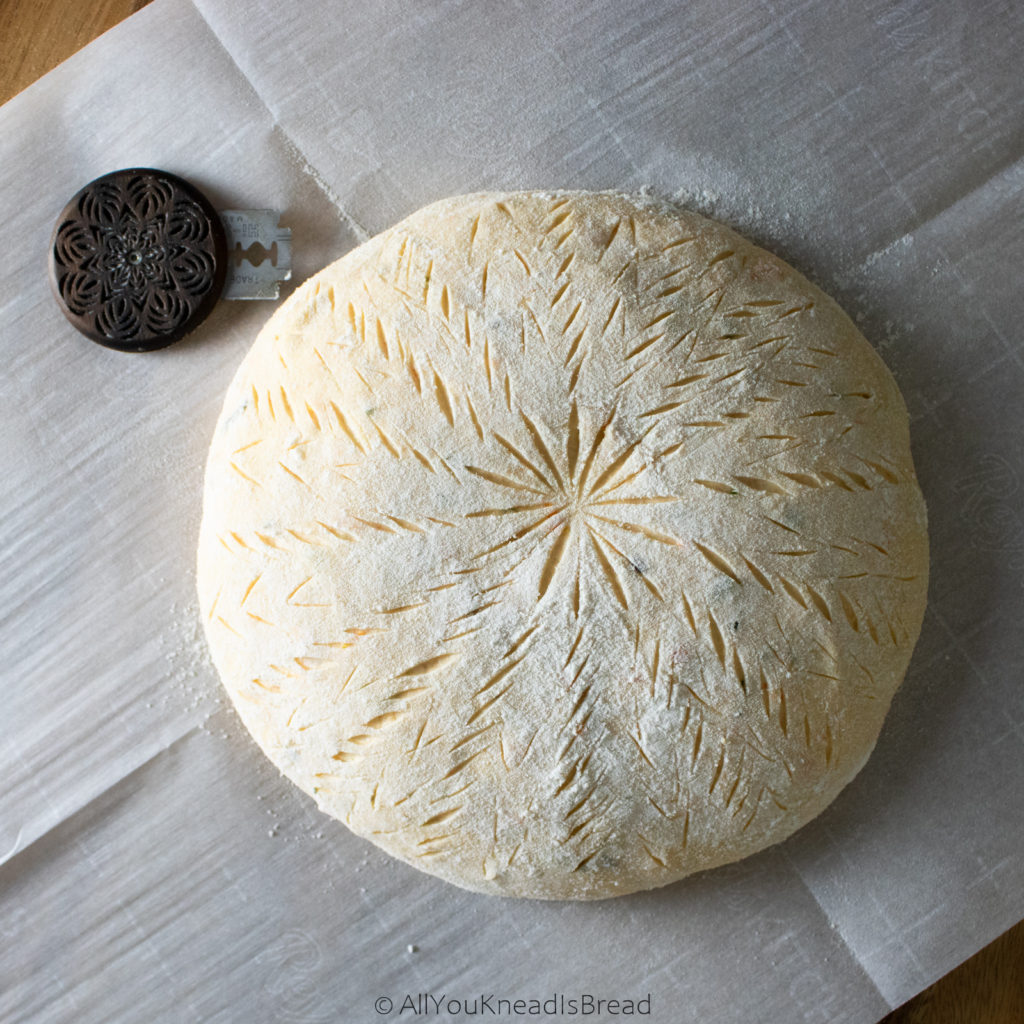
Since the hydration is not too high, the dough is lovely to work with. If you’re feeling adventurous, it can be a great bread to practice your scoring!
Here’s the video of how I scored this loaf:

I used my wiremonkey bread lame that you can purchase here.
I love this lame, it’s ergonomic, efficient, easy to work with and allows you a range of movement that you don’t have with other lames. And best of all? It’s a family business that throughout the pandemic has been helping bakers in need. Not to mention that Tyler is also environmentally conscious and doesn’t use plastic on his lames.
If you’re into bread art or are looking for a nice bread lame, consider buying a wiremonkey ufo lame. They’re simply amazing!
The ingredients
For this recipe, I used Roma tomatoes because they are less watery, so if you’re using other types of tomatoes, I’d suggest you either reduce the amount of water on the recipe or drain the tomatoes a little.
I decided to make a paste first with all the ingredients so I blended the tomatoes, olive oil, salt, and rosemary leaves together. But if you prefer, you can leave the leaves out and add them whole.
Tomatoes and health
Did you know tomatoes are rich in lycopene? A red carotenoid that it’s known for its anti-cancer properties and powerful antioxidants. Tomatoes are also rich in potassium and magnesium. In other words, tomatoes rock!
Not only they’re healthy, but some studies have found that adding tomatoes to bread increased dough elasticity. That, along with the olive oil makes the dough LOVELY to work with, and it’s one of the reasons the crumb is so nice and velvety. Ahh Science! 🙂
How to make this tomato and rosemary sourdough bread
If you follow me on Instagram you might know by now that I’m leaning towards kneading my loaves rather than doing just stretch and folds. I don’t laminate my dough unless I’m going to add things to it (olives, nuts, cheese…). I don’t do long autolysis either, especially during summer because the higher temperatures really have an impact on dough strength.
What I do is mixing all the ingredients, I give them a 20-60 minutes rest (it depends on how busy I am or what I’m doing at the moment) and then I knead using the slap and fold method. I knead the dough for a few minutes and then let it rest for a little while. Resting periods are very important as you allow the gluten strands to realign and the dough gets stronger; you can read more about it here.
Kneading is just a way to 1) strengthen the gluten and 2) incorporate air in the dough. So, you can use whatever method you’re comfortable with. Manually or using a stand mixer, as long as you develop the gluten well.
Bulk fermentation
Once you’re sure the gluten is well developed, you can add a coil fold if you want. Then let the dough ferment for a few hours. The temperature in my kitchen ranges from 74-77F these days, so usually I don’t leave any dough out for longer than 6h (start to shaping). That’s why I also prefer kneading vs. not kneading. It allows me to develop the gluten faster and have a nice bulk fermentation in just a few hours.
I don’t wait until the dough doubles in size, I tend to cut the bulk fermentation short. With summer temperature and humidity under fermenting the dough a little helps maintain the gluten structure strong throughout the entire process.
The length of the bulk fermentation depends on how much starter you used, the temperature of your kitchen, the condition of your starter etc. If you want to know more about sourdough growth and sourdough starters click here. You can learn the science of sourdough and how that applies to your sourdough bread.
If you’re a bit new to sourdough and are not sure about what to do, you can check other things to make sure the fermentation is going well. For example, after a few hours of bulk fermenting: does the dough feel puffier? Can you see small bubbles forming in the bottom? Did the dough grow a little or can you even see some larger air pockets on the surface? Does it smell just like flour or can you identify some slightly alcoholic/vinegary smell (similar to the smell of your starter)?

Shaping and cold proofing
Alright, so once you consider that the bulk fermentation is done, you just need to shape the bread and put it in a banneton (proofing basket). If you don’t have one, you can use a bowl and a cotton cloth.
I shaped this loaf into a bule, but you can use whichever shaping method you’re comfortable with. Be gentle, don’t push to much or you could tear the outer layer and the loaf will lose structure. If that happens, you might end up with a pancake after baking!
I have this round banneton, and I really like it. 9 in is enough for a medium-size loaf. I also have this oval banneton, I am very happy with both of them.
The overnight cold-proof was a total of 12h. A cold-proof is not mandatory, but it does come handy when it’s time to score the loaf. Colder loaves are firmer, and the blades cut through the dough much better.
Baking
Ideally, the first 15-20 minutes of baking should be with steam. In a house oven, keeping the steam inside is almost impossible, so I prefer to use a dutch oven that I preheat along with the oven at 450F.
I actually have a double dutch oven, I find that it’s much easier to load the dough without burning yourself if you can set the dutch oven upside down 😉
When I put the loaf in the dutch oven I also add the rosemary stalks. I’m telling you… the stalks end up roasted but the loaf is baked in those aromas and the crust ends up with a nice rosemary kick!.
After baking, try to wait for the bread to cool down to room temperature. It helps to set the crumb and all the aromas. Thanks to the tomato and the oil, the bread will be very soft, and it’ll keep fresh at least a couple of days.
Let me know if you make this loaf! I love to see what you bake and what you experiment with. You can use #allyoukneadisbread on Instagram.
You can find me on Instagram, Facebook, and Pinterest, and you can also subscribe to my Youtube channel.
Happy baking!!
This post contains affiliate links and any sales made through such links will reward me a small commission – at no extra cost for you – that allows me to keep running this blog.

Tomato and rosemary sourdough bread
An amazing bread, full of flavor and ideal for summer dinners!
Ingredients
- 300 g bread flour
- 150 g water
- 45 g sourdough starter at its peak of activity
- 75 g roma tomatoes
- 20 g extra virgin olive oil
- 6 g salt
- 2 stalks rosemary
Instructions
-
Blend the tomatoes, olive oil, salt, and the rosemary leaves together until you have a paste (you don't have to blend the rosemary leaves, you can add them whole or chopped to the dough)
-
In a bowl add the flour, make a well in the middle and add the water, the starter, and the tomato paste and combine until there aren't dry flour particles. Let the dough rest 20 minutes (covered)
-
Knead the dough until it's elastic and smooth. You can do it manually or with a stand mixer. I'd recommend you let the dough rest 10-20 mins every 5-10 minutes of kneading
-
When the dough feels smooth and elastic, lightly oil a bowl and place the dough inside to ferment. You can add a coil fold after 30-45mins if you want. At 74-77F (23-25C), my dough was ready after 5h.
-
Turn the dough onto a floured surface and carefully bring the edges toward the center to shape the dough into a ball, flip it upside down cleaning the flour underneath and with your hands, bring the dough ball toward you to create some tension on the outer layer
-
Flour a cotton cloth, place it in a proofing basket and put the dough inside. Cover it with the cloth and put the basket in the fridge overnight.
-
The next day, preheat your oven at 450F (230C) with a pizza stone or a dutch oven if you have , for at least 30-40 minutes
-
When the oven is ready, take your dough out of the fridge, flip it onto a parchment paper, put it in the dutch oven or the pizza stone and score the loaf (make some cuts on the surface). *SEE NOTES
-
Put the loaf in the oven and turn the temperature down to 425F / 220 C. Bake the loaf with a lid on (if you're using a dutch oven) or with steam (if you're using a pizza stone or just a baking tray) for 15-20 minutes. Remove the lid and bake the loaf for another 20-30 minutes or until it's golden brown
-
Take the dough out of the oven and let it cool down in a rack for at least 1h
Recipe Notes
* I like to put the dough on a thin metallic tray lined with parchment paper and then just slip it into the lid of my double dutch oven.
How to create Lievito Madre (Pasta Madre) for panettone
UPDATE: This post has been updated to add some modifications to the process of creating your own lievito madre or pasta madre. The new information will be in colored boxes like this paragraph.
Hello everyone!
As promised, here’s my guide to building a lievito madre or pasta madre to make panettone. I will use both names because it came to my attention that some people are using the term lievito madre to refer to liquid sourdough and it’s not the same. I want you to get familiar with both names so you know that lievito madre or pasta madre are the same thing 🙂
First of all, I want to say that all this is not my idea. I’ve been reading blogs and watching videos to have a better understanding of the whole process. Eva’s posts were full of information. I’ve been tracking down everything the Italian Pasticcieri had online and read scientific publications to understand better how bacterias work (surprisingly there’s not much research on this).
This guide is a summary of everything I’ve read and everything I’ve learned every day, and I hope it can be useful to you. It’s focused on building and training the lievito madre. The next step will be the 3 refreshments before making panettone, which I will write about once I’m more familiar with the process.
For a better understanding of how sourdough bacteria grow, I recommend you read this post first. It’ll help you understand how pasta madre works.
When I first heard about panettone, I never thought it was this incredibly challenging bread! It never even occurred to me that it was made with sourdough or how laborious the process was!
To be honest, I do have a panettone recipe here, and trust me when I tell you that I spent a lot of time trying to get the dough right, but now… I feel like I was cheating! (I still think it’s a good place to start getting familiar with very enriched dough and gluten development).
A few notes about pasta madre
First and foremost, is not just a firm sourdough starter. This stiff dough is indeed a sourdough starter, but a special one. It requires a very specific maintenance routine and it has a very specific purpose: to bake grandi lievitati products such as panettone, pandoro, colomba…
If you want to make some rustic Italian bread using sourdough, you can create a stiff starter, or use your own sourdough starter. You wouldn’t need lievito madre, because you wouldn’t need the specific characteristics of grandi lievitati products in a rustic loaf.
Grandi lievitati bakes also require very strong flour, and most likely, your regular bread flour won’t be enough. Also, I wouldn’t say that nobody uses whole wheat flour, but I believe that’s not the most common way to maintain pasta madre.
Things you need to know before you start
These are things that I’ve learned along the way and that I think everyone should know before making the decision to start this journey.
- Be aware that it’s going to take 15 days to get the lievito madre ready. There are two major parts in this process: building the stiff starter and training it.
- I encourage you to do a few experiments to see if you can find a place where you can keep a constant temperature of 30C/86F. This step is crucial in the first couple of days and also to ferment the panettone dough.
- Check your schedule and plan accordingly. Don’t start making the starter on a Saturday at 1 pm if you won’t be home at 1 pm during the week because the cycles are either of 12 or 24h.
- Gather all your ingredients before you start and make sure you have enough flour. You will need it. I bought 15lb and it’s enough to prepare the pasta madre, train it and make at least 1 batch of panettone (probably more).
- If the quality of your water is not good, buy water (you don’t need a high mineral concentration in the water). If the quality is fine, I suggest you filter the tap water.
- Get your mind in the right place. Some days you will be tired and will want to go to bed, but you’ll have to feed your pasta madre, this is very important when you’re training it. The whole point of this is to reduce the acidity. Once is matured, you can put it in the fridge and feed it once a week.
- Be patient. Use your eyes and, especially, your nose to let the dough tell you what’s happening.
The process of creating your lievito madre
| Building period | |
| Day 1 | Make apple yeast water |
| Day 2 | Create a 100% hydration sourdough |
| Day 3 | Convert into a stiff starter and start anaerobic fermentation (wrapped log) |
| Day 4 | Wait. Nothing to do |
| Day 5 | Collect the core of the log, refresh it with flour and water and start fermentation in water |
| Training Period | |
| Days 6-10 | Refreshments using same amounts of flour and starter +30-50% of the weight of flour in water |
Building the lievito madre: 5 days
The first step of the building period is to activate the wild microorganisms found on apples. In other words: create an apple yeast water.
As you know, vegetables, fruits, cereals, etc have lactic acid bacteria and yeasts that are dormant and need to be activated.
These microorganisms, in general, proliferate better when their environment is moist. In science, we refer to this as “water activity”. This number ranges between 0 and 1 (pure water being 1), so the higher the water activity, the easier it will be for the microorganisms to wake up and grow.
Temperature is also crucial. Fermentation can occur at different temperatures, but not all microorganisms are activated at the same temperature. For panettone purposes, we should make sure our culture is at 28-30C (82-86F) so we promote the fermentation of specific strains of lactic acid bacteria.
A typical sourdough culture can have dozens of different strains of bacteria and many different types of yeast. So we can select which ones we prefer by controlling the temperature, moisture content, pH…
Day 1: Start the apple yeast water
You will need:
- 1 or 2 pesticide-free and untreated apples (I bought organic and they worked great, they shouldn’t have wax or anything, the more natural the better. If you can go to an orchard even better!)
- A glass container with a lid
- A grater
- Water at 30C/86F ( I used tap water filtered with my Brita)
- A scale
- A knife
- A thermometer
- A warm place where you can maintain a temperature between 28-30C/82-86F (my oven with the light on is enough, if it’s too cold and the temperature drops in the evening I put a glass with hot water on the other corner of the oven before I go to bed or when I wake up)
- Cut the apples in 4 and remove the core. You don’t need to clean the apples because if you do, you’ll probably wash out lots of nice microorganism. If there’s dirt on the stem area, just cut that part out.
- Grate the apples and keep the peels
- Weight 200g of grated apples and peels an place them in the glass container
- Weight 200g of water at 30C/86F
- Add the water to the glass container and close it tightly. You can shake it a little bit if you want
- Place the container in your oven or fermenter and wait for 24h
That’s it for now!
Day 2: create a sourdough starter with the apple yeast water
After 24h you might see small bubbles in your container, it can make a fizzy noise when you open it, it can smell like cider or maybe you can’t tell if something happened in there. That’s why this step is important. If after 24h, your starter doesn’t show activity, start with the apples again because something went wrong.
You will need:
- Fermented apple mixture from day 1
- A strainer
- A tall and transparent container*
- A spatula or a spoon
- 200g of Manitoba flour
- A scale
- Sharpie or rubber band to mark the container
Today is an easy day, enjoy it, because things get more complicated!
- Strain the apple mixture from the day before and collect the liquid. In my case, I didn’t see small bubbles, but it did smell like cider.
- In a medium bowl weigh 200 g of Manitoba flour and add 200 g of the fermented apple water. With a spatula mix well until you don’t see dry flour particles. It should look like a regular 100% hydration starter.
- Carefully transfer the starter to the tall container. And let it ferment at 30C for 24h. I put it in the oven with the light on. After 24h the starter will raise and collapse. At the very least it should double in size. That’s why it’s important to not leave dough stuck on the container wall because while the starter rises and collapses it’ll leave a mark on it, so you’ll be able to tell how far it rose. If there was anything there before, you might get confused.
NOTES:
You don’t have to put a lid on the container, you just need to place a napkin on top it there is any risk of something falling inside.
If you have it in the oven, try not to open the door all the time. That way you avoid streams of colder air coming inside and changing the temperature. The more constant the temperature the better. I checked my oven before going to bed and in the morning if the temperature changed too much overnight or I felt the house very cold.
Make sure the container you use for this is tall enough that can hold the dough even if it quadruples in size. Also, just in case some starter overflows, put a plate or a tray underneath.
*my container is a coffee canister that I bought in Walmart for less than $2. It’s 10x9x20 cm (4×3.6×8 in)
Day 3: Convert the starter into a stiff starter and do an anaerobic fermentation
Today is when you should start seeing activity in the sourdough. After 24h at 30C, your sourdough should’ve grown and collapsed. There should be some debris on the walls of your container that indicates how high the starter rose. It should’ve, at the very least, doubled in size. If it didn’t, at least, double, I’d start again. There aren’t enough bacteria or the ones that are in the culture, are not strong enough.
You must always keep in mind that making panettone is a difficult task and fermenting all that dough full of sugar, butter and egg is difficult too. So, we need to make sure that the bacteria we select and will train is the strongest.
The starter should be very runny, the same as a 100% hydration starter that has reached the peak and collapsed. It should have small bubbles on the surface and a pungent aroma. Don’t freak out if it smells like something rotten, so far, it’s normal. The bacterial colonies are fighting against each other, everything we do is to promote the survival of the ones we want.
The second time I built my LM I didn’t wait until it completely collapsed (24h), instead, I decided to proceed with the next step after 12h. This way most of the bacteria were still in the stationary phase, which means that I collected more live bacteria. Ultimately, my PM was more active than the previous one.
You will need
- 200 g of yesterday’s starter
- 200 g of flour (more if needed to achieve desired consistency)
- A rolling pin
- A scale
- A Ziplock bag
- 2 cotton cloths
- 1 meter/1 yard of some strong rope or string
- Collect 200g of the starter and add 200 g of flour.
- With your hands mix everything well. The dough should be dry and relatively hard, it shouldn’t stick to the counter but should be soft enough to work with a rolling pin. It is OK if you need to let it rest a few times to relax the gluten.
- Once you’ve incorporated the flour, with a rolling pin start working the dough until it gets a little bit more elastic. It doesn’t have to be extremely soft and smooth, but it shouldn’t have lots dry flour or chunks of dry flour either.
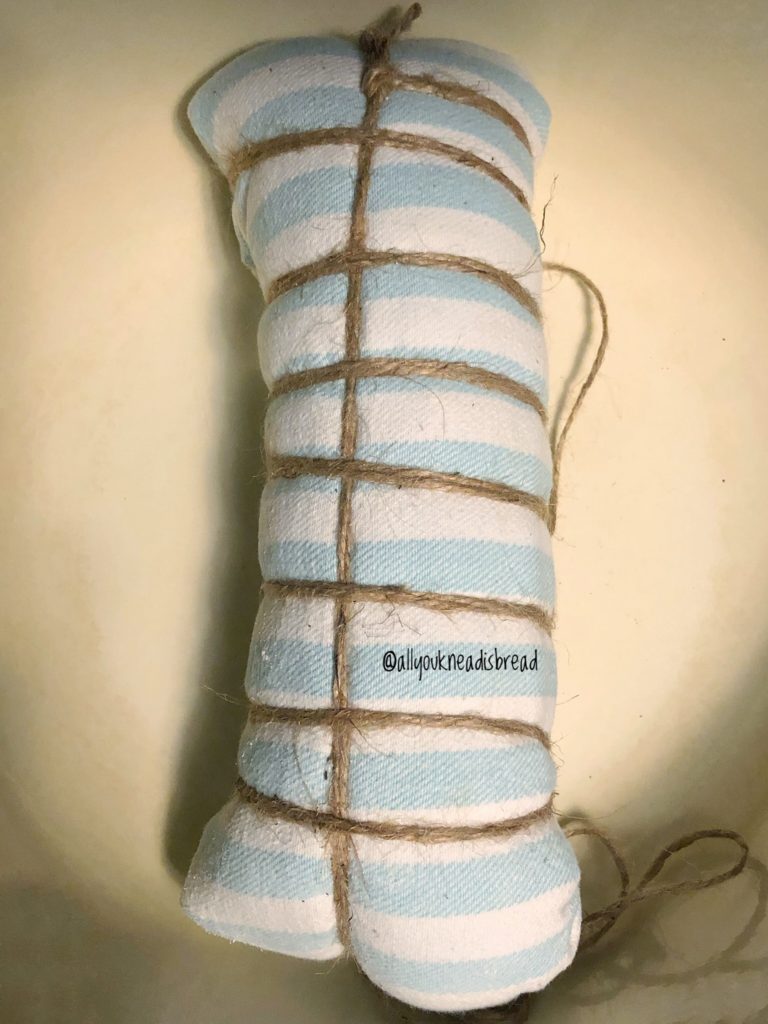
- Shape the dough into a rectangle-ish that’s about 20cm long and 15cm wide and roll it into a log. Place it into the ziplock bag and wrap it well. Wrap the packet with a cotton cloth and then with another cotton cloth and tie it with the rope or strings you have. It doesn’t need to be too tight, just enough to keep the cloths in place.
- Put the dough in an empty pot and put the pot inside of your oven (this is precaution, it can explode due to the built-in pressure). You don’t need to leave the light on. Just make sure that nobody turns the oven on and burn your pasta madre.
- Let it ferment for 48h. As time goes by the log gets harder and harder. That’s a good sign. It means that it is fermenting and as a result, the pressure is increasing.
Day 4: No need to do anything
Day 5: Collect the fermented stiff starter and begin the fermentation in water
After 48h the log might not feel as tight as after 24 or it might still feel a bit tight. Anyhow, today we’re going to unwrap the whole packet. Be careful because it can explode. Most likely, you’ll see how, due to the pressure built inside, the dough tore apart the plastic bag and some of it came out and it’s dry and stuck on the cloth. Don’t worry, it’s absolutely normal.

You will need:
- A knife
- A scale
- 200 g of stiff sourdough
- 200 g of flour
- 60-100 g of water at 30C/86F
- Mixing bowl
- Rolling pin
- A tall and transparent container
- Water for the bath
- Unwrap the log carefully
- With a knife cut the bag and open the log lengthwise. You should see small alveoli. The dough should have a dark color (from the apple water) and it should smell better, more of a fermentation smell than in the previous step.
- With a clean spoon, collect the inside part of the log (the “cuore” as Italians say). The strongest bacterial colony is in the core of the log. The bacteria undergo a very rough 48h where an anaerobic fermentation takes place and only the strong survive, and those are the ones we want.
- Collect 200g of dough or as many as you can.
- In a bowl add 200g of dough, 200g of flour and 30-50% of the weight of flour in water at 30C/86F. That is 60-100 g. Start by adding 30% and move up if needed. The dough should be dry and hard, it shouldn’t stick to the counter but should be soft enough to work with a rolling pin.
- Roll the dough into a rectangle, fold it in 2 or 3 and roll it again. The procedure is very similar to working with laminated dough.The dough should get smoother and smoother. It shouldn’t have pieces of dry flour in the middle.
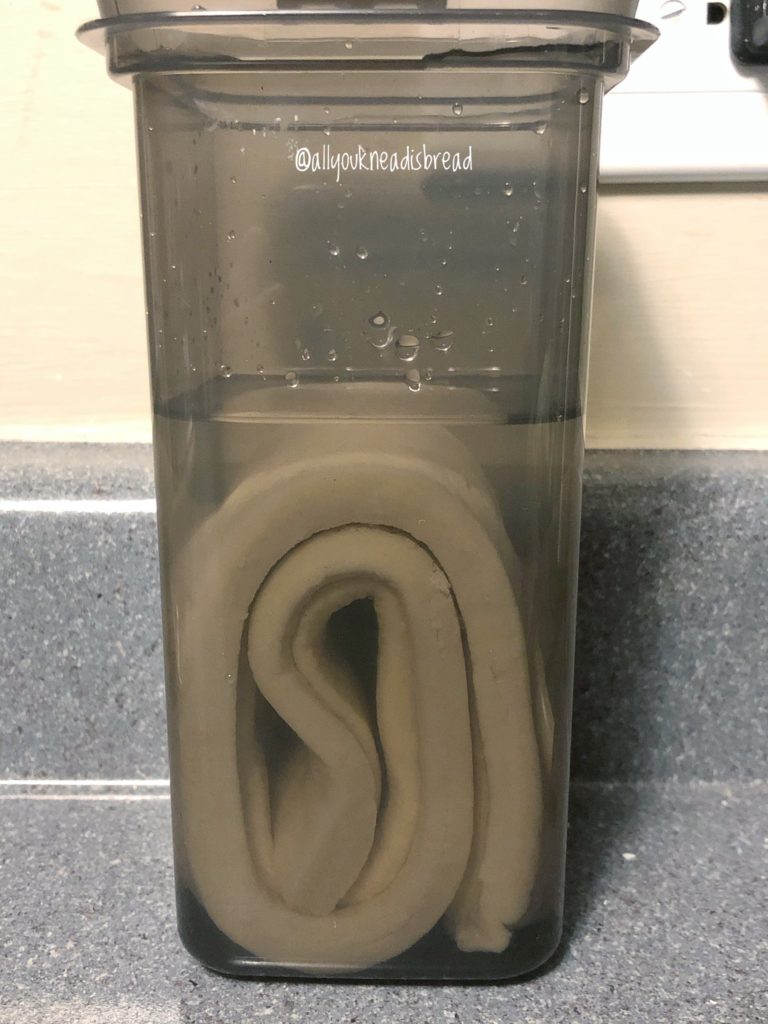
- Roll the dough into a long rectangle that is slightly narrower than your container and about 1cm/0.5 in thick.
- Fold the rectangle into 3 or 4, put it inside of the plastic container and fill it with water just to cover the dough.
NOTES:
If your kitchen is:
- Cold-Very cold: you can use room temperature water for the bath
- Not too cold, not too warm (around 20-23C, 69-73F): you can use room temperature water and check how it evolves, you might be able to do refreshments every 12h or every 24.
- Warm-very warm: use cold water. Keep a bottle of water in the fridge, or cool it with ice cubes and when it’s cold enough add it to the container.
Pay attention to how the dough behaves. Warmer temperatures will accelerate the fermentation process and colder will slow it down. Avoiding over fermentation is crucial.
In my case, my kitchen was not too warm and not too cold, but since I’m not home all day, I didn’t want to risk the dough to over ferment and lose a lot of it, so I started using cold water. The dough didn’t show much sign of fermentation in the first 12h. After 16h it was floating and after 24 it had clear signs of fermentation (alveoli), the layers weren’t visible anymore and it had developed a dry skin on top.
Something I realized was that this sourdough starter likes routines, so try to always do the same thing and keep it at the same temperature. During this process, there was a night when the temperature dropped a lot and the pasta madre didn’t rise as usual. In my experience, consistency is key!
The reason the container and the dough should be almost the same width is that when the dough starts fermenting and the layers get thicker, the container will retain the dough and prevent it from expanding to the sides. Therefore, the dough doesn’t have a choice but to grow upwards.
Training your pasta madre: 10 days
Days 6-15: refresh the lievito madre every 12 or 24h
According to the Italian regulations for Artisanal Panettone, the lievito madre has to be trained for at least 7 days. In our case, it’ll be trained for 10 days.
From now on you need discipline because you must feed your LM at the very least every 24h. Whether you’re tired or sleepy. Therefore, you need to think well about which schedule works for you best.
For example, I leave my house around 8:45 am, and come back home around 8 pm, that’s my window. I started the process at 8:30 pm and then I was doing the refreshments at 8:30 pm every 24h. I chose this time because not only is it when I’m home, but it’s also a time that works for me on the weekends. Because your pasta madre doesn’t take weekends off!
I’m saying this because if you start working very early, you might do refreshments at 5 or 6 am, but… will you wake up that early on a weekend? If you will, then it’s fine! I know I wouldn’t, I’d probably turn my alarm off and regret it later.
You will need:
- A knife
- A scale
- 200 g of stiff sourdough
- 200 g of flour
- 60-100 g of water at 30C/86F
- Mixing bowl
- Rolling pin
- Tall and transparent container
- Water for the bath
- A large bowl to discard the water or the kitchen sink
I changed my container to a shorter but wider one after day 6 or 7. It allowed me to control and shape the dough better.
The procedure is similar to day 5.
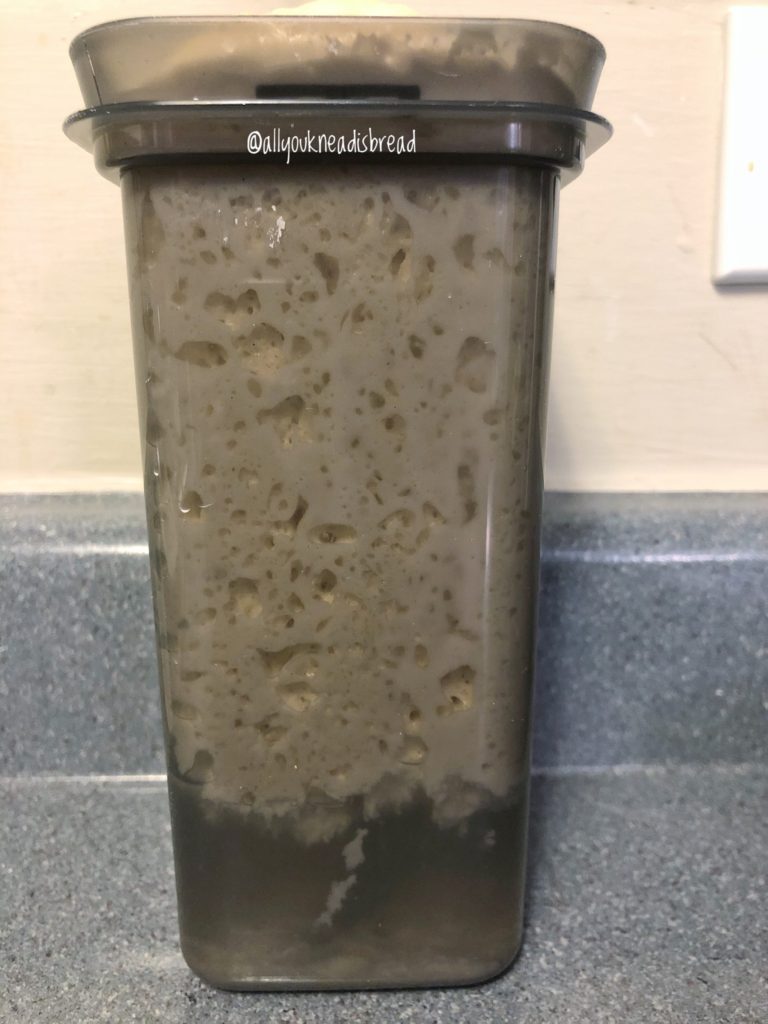
After 24h, the lievito madre should’ve risen to the top of the container and probably developed a dry skin. In the bottom, you will see some flour. Your pasta madre will be very soft and slimy on the outer parts. What we need is the core of the dough.
- Remove the dry skin that developed on top. It might not be completely dry, but even so, remove it. It’s the part that has been exposed to dust and particles falling on top of it.
- Hold the container with one hand and with the other try to separate the dough from the walls of the container so the water to come out but you can hold the dough, and remove the water.
- Squeeze the dough to drain water out of it and massage it so the slimy mushy part falls out and you only keep the dough that was not degraded.
- In another bowl weigh 200g of Manitoba flour, add 200 g of the drained pasta madre and add 60-100 g of water at 30C/86F
- Knead everything and incorporate all the flour. If you need to let the dough rest, do so.
- Roll and shape the dough the same way you did the day before
- Place the dough in the container and add water to cover it.
Repeat this every day for the next 10 days paying attention to how the dough smells, how the alveoli look after the fermentation cycle etc. Also, smell everything. The dough, the water you discard… Your nose will let you know how the lievito madre is doing more than your eyes will.
Things you need to know
- You need to keep everything extremely clean to reduce the chance of cross-contamination.
- Keep in mind that you’re going to use a lot of flour just to build your starter. If you’re a pro at this, probably you can use smaller amounts of flour and LM because you can tell how the dough is doing just by looking at it. But if you’re like me, in the learning process, you might want to keep relatively large amounts of flour for each refreshment until you learn to feel the dough and see if it needs more or less water, 24 or 12h refreshment cycles, etc. I learned this method this way and larger amounts are easier to deal with and to avoid over-degradation of the dough. This is especially handy when you’re not home all day. I see this as an investment, from now on I’ll take care of my lievito madre and, hopefully, I won’t have to do it again!
- Your hand will suffer, keep your moisturizing lotion close by! After a few days I noticed my hands were getting very dry. I guess it’s normal, you’ll be washing your hands all the time, and let me tell you… this dough is difficult to get rid of! Warm water is your best friend here. Also, you’re going to be working every day with a slightly acidic dough. So yeah, keep the lotion close by.
- If you can find/afford 2 containers with the same dimension, get them. It’ll make the process a bit faster because you don’t have to stop to wash it to put the dough back in.
That is all for now!
This is all for now. If you have any questions you can contact me through email, DM on Instagram, or send me a message on Facebook and I’ll try my best to help you!
Let’s start a movement for homemade artisanal panettone! Tag your pics with the hashtag #missionpanettone so we can all see how everyone’s lievito madre is doing.
You can find me on Instagram, Facebook, and Pinterest, and you can also subscribe to my Youtube channel.
This post contains affiliate links and any sales made through such links will reward me a small commission – at no extra cost for you – that allows me to keep running this blog.
I hope you all have a wonderful weekend and if you are celebrating Thanksgiving… Happy Thanksgiving!
Maria.
Pulp crackers – rich in fiber!

Hello guys! I am back!!!
These last few months have been a roller coaster. This is my last semester in my PhD program and I was full time writing. I never realized under how much stress I was until I finally defended my dissertation. It felt as if I took a heavy load off my shoulders. I can’t tell you how much better I’m sleeping now! And my bread-creative mind is starting to function again! I have this “to-bake” list that I carry with me everywhere and every time I have an idea, or I see a bread I want to make, I write it down. Welp… I haven’t written anything down in the last few months (I still have a long list of breads I want to make).
There’s this thing about me, when I’m anxious I crave weird things. And I had been craving horchata for the longest time!
Note: Do not mistake with Mexican horchata, which is a different beverage made with rice and milk.
Spanish horchata is a vegetable milk made from tiger nuts (also known as chufa seeds) typical from the south-east of Spain (Valencia). Chufas are naturally sweet with a very distinct flavor. A cold glass of horchata is one of the best beverages for hot summer days! I bought a small packet on amazon and I made my vegetable milk. It’s very easy to make, the only thing is that the seeds are very hard and dry, so you need to soak them for at least 24h (best results after 48-72h). Then put them in your blender with water and strain the mixture!
I was so happy with my horchata! Plus, tiger nuts are rich in resistant starch, which is a type of starch that is not digested and counts as dietary fiber (yeah!). With ½ pound of seeds, I made about 40 oz of this vegetable milk aaaand I had a bunch of leftover pulp!
Why you should use leftover pulp
The pulp is rich in dietary fiber too, so I didn’t want to throw it away because it’s the healthiest part. Throwing the pulp away (or cereal bran, fruit peel etc.) is like finding a diamond full of dirt, keeping the dirt and throwing the diamond away. Crazy right?! So, I used the pulp to make crackers! I had enough to make lots of crackers and they can last a long time in an airtight container 😊
The reason I am posting this recipe is because all of us, at some point, might have some “edible leftovers” that are packed with nutrients, but we toss them because we don’t know that to do with them. Not only this recipe will help you to use valuable leftovers, but also to reduce food waste.
Let’s make some crackers!
This dough is super easy to make, you don’t have to knead too much, just enough to have a good ball of dough. This might be one of the few cases were developing the gluten network very well its not crucial. You can also add whatever spices or seeds you like to the dough. And, of course, you can adjust this recipe to any type of pulp you have. You can use almond pulp, cashew pulp, okara… Or you can switch it for any cereal bran or fruit peels… Your choice!
In this recipe I use butter because I was looking for that flaky texture but if you don’t want to use butter, substitute it for shortening or any vegetable oil. If you want to make the crackers healthier, you don’t have to use any type of fat, maybe just a bit more water. But the crackers won’t be as flaky.
The only requirement here is to be able to make a nice dough ball. Not too sticky, not too dry. That’s it, that’s my secret

Start by mixing flour and the rest of the dry ingredients and then add the pulp and the butter.
Then blend the butter with the flour and pulp. You can use a pastry blender, a fork or your hands, whatever is more comfortable for you. I did it by hand.
You should have small pieces of solid butter

Then start adding the cold water. Do it little by little, controlling you don’t add too much. We’re not looking for a wet dough.

Knead the dough for a few minutes and with a rolling pin roll it on parchment paper to your desired thickness. My crackers were about 1/5 of an inch (0.5 cm). The thicker the crackers, the longer the baking time, just keep that in mind.

With a knife or a cookie cutter cut the crackers. Trim the edges and roll the dough again on another piece of parchment paper. By doing this you don’t need to transfer the crackers and mess their shape. And remember, you can use parchment paper several times before you discard it. You can do this as well using silicone baking sheets.

With a fork or a toothpick prick the crackers so during baking they won’t puff.

You can brush the crackers with oil or egg if you want, I didn’t. Sprinkle your favorite toppings and bake the crackers!
I like to sprinkle coarse salt or black pepper, but you can use whatever you like.
Baking time: it depends, bake the crackers at 400 F (205 C) and after 5-7 minutes (less time if your crackers are thinner) Check the crackers, if they’re not ready let them bake a bit longer but keep an eye on them. When they start getting some color they’ll be almost ready! Don’t let them bake too long or they will get hard and the taste might not be good.
NOTE: keep in mind that because of how the heat is transferred in your oven and the thickness of the crackers, some might take longer time than others. So don’t worry if you need to take some out of the oven while others are not fully cooked yet.
Now, go make some hummus and enjoy these crackers!


Tiger nuts pulp crackers
An easy way to use leftovers packed with nutrients!
Ingredients
- 300 g bread flour
- 150-200 g finely ground tiger nut pulp (any other pulp works too)
- 75 g butter (optional)
- 100-160 g water
- 2 tsp salt
- 1 tbsp baking powder
- 1/2 tbsp sugar (optional)
- 2 tbsp sesame seeds (optional)
Instructions
-
Preheat your oven at 400 F (205 C)
-
Mix dry ingredients, spices, seeds and pulp
-
Add cold butter and blend it in with your hands or a pastry blender until you have small pieces of butter evenly distributed
-
Start adding cold water little by little until you have a cohesive ball of dough. Not too dry and not too wet
-
Knead the dough a little bit and let it rest 20 mins
-
Roll the dough onto a piece of parchment paper to the desired thickness and with a cookie cutter or a knife cut the crackers.
-
Trim the edges, roll them out again and keep cutting crackers
-
Prick the crackers with a fork or a toothpick and add your toppings (salt, black pepper, dried onion…)
-
Bake for 5-7 minutes keeping an eye on them. After that time take out the crackers that have a nice brown color and keep baking the rest.
-
Enjoy!
Recipe Notes
You can customize this recipe as you wish. Add spices, herbs… Change the tiger nuts pulp for something else.
Keep in mind that the pulp I used was moist and that affects the total water I used. If you use cereal bran you might need more water.

Fiber packed loaf
Hello everyone! Happy New Year even though it’s mid-January already! 😊
I hope you all had a wonderful holiday time! I sure did! We spent Christmas in NYC and it was so pretty! It was a great trip, we disconnected from the routine and eat some delicious food! (I’m looking at you, Queens Chinatown!). We walked, walked, walked… My fitbit was so happy!
Unfortunately, the holidays are over, and we have a new chance to start living a healthier life. Less sugar, more veggies, more FIBER.
For those who don’t know, I do research on high fiber bread, so I know a bit about the importance of eating fiber and I know how difficult it is sometimes to eat the 25g/day that the FDA recommends.
This is what 25g of fiber looks like:
- 1.2 kg of boiled kale OR
- 240 g of old fashioned oats OR
- 2.7 Kg of grapes OR
- 1 kg of broccoli
It’s very possible you’re not eating enough fiber. But what if you change your bread slices for whole grain bread? Bread is an excellent way to increase our fiber intake because it’s everywhere! Morning toasts, lunch sandwiches, dinner rolls, garlic bread, snack crackers… you name it!
Easy, right?
NOPE
If you’ve baked a few loaves, you might now already how difficult it is to bake with whole wheat flour, and more so if you want to add more grains or a mixture of flour with less (or none) gluten.
I could literally go on a full essay on why this happens (currently writing my dissertation, it’d be a copy/paste lol), but long story short: THE GLUTEN NETWORK.
A little bit of nerdy talk.
What happens when there’s fiber in the bread dough?
We all know that gluten is what makes the dough elastic, what helps the dough retain the gas the yeast releases and what helps the baked bread have that particular structure and soft crumb. When we add fiber (as cereal bran, whole grains etc.) there are three major things that happen in the bread:
1.-The replacement some of the flour with some cereal bran, grains etc. that DON’T have gluten, so for the same weight of bread,
2.- Competition for water between gluten proteins and fiber. Gluten proteins need water to bind to each other and create the gluten network. Without enough water, the network can’t be developed properly, and it’d be weaker. BUT fiber loves water too and can take it faster than the gluten proteins, so they cannot build a good gluten network.
3.- We’re still not sure about how it works, but some molecules present in the cereal bran might interact with the gluten proteins and weaken the gluten structure, making the dough more prone to collapse during fermentation and/or baking.
Basically, everything that makes bread healthier, destroys its structure (and texture, and quality).
OH, THE IRONY!
With this recipe, I had to face another problem: whole rye flour. Rye flour has a different type of gluten and it works a bit different. It’s going to affect the dough and the final bread.
Lucky for us, we can add a bit of magic to our dough, that is: vital wheat gluten.
For those who are not sure about adding “weird” things to your bread I’ll say this: Unless you have a gluten allergy or sensitivity, adding extra gluten to your bread it’s perfectly safe. If you do have a problem with it, you probably wouldn’t be eating bread anyway.
You can make this recipe without the extra gluten, but the dough will be less elastic and the bread will have a denser crumb. I’ve tried with and without and the difference is palpable!
Why is fiber so healthy?
We all know fiber is good, but why?
You know fiber helps us… ehm… to go to the toilet more regularly! And this is important because that’s the way our body has to get rid of toxins and sometimes even cells that are acting weird and could become cancerous. Fiber also helps us regulate the bad cholesterol, it makes us feel full for
FIBER FEEDS THE GUT MICROBIOTA! Fiber is super important to keep your gut bacteria healthy and balanced. And gut bacteria is EVERYTHING! Everyday there are new studies that link our gut bacteria to something unexpected like mental health or neurodegenerative diseases. It’s an amazing field of research by itself.
Seriously, I cannot stress enough how important fiber is for the proper functioning of our body. So please, please, please… today more than ever: eat your veggies!
Now, this doesn’t mean that eating all the veggies and all the fiber is going to fix all our problems. But it will significantly reduce the probability of developing other problems or suffering other diseases, and help you have a healthier lifestyle 😉
This bread is also vegan, so if you’re lactose-free, egg-free, vegan or taking part in Veganuary this is your bread!
Without further ado, here are my notes on the recipe!

The very first thing to do is to soak the grains that would take up lots of water. Oats, chia seeds, wheat grains and millet in my case. But feel free to add whatever you want!
Boil some water and add it to where you have your grains. Don’t worry about the amount, just make sure there’s plenty. You’ll rinse the water later on.
Let the grains soak until the water is at room temperature or lukewarm. In the meanwhile, you can prepare the rest of the ingredients.
Mix all the flours, the salt and the vital wheat gluten ( I like to add the salt now because this dough is a bit reluctant to absorb it later on. But you can perfectly add the salt later if you prefer).
Take 300 g of water and dissolve the sugar and the yeast in it. Start with just 300g you’ll add more water with the grains that are soaking and your flour might not have as much protein as mine, so start with 300 and add more gradually if needed.
Once the temperature of the soaking grains is okay, use a colander and get rid of as much water as you can. It should be viscous and the grains should be swollen
To the yeast mixture add the soaked grains and mix well.

Then add the sesame and flax seeds.

Add the wet ingredients to the flour mixture and mix until you don’t see wet particles. If the dough doesn’t come together add more water, 1 tbsp at a time. I used 350 g of water.

Let the dough rest for 25mins to make sure the water can be absorbed by the flour particles.
After the autolysis period, start kneading the dough and when it starts getting a bit of consistency, add the oil little by little and knead until the dough is no longer sticky and has a good elasticity.

You can replace the oil with whatever other fat of your choice. I like to use olive oil because it’s a good source of omega 3 and I love the taste . Plus, I wanted to make this bread vegan because I am doing veganuary! 😊
I love this dough! The extra gluten works wonders. You’ll see how great it is to knead!
When the dough is ready, place it in a lightly oiled container and let it ferment until it doubles in size. This recipe yields 2 loaves.

Deflate the dough and separate it into two equal balls and let them rest, covered, for 5 minutes

Shape the dough and use either a metallic mold or a banneton. I used bannetons because I wanted a “rustic” loaf.

Let the dough rise until is puffy. Follow the “poke” test to know how your dough is.
Turn on your oven at 450F. If you’re using a pizza stone or a dutch oven let them heat up inside of the oven.
Before placing the dough in the oven score it (Make a deep cut), you can even practice a bit your scoring skills, this is a very nice dough to do so because it’s easy to cut through.

Put the bread in the oven and let the magic happen!
If you’re using a pizza stone, make sure you generate enough steam inside to allow a proper oven rise. If you use a dutch oven, you can spray a bit of water on the dough or even put a little piece of ice inside.
If you’re using a dutch oven, take the lid off after 25mins of baking and keep baking until it gets a nice brown color.
Take the bread out of the oven and let it cool down. Right after baking the bread might feel a bit hard, but the crust will soften. This bread is perfect for sandwiches!


Fiber packed loaf
Ingredients
- 140 g whole wheat flour
- 60 g whole rye flour
- 360 g bread flour
- 17 g vital wheat gluten
- 20 g extra virgin olive oil
- 14 g brown sugar
- 10 g salt
- 1/2 cup mixed grains (millet, oats, wheat, chia seeds)
- 2 tbsp white sesame seeds
- 2 tbsp black sesame seeds
- 2 tbsp flax seeds
- 7 g active dry yeast
- 300-350 g water
Instructions
-
Soak the grains with boiling water and let them rest until they cool down to room temperature.
-
Mix the whole wheat flour, bread flour, rye flour, vital wheat gluten, and salt.
-
Dissolve the yeast and the sugar in 300 g of water and let it rest for 5 minutes to activate the yeast.
-
When the soaking grains are at room temperature use a strainer or colander to drain the water and add them to the yeast mixture.
-
Add the seeds to the yeast and grains mixture and mix thoroughly.
-
Add the wet ingredients to the dry ingredients and mix with your hand until you don’t see dry flour particles. Adjust water if needed 1 tbsp at a time.
-
Cover the dough and let it rest for 25 minutes.
-
Start kneading the dough and when it starts to be elastic add the oil little by little.
-
Keep kneading until the dough is no longer sticky and it’s very elastic.
-
Place the dough in a lightly oiled container and let it ferment, covered, until it doubles in size (about 2h in a cold kitchen – approx time).
-
Deflate the dough and separate it into 2 equal parts.
-
Roll each part into a ball, cover them and let them rest for 5 minutes.
-
Shape each loaf and place it in a floured banneton or a couche or a lightly oiled Pullman pan.
-
Let the loaves ferment until they’re puffy (about 1h in my kitchen). They don’t have to necessarily double in size.
-
Preheat your oven at 450 F with the pizza stone or dutch oven inside if you’re using any of those.
-
When the loaves are ready, take them out of the bannetons, score them (avoid scoring if you’re using a Pullman pan), and put them inside of the dutch oven or on top of the pizza stone.
-
Bake for 25 minutes and remove the lid of the dutch oven if using it. If no, bake for 45 minutes or until the loaves have a nice brown color.
Enjoy!