
One of the most typical summer lazy dinners I used to grow with was “Pa amb tomàquet” (or commonly referred to as “pan tumaca”). It translates to “bread and tomato”. It is basically a toast with rubbed tomato and olive oil, I wanted to introduce my husband to this dish and that’s when I had an idea… What if… What if I add the tomato to the dough? And what if I add some other herbs? So I did… And that’s how this tomato and rosemary sourdough bread was born!
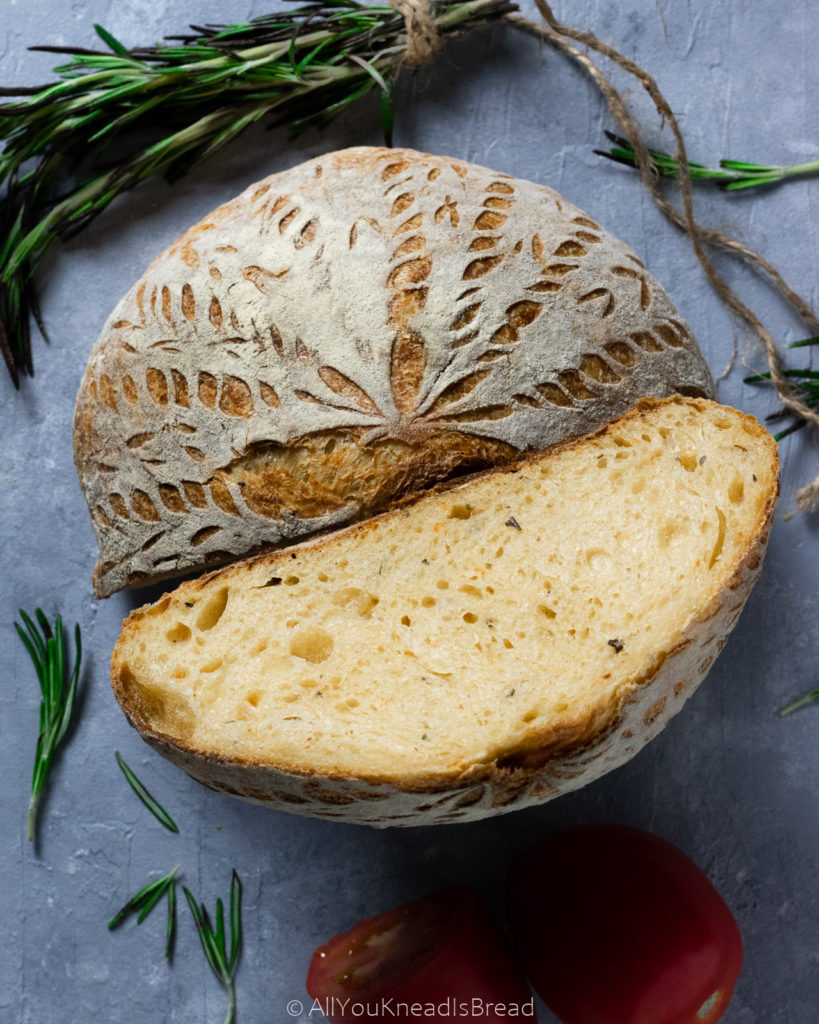
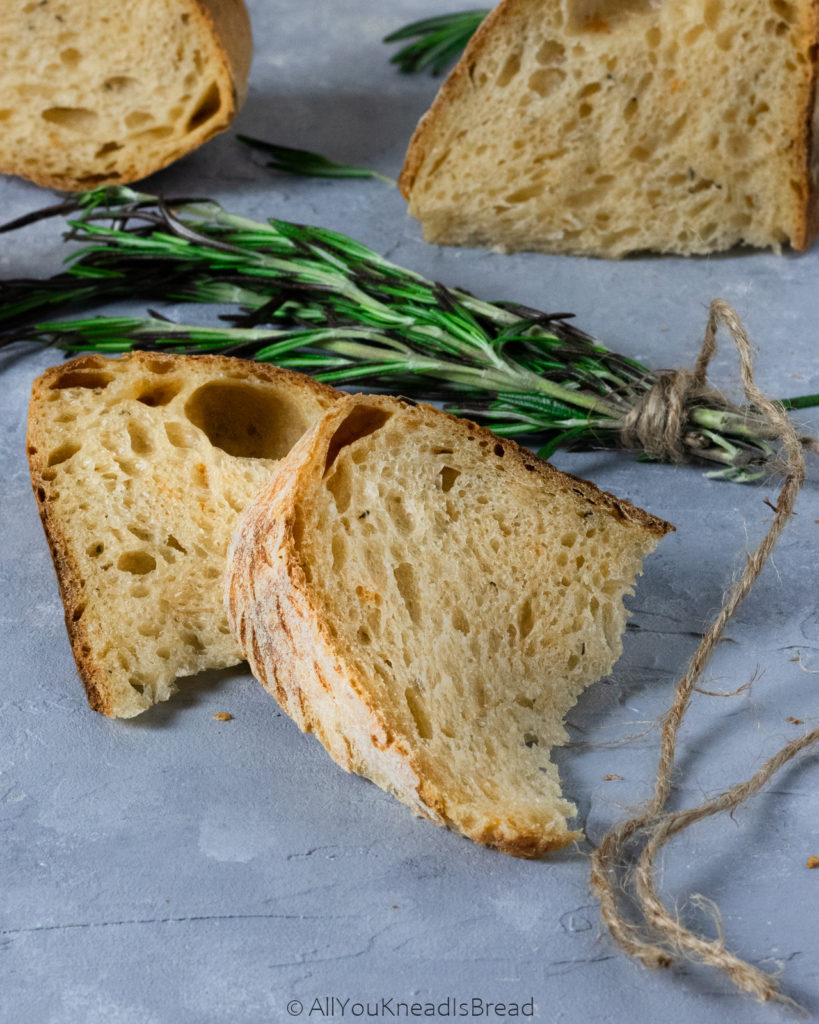
The result was amazing! This tomato and rosemary sourdough bread was so flavorful! The ingredients balanced each other perfectly and the loaf turned out super soft. The crumb was very soft and delicate.
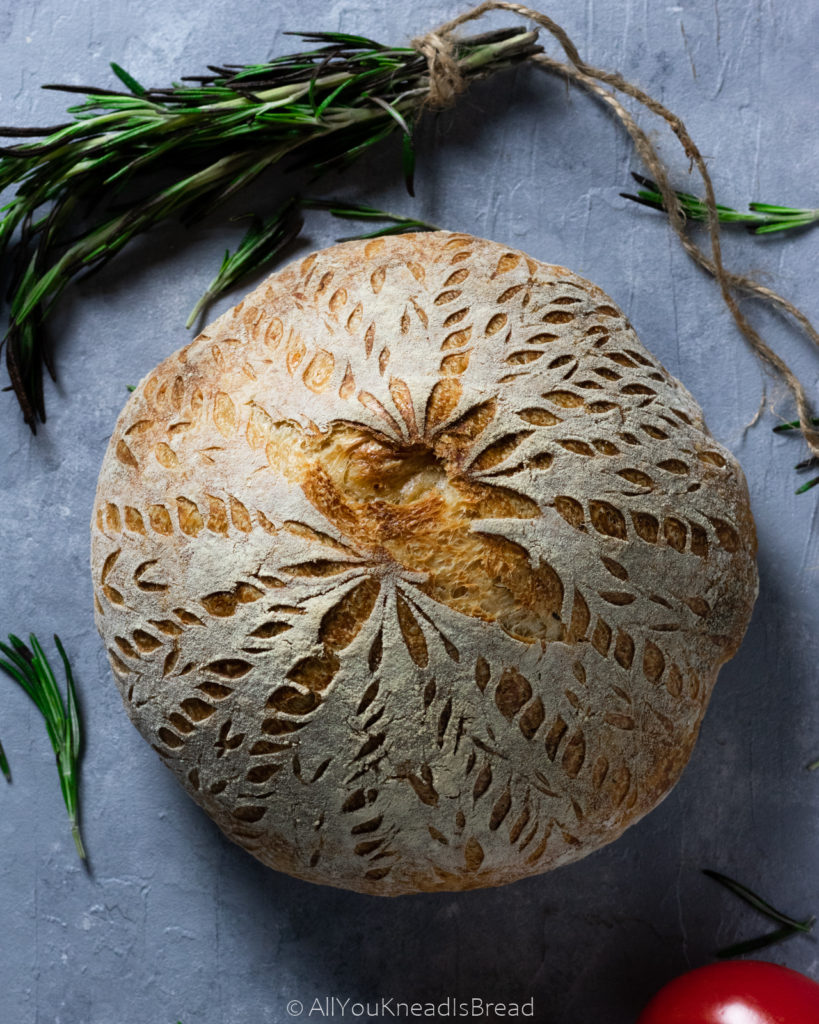
Since the hydration is not too high, the dough is lovely to work with. If you’re feeling adventurous, it can be a great bread to practice your scoring!
Here’s the video of how I scored this loaf:

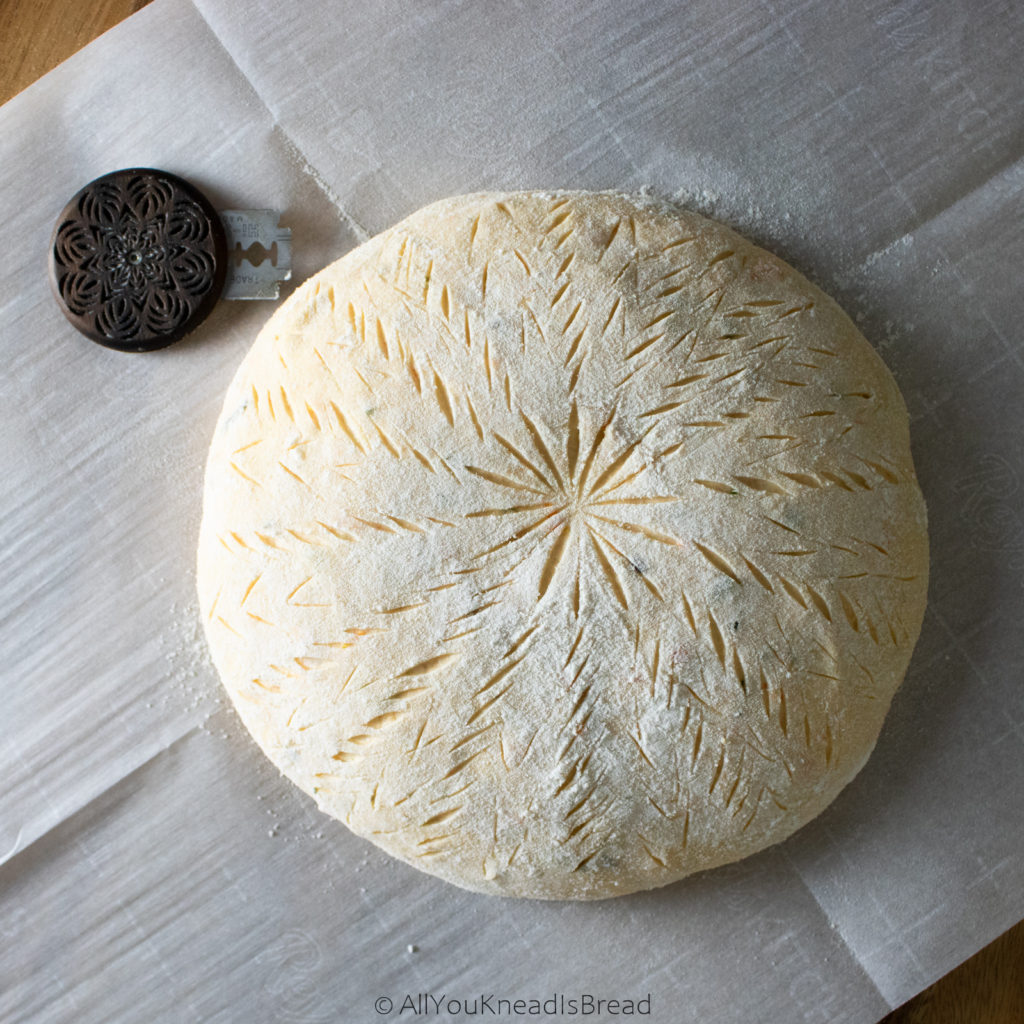
I used my wiremonkey bread lame that you can purchase here.
I love this lame, it’s ergonomic, efficient, easy to work with and allows you a range of movement that you don’t have with other lames. And best of all? It’s a family business that throughout the pandemic has been helping bakers in need. Not to mention that Tyler is also environmentally conscious and doesn’t use plastic on his lames.
If you’re into bread art or are looking for a nice bread lame, consider buying a wiremonkey ufo lame. They’re simply amazing!
The ingredients
For this recipe, I used Roma tomatoes because they are less watery, so if you’re using other types of tomatoes, I’d suggest you either reduce the amount of water on the recipe or drain the tomatoes a little.
I decided to make a paste first with all the ingredients so I blended the tomatoes, olive oil, salt, and rosemary leaves together. But if you prefer, you can leave the leaves out and add them whole.
Tomatoes and health
Did you know tomatoes are rich in lycopene? A red carotenoid that it’s known for its anti-cancer properties and powerful antioxidants. Tomatoes are also rich in potassium and magnesium. In other words, tomatoes rock!
Not only they’re healthy, but some studies have found that adding tomatoes to bread increased dough elasticity. That, along with the olive oil makes the dough LOVELY to work with, and it’s one of the reasons the crumb is so nice and velvety. Ahh Science! 🙂
How to make this tomato and rosemary sourdough bread
If you follow me on Instagram you might know by now that I’m leaning towards kneading my loaves rather than doing just stretch and folds. I don’t laminate my dough unless I’m going to add things to it (olives, nuts, cheese…). I don’t do long autolysis either, especially during summer because the higher temperatures really have an impact on dough strength.
What I do is mixing all the ingredients, I give them a 20-60 minutes rest (it depends on how busy I am or what I’m doing at the moment) and then I knead using the slap and fold method. I knead the dough for a few minutes and then let it rest for a little while. Resting periods are very important as you allow the gluten strands to realign and the dough gets stronger; you can read more about it here.
Kneading is just a way to 1) strengthen the gluten and 2) incorporate air in the dough. So, you can use whatever method you’re comfortable with. Manually or using a stand mixer, as long as you develop the gluten well.
Bulk fermentation
Once you’re sure the gluten is well developed, you can add a coil fold if you want. Then let the dough ferment for a few hours. The temperature in my kitchen ranges from 74-77F these days, so usually I don’t leave any dough out for longer than 6h (start to shaping). That’s why I also prefer kneading vs. not kneading. It allows me to develop the gluten faster and have a nice bulk fermentation in just a few hours.
I don’t wait until the dough doubles in size, I tend to cut the bulk fermentation short. With summer temperature and humidity under fermenting the dough a little helps maintain the gluten structure strong throughout the entire process.
The length of the bulk fermentation depends on how much starter you used, the temperature of your kitchen, the condition of your starter etc. If you want to know more about sourdough growth and sourdough starters click here. You can learn the science of sourdough and how that applies to your sourdough bread.
If you’re a bit new to sourdough and are not sure about what to do, you can check other things to make sure the fermentation is going well. For example, after a few hours of bulk fermenting: does the dough feel puffier? Can you see small bubbles forming in the bottom? Did the dough grow a little or can you even see some larger air pockets on the surface? Does it smell just like flour or can you identify some slightly alcoholic/vinegary smell (similar to the smell of your starter)?

Shaping and cold proofing
Alright, so once you consider that the bulk fermentation is done, you just need to shape the bread and put it in a banneton (proofing basket). If you don’t have one, you can use a bowl and a cotton cloth.
I shaped this loaf into a bule, but you can use whichever shaping method you’re comfortable with. Be gentle, don’t push to much or you could tear the outer layer and the loaf will lose structure. If that happens, you might end up with a pancake after baking!
I have this round banneton, and I really like it. 9 in is enough for a medium-size loaf. I also have this oval banneton, I am very happy with both of them.
The overnight cold-proof was a total of 12h. A cold-proof is not mandatory, but it does come handy when it’s time to score the loaf. Colder loaves are firmer, and the blades cut through the dough much better.
Baking
Ideally, the first 15-20 minutes of baking should be with steam. In a house oven, keeping the steam inside is almost impossible, so I prefer to use a dutch oven that I preheat along with the oven at 450F.
I actually have a double dutch oven, I find that it’s much easier to load the dough without burning yourself if you can set the dutch oven upside down 😉
When I put the loaf in the dutch oven I also add the rosemary stalks. I’m telling you… the stalks end up roasted but the loaf is baked in those aromas and the crust ends up with a nice rosemary kick!.
After baking, try to wait for the bread to cool down to room temperature. It helps to set the crumb and all the aromas. Thanks to the tomato and the oil, the bread will be very soft, and it’ll keep fresh at least a couple of days.
Let me know if you make this loaf! I love to see what you bake and what you experiment with. You can use #allyoukneadisbread on Instagram.
You can find me on Instagram, Facebook, and Pinterest, and you can also subscribe to my Youtube channel.
Happy baking!!
This post contains affiliate links and any sales made through such links will reward me a small commission – at no extra cost for you – that allows me to keep running this blog.

Tomato and rosemary sourdough bread
An amazing bread, full of flavor and ideal for summer dinners!
Ingredients
- 300 g bread flour
- 150 g water
- 45 g sourdough starter at its peak of activity
- 75 g roma tomatoes
- 20 g extra virgin olive oil
- 6 g salt
- 2 stalks rosemary
Instructions
-
Blend the tomatoes, olive oil, salt, and the rosemary leaves together until you have a paste (you don't have to blend the rosemary leaves, you can add them whole or chopped to the dough)
-
In a bowl add the flour, make a well in the middle and add the water, the starter, and the tomato paste and combine until there aren't dry flour particles. Let the dough rest 20 minutes (covered)
-
Knead the dough until it's elastic and smooth. You can do it manually or with a stand mixer. I'd recommend you let the dough rest 10-20 mins every 5-10 minutes of kneading
-
When the dough feels smooth and elastic, lightly oil a bowl and place the dough inside to ferment. You can add a coil fold after 30-45mins if you want. At 74-77F (23-25C), my dough was ready after 5h.
-
Turn the dough onto a floured surface and carefully bring the edges toward the center to shape the dough into a ball, flip it upside down cleaning the flour underneath and with your hands, bring the dough ball toward you to create some tension on the outer layer
-
Flour a cotton cloth, place it in a proofing basket and put the dough inside. Cover it with the cloth and put the basket in the fridge overnight.
-
The next day, preheat your oven at 450F (230C) with a pizza stone or a dutch oven if you have , for at least 30-40 minutes
-
When the oven is ready, take your dough out of the fridge, flip it onto a parchment paper, put it in the dutch oven or the pizza stone and score the loaf (make some cuts on the surface). *SEE NOTES
-
Put the loaf in the oven and turn the temperature down to 425F / 220 C. Bake the loaf with a lid on (if you're using a dutch oven) or with steam (if you're using a pizza stone or just a baking tray) for 15-20 minutes. Remove the lid and bake the loaf for another 20-30 minutes or until it's golden brown
-
Take the dough out of the oven and let it cool down in a rack for at least 1h
Recipe Notes
* I like to put the dough on a thin metallic tray lined with parchment paper and then just slip it into the lid of my double dutch oven.
Can you substitute tomato powder for the tomato paste/puree? How would that impact the amount of water needed? (I blended and dehydrated tomatoes into a tomato powder to store it but take up less shelf space.)
I haven’t tried but I don’t see why it wouldn’t work. I would start with the powder and adding about half the weight of tomato in water. If the dough still feels too dry you can add more little by little.
Hi! I’m about to try your recipe, but with dried basil per a friend’s request. Did you seed the tomatoes before creating the paste? Thanks!
Hi Jacquie! I usually don’t seed the tomatoes, I’m too lazy for that haha. I blend them until I have a smooth paste, but you can seed them if you prefer! It won’t change the flavor 🙂