
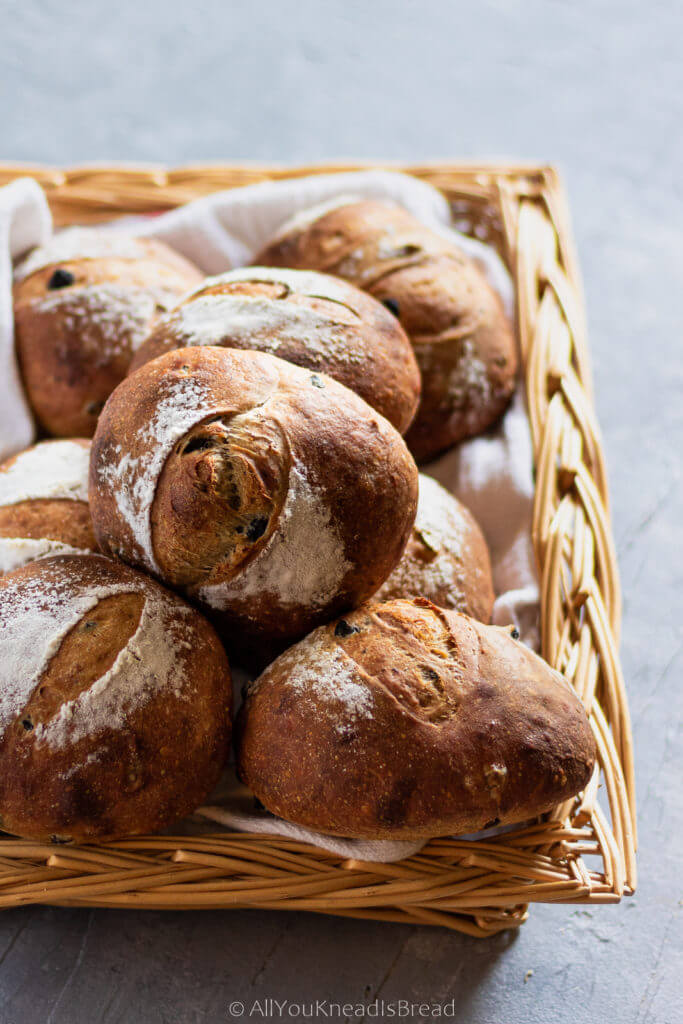
Black sesame bread is one of my favorite bread recipes. I’m talking top 3 favorites! And it’s simply because black sesame is incredibly aromatic and the taste combines spectacularly with bread, especially if you are using sourdough. But don’t worry, this recipe is for both yeast and sourdough bakers. Black sesame bread is so good, that I want everybody to enjoy it!
I started making this bread using black sesame powder. I learned about it when my husband bought it many years ago at our Chinese store. He likes to make a hot soup for dessert, especially on the days he feels more homesick. The smell of that soup was so delicious! That toasty and nutty aroma of sesame but deeper and with some sweetness to it. So, of course, my baker’s mind thought… “black sesame bread!”.

Are black sesame seeds good for you?
In Traditional Chinese Medicine, black sesame can help you with your liver and kidney health, and grey hair, among other things. Given the amount of good compounds found in sesame seeds and the results of some studies, it’s safe to say that yes, sesame, and in this case black sesame, is good for us. Of course, as a part of a balanced diet and healthy lifestyle.
What are sesame seeds rich in?
Black sesame seeds are rich in omega-3 fatty acids and lignans, a type of polyphenol typically found in seeds. They are also rich in vitamins, minerals, and antioxidants. Some studies have even suggested that black sesame can have a positive impact in cardiovascular health and others have seen improvements in fasting blood sugar. Overall, sesame, and in particular, black sesame seeds, are an excellent addition to our diet!
How to make black sesame powder at home
After making black sesame bread several times, I realized that making the powder myself was not only super easy but also more flavorful because I was using freshly ground seeds. These steps are optional, but I highly recommend them to make the most out of your seeds.
Toasting the seeds
Black sesame seeds are very flavorful, but I prefer toasting them to deepen the aromas even more. To toast the seeds put them in a saucepan and heat them at medium-high temperature, stirring often. Because of their rich oil content, they can burn easily, so keep stirring until you start seeing seeds popping and a bit of smoke. Then transfer the seeds to a plate to cool.
Grinding the seeds
In the industry, companies have equipment to grind sesame seeds without releasing all the oil and turning it into a paste. When you buy black sesame powder, it’s less oily and a tad drier than the powder you make at home. At home, we need to be cautious when grinding sesame seeds (all sesame seeds, and even chia, or flax seeds) because they’re rich in oils and can turn into a paste quickly (like tahini but with a darker color).
You don’t need to grind all of the seeds to make black sesame bread, you can use them whole. I prefer blitzing at least 3/4 of the seeds to enhance the aroma of the bread. To avoid releasing too many oils, pulsing instead of grinding for long periods works better.
You can grind the seeds with any device of your choice, I have this coffee grinder that I only use for spices, etc. it’s inexpensive and does the job perfectly! But you can use anything you have at home. Even a mortar and pestle if you don’t have a grinder. However, if you have a very powerful grinder (something like a Vitamix), I’d recommend freezing the seeds. When the seeds are hot, they release the oils much faster, and powerful grinding can raise the temperature of the seeds, so starting with frozen seeds gives you a bit of a leeway.
Preparing the dough
Now that we have the seeds ready, let’s start with the dough! The method is similar for both sourdough and yeast versions. The yeasted version uses a poolish and has only a very small amount of yeast, so the fermentation will be as slow as sourdough. If you were to make this bread on a cold day, you can add a bit more yeast to the final dough.

Black sesame bread with poolish
The night before dissolve 1/4th of a teaspoon (a pinch) in 40ml of water, then add 40g of bread flour and mix well. Cover the container loosely and let it ferment overnight.
If your kitchen is too warm, you can prepare the poolish earlier, and keep it in the fridge overnight.
Black sesame bread with sourdough
The night before refresh your starter as you normally do. Prepare more than 80g total, 80g for the recipe plus what you need to feed it again.
Mixing the dough
Both poolish and sourdough methods are prepared the same. First, you need to dissolve the starter in the water. This step will make developing the dough easier. I like to add salt in this step as well, if I leave it for later, the chances of forgetting it increase exponentially!
When you have dissolved the salt, add the seeds and the flour and mix well until you don’t see dry flour particles. Let the dough rest for 20 minutes to allow the flour and seeds to hydrate. Depending on the strength of your flour, the seeds will absorb more or less water. Give the dough some time so you can decide if it needs more water or if it’s okay the way it is. And always add water little by little, it’s easy to go from a dry dough to a very slack one.
Kneading vs no-knead method
After a 20-minute autolyse, I like to knead the dough using the “slap and fold” technique. This technique is very efficient and you can have your dough ready in a few minutes. But if you don’t like kneading, you can try the stretch and fold + coil folds method. And always remember that when you knead and the dough doesn’t come together, rest is your best choice. Let the dough rest and the gluten proteins realign and when you go back to kneading you will see a big difference!
Fermentation & proofing of black sesame bread
Both methods (poolish and sourdough) will ferment slowly. If you start early in the morning, you will be able to shape your bread somewhere between late afternoon and early evening. Aim for 8-12h fermentation (depending on the temperature of your kitchen), or when the dough almost doubles in size.
I usually don’t give exact times in my recipes because it depends on your specific conditions. Weather, skills, type of flour, oven… everything can alter the times for each part of the process.. That’s why it’s important to get familiar with your dough.
How to tell my bread is fermented
If you struggle with fermentation times and when the dough is ready etc., there are two easy ways to keep an eye on the fermentation. One is using a clear bowl where you can see the air pockets in the bottom that develop over time. You want to see a consistent size of air pockets. Not some too large and some areas without any pocket. The dough shouldn’t leave residue in an oiled bowl. If it does, it’s probably a bit over-fermented.

Another way is to use a “spy”. This is very common in panettone making. You put some dough in a cylindric container, and make a mark where the dough is, as it grows, you can tell when it doubles, triples… For this method you don’t need to buy anything, you can use a small glass, a recycled glass jar… I use a shot glass or a little measuring cylinder I have.
Shaping and cold-proofing black sesame bread
When the bulk fermentation is over, it’s time to shape the bread! If you feel the dough is a bit slack, you can add a pre-shape to add a bit of extra tension. It’s usually a good idea when the dough has over fermented a bit, or if the gluten network wasn’t developed properly.
You can shape the bread in any shape you want using any method. I like to do it like this, a very simple way and it has yet to fail me.
After shaping and putting the dough in a banneton, it’s time for the final proof. You can do it at room temperature, but doing it in the fridge will improve the flavor profile of your bread. Either sourdough or poolish, a cold-proof is a very interesting way to develop extra aromas in your bread. Plus, a cold dough is much easier to score than a warmer one!
During the cold proof, the dough will rise while it’s at a warm temperature, but once it cools down, it will stop. That’s why bulk fermentation is so important, once it’s in the fridge, not much will happen no matter how long it stays in the fridge. You can leave the bread in the fridge for 12-24 hours to develop flavor.
PRO TIP: If your bulk fermentation isn’t long enough and the dough is a bit underfermented, shape your bread and let it ferment at room temperature in the banneton for an hour or two before putting it in the fridge.
Tips on how to bake your black sesame bread
To have a great oven spring it’s necessary to have steam during the first minutes of baking. You can achieve this by introducing steam, or by baking the loaf in a closed container like a Dutch oven. A cast iron Dutch oven is ideal because it’s less susceptible to temperature changes when you open and close the oven.
If you don’t have a Dutch oven, just know that you don’t need to spend hundreds of dollars on one. I have this one and is been working perfectly for many years! Since the lid is flat, you can put the bread there and use the larger part as the lid to avoid burning your hands when loading and unloading the bread!
I also like to add one ice cube inside the Dutch oven. It helps with oven spring and keeps the crust a bit thinner because it takes longer to dry out. But this is a matter of preference, if you like thicker crusts avoid the ice.
Many people usually preheat the oven and Dutch oven to 500F, but in my experience, that’s too hot and my loaves have suffered because they dried out too fast at such a high temperature. So I use 435F in my convection oven or 445F in a non-convection oven.
I like to bake the loaf covered for 15-20 minutes and uncovered for another 20-25 minutes or until the loaf has the color I like.
An that’s it! That’s how you make one of the most delicious breads you’ll ever eat!
If you liked this recipe…
You might enjoy these:
Brie and olives sourdough rolls
If you make any of my recipes let me know what you think! As always you can find me on Instagram, Pinterest, and Facebook. I also have a few videos up on my YouTube channel (which I hope I can resume soon!)
Starting on breadmaking but don’t know where to start? Check my Amazon store to see my favorite and affordable utensils you will need. You can make the best bread with simple and inexpensive tools!
(This post contains affiliate links, if you purchase something from this link I will make a small commission that helps me run this blog, but you will not be charged any extra money 😉 )
Happy Baking!

Black sesame bread
Super aromatic bread with either yeast or sourdough, you choose!
Ingredients
Poolish (if you're making the yeasted version)
- 40 g bread flour
- 40 g water
- ¼ tsp dry active yeast
Sourdough (if you're making the sourdough version)
- 80 g active sourdough starter at peak
Black sesame seeds powder
- 35 g black sesame seeds (plus some extra for crust decoration if you want)
- 5 g white sesame seeds optional, for some extra color
Main dough
- 80 g poolish OR sourdough choose the preferment you like the most
- 280-320 g water depends on your flour
- 8 g salt
- 400 g bread flour
Instructions
Poolish
-
In a small bowl, dissolve the yeast in water.
-
Add the flour and mix until a sticky dough forms.
-
Cover the container and allow the poolish to ferment overnight at room temperature.
Sourdough
-
Refresh your sourdough starter to ensure you have at least 70g.
Black sesame seed powder
-
Toast the sesame seeds in a saucepan until they consistently pop and emit a slight smoke.
-
Allow the seeds to cool, then grind them in a spice grinder until coarse powder forms. Some whole seeds may remain.
Main dough
-
In a large bowl, combine water and the chosen preferment (poolish or sourdough), dissolving the preferment.
-
Add salt and sesame seeds, mixing thoroughly.
-
Gradually incorporate the flour until no dry particles remain, adjusting the water if necessary. Cover and allow the dough to hydrate for 20 minutes.
-
After the autolyse, knead the dough using the slap and fold method until smooth, allowing the dough to rest for 10 minutes if it starts resisting.
-
Let the dough rest for 30 minutes, then perform 2-3 sets of coil folds every 30-60 minutes until the dough nearly doubles in size (adjust this step to your own schedule)
-
Turn the dough onto a floured surface and shape it into a boule or batard, placing it in a banneton.
-
Refrigerate the banneton for up to 24 hours.
Baking
-
Preheat the oven to 440°F (225°C) with a Dutch oven inside for 20 additional minutes.
-
Remove the banneton from the fridge and transfer the dough onto a baking paper. Score the dough's surface.
-
Place the dough in the hot Dutch oven with an ice cube and cover quickly to trap the steam.
-
Bake with the lid on for 10-20 minutes (the longer it bakes without a lid the thicker the crust will be)
-
Remove the lid and continue baking for 35-25 minutes or until it's golden brown and the inner temperature reaches 96°C (204°F).
-
Take the loaf out of the oven and allow it to cool for at least one hour before slicing
Easy brie and olive sourdough rolls
Hello friends! Today I bring my new favorite recipe: brie and olive sourdough rolls! Brie cheese and black olives balance each other perfectly and combine great with the aromas of sourdough. These rolls are pillowy and delicate and can keep fresh for several days.
Brie, olives, and buckwheat flour
Let’s talk a little about brie. It is a French soft cheese made of cow milk. It has a considerable amount of fat, so it melts easily while the rolls are baking and helps soften the structure of the bread. As a result, these brie and olive sourdough rolls turn out unbelievably fluffy and full of flavor.
I like black olives because they’re not as tangy as green or kalamata, and I think the flavor goes great with cheese in general, but brie in particular; however, you can experiment with other types of olives and try other types of cheese if you don’t like or don’t have access to brie. Cheese with at least 25% fat content will work better because the key of these rolls is in the fat melting.

The trick is using a strong enough flour that will hold the dough and all fillings and slightly weaken the gluten with flour that doesn’t have gluten. In this case, I used King Arthur AP flour (it is strong for an all-purpose flour, it has 11.7% of protein), and buckwheat flour. This combination not only gets the gluten where I want it to be, but it also enhances the flavor of the bread so it doesn’t get lost in the cheese and olive aromas. I used this buckwheat flour but I have also tried this one and I liked the results as well.
If you don’t have buckwheat, you can use other flours that have less or none gluten (whole wheat, teff…). Just keep in mind that you might need to change the amount of water on the recipe and the result could be a bit different.
About the dough
This dough isn’t very hydrated, so when it comes to incorporate the olives and the brie you will need to let it rest and stretch it little by little. Make sure you pierce large air pockets that you might catch while stretching the dough. These sourdough rolls shouldn’t have a dramatic open crumb, you should aim for smaller air pockets and pillowy structure.
How to incorporate the brie and olives
An easy way to add the brie and olives is to stretch the dough, add the chunks of cheese and olives and then fold the dough and shape it into a ball. However, when we fold the dough we also trap a lot of air that will affect the structure of our crumb, and thus, the dough doesn’t feel like it has naturally incorporated the fillings. It’d feel like it has layers and the chunks of cheese or olives will come out of the dough easily.
To avoid this you just need to 1) Pierce large air pockets, 2) Knead the dough a little after adding the chunks and let it rest for 10-20 minutes, and 3) Knead again for a couple of minutes. Doing this will help you distribute the filling better and have an elastic dough.
This kneading is not meant to strengthen the gluten, but to help incorporate the ingredients. The gluten should be well developed before we add the fillings.

The fermentation
Sourdough always takes more time to ferment, but if you live in a pretty warm and humid place, pay attention to the dough. Let it ferment until you start seeing signs of fermentation (small bubbles in the bottom, feels puffy, has grown a little…), but don’t wait until it doubles or the gluten can be compromised and you’ll end up with a super sticky dough and flat rolls.
Once it’s clear that there’s activity, deflate the dough a little and put it in the fridge. It can stay there overnight.
Since you’re not going to proof the dough in a banneton, you can keep the dough in the fridge before shaping. Then, once shaped, you won’t need too much time before the rolls go into the oven!
Get your sourdough starter ready
Sourdough can be a bit tricky, but it all boils down to science! If you want to know more about the science of your sourdough starter, check this post where I explain all the phases your starter goes through and how you can apply that knowledge into your baking.
Knowing the science of your starter will help you adapt your baking schedule depending on the weather conditions. This summer is especially challenging here in North Carolina, but understanding the bacterial behavior helped a lot!
Final proof
The final proof is easy and somewhat fast. Take the dough out of the fridge, divide it into 8 equal pieces and shape them into small dough balls.
Let them proof in the tray you’ll use to bake them while you preheat the oven at 400F. No more than 1h should be fine if your starter is healthy and strong.
Before putting them int he oven score the surface of the rolls and off they go! In 20 minutes approx (depends on your oven), you’ll have these delicious brie and olive sourdough rolls!

How to create steam in the oven
Steam is very important when you bake bread, specially rustic style. When I bake loaves, I use my dutch oven and it usually is enough to allow the bread to open up. In this case, I use an old baking tray that I keep in the oven as it preheats, and when I load the rolls I add 1 cup of boiling water into that tray and immediately close the oven door.
Don’t open the door for the first 10 minutes of baking, some of the steam inevitably will scape but it’s better to minimize it.
Guaranteed deliciousness!
Since these sourdough rolls turn out so soft and airy you can use them to make sandwiches, sliders… And worry not! Because they won’t fall apart or crumble when you’re trying to take a bite or spreading butter on it😊
The rolls last fresh several days, but you can put them in a ziplock bag and freeze them once they’ve cooled down. You can keep them frozen for a few weeks.
If you decide to freeze de rolls, take them out of the freezer and let them chill for an hour or so, then bake them at 300F until they’re nice and hot inside. However, if you only need one or two rolls, why would turn the oven on? What I like to do in this case is slice the rolls before freezing them and when I want to make a sandwich, I just pop them in the toaster! It’s faster and your power bill will thank you 😉
Let me know if you make these rolls or any other recipe! I love to see what you bake and what you experiment with. You can use #allyoukneadisbread on Instagram.
You can find me on Instagram, Facebook, and Pinterest, and you can also subscribe to my Youtube channel.
Other sourdough recipes
If you’re looking for some sourdough inspiration check these other recipes:
Tomato and rosemary sourdough bread
Gorgonzola and apple sourdough bread (video included!)
Sourdough donuts with rose cream filling
Sourdough chocolate banana bread
Happy baking!
This post contains affiliate links and any sales made through such links will reward me a small commission – at no extra cost for you – that allows me to keep running this blog.

Easy brie and olive sourdough rolls
Fantastic sourdough rolls with a twist. Your new favorite!
Ingredients
- 385 g strong all purpose flour (11.7% protein)
- 65 g buckwheat flour (or similar)
- 70 g active sourdough starter
- 7 g salt
- 80 g black olives (sliced)
- 100 g brie cheese (with or without the rind and cut into 0.5 in/ 1 cm pieces)
- 270 g water (room temperature)
Instructions
-
Dissolve the starter in the water and add the flours and salt. Let it rest, covered, 20 minutes
-
Add the salt and start kneading. Knead until the dough feels elastic, it's smooth and doesn't stick to your fingers. If you need to let it rest a few minutes, do so.
-
After kneading, and once the dough is well developed, let it rest 30-60 minutes in a lightly oiled bowl
-
Oil you rcounter lightly, just enough so the dough doesn't stick and carefully try to stretch the dough on the counter into a 18×18 in / 45×45 cm square. It doesn't have to be exact.
-
Distribute the olives and cheese evenly and carefully fold the dough and shape it into a ball. Pierce large air pockets that might've been trapped during the process. Let the dough rest 20 minutes.
-
Knead the dough a little to make sure the filling is well distributed and has been incorporated into the dough (so they won't come out). If you find it easier do some stretch and folds do so. Just make sure the add-ons don't come out easily.
-
Let the dough ferment until it feels puffy, it has grown a little and you see obvious signs of fermentation. Mine, at 74F took about 4 hours. Then carefully deflate the dough and plut it in the fridge over night.
-
The next morning turn the oven on at 400F with an empty pan in the bottom rack. If you have a pizza stone, place it in the middle rack and preheat the oven for 30-60 minutes (depends on your oven, if you have a stone etc.)
-
While the oven preheats, divide the dough into 8 equal pieces and shape them into balls. You can do a pre-shape and final shape, but since they're not going to proof for long, you might not need to preshape them.
-
Place the rolls in the baking tray and once the oven is hot score them with a blade or sharp knife and put the baking tray in the middle rack (or on top of the hot stone if you have one). Add 1 cup of boiling water to the empty tray in the bottom rack and close the oven door immediately.
-
Bake the rolls with steam, for at least 10 minutes and another 10 minutes without steam or a few more minutes if they're not golden brown yet.
-
Let the rolls cool down for at least 30 minutes to allow the crumb to set, and dig in!
Tomato and rosemary sourdough bread
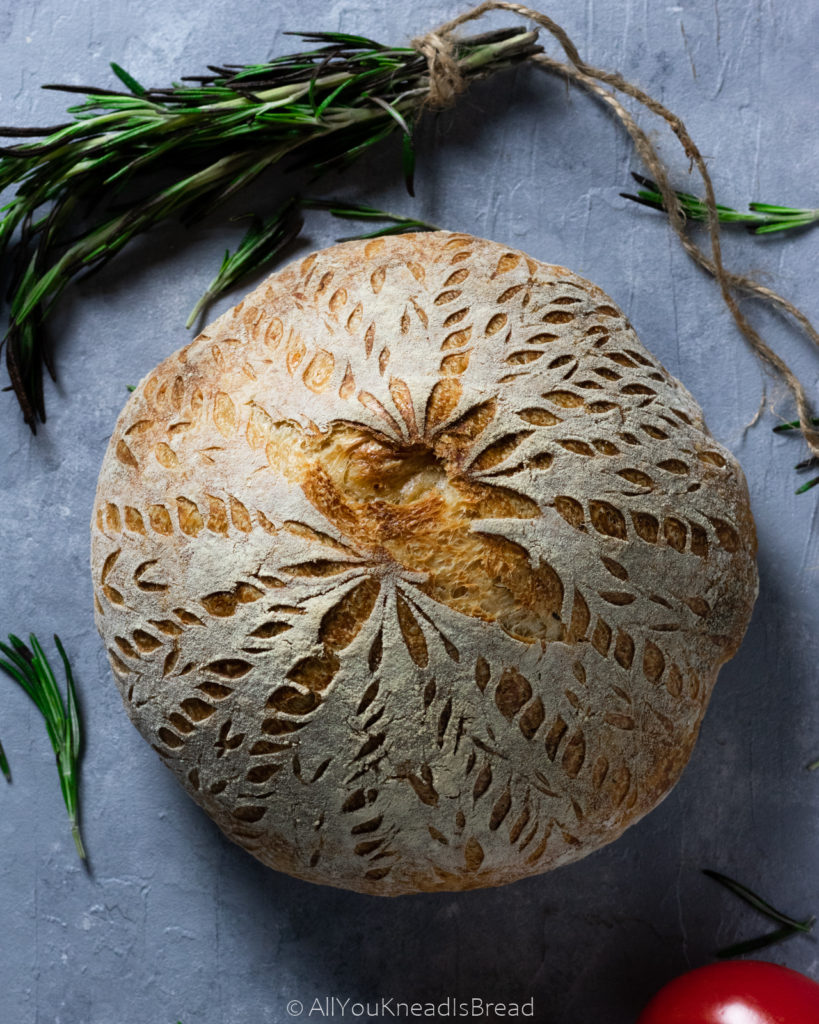
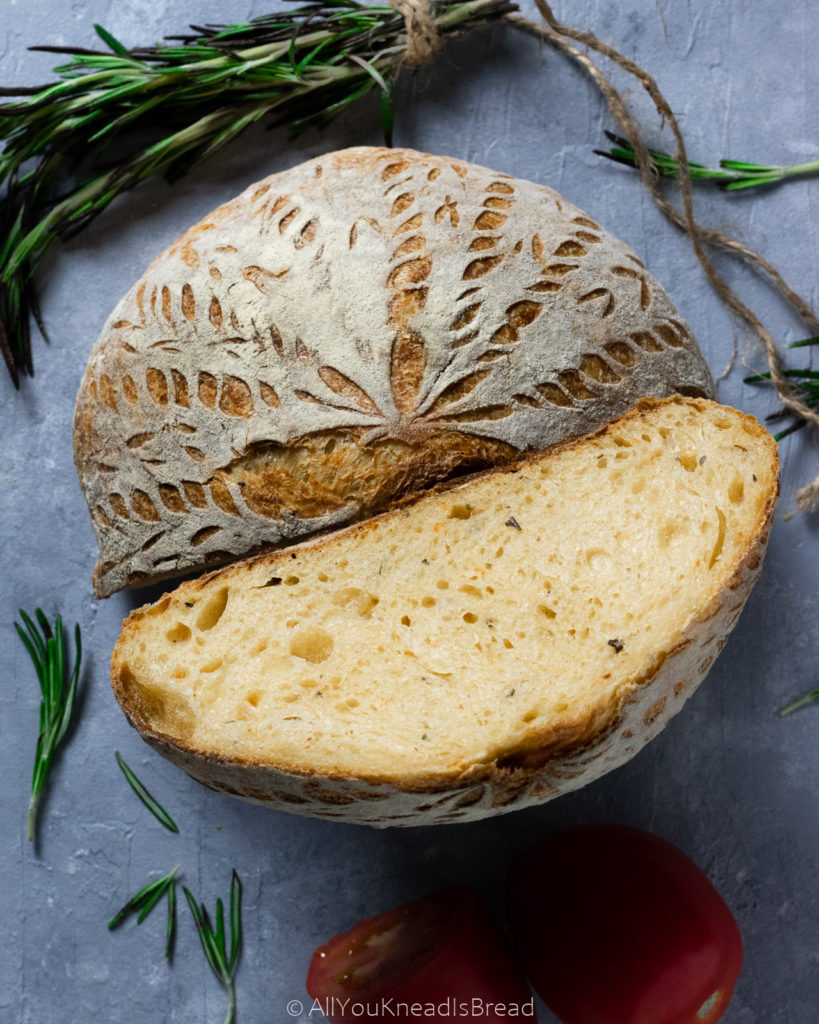
One of the most typical summer lazy dinners I used to grow with was “Pa amb tomàquet” (or commonly referred to as “pan tumaca”). It translates to “bread and tomato”. It is basically a toast with rubbed tomato and olive oil, I wanted to introduce my husband to this dish and that’s when I had an idea… What if… What if I add the tomato to the dough? And what if I add some other herbs? So I did… And that’s how this tomato and rosemary sourdough bread was born!
The result was amazing! This tomato and rosemary sourdough bread was so flavorful! The ingredients balanced each other perfectly and the loaf turned out super soft. The crumb was very soft and delicate.
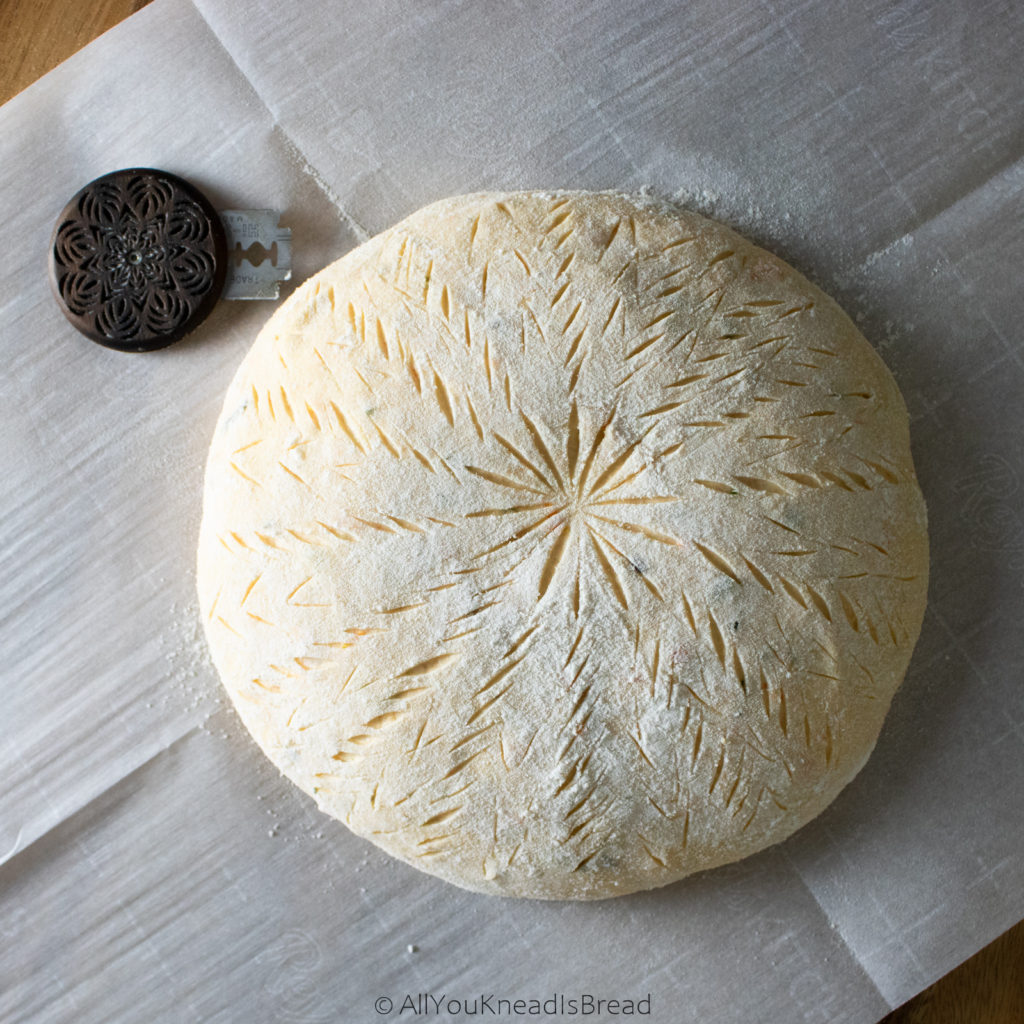
Since the hydration is not too high, the dough is lovely to work with. If you’re feeling adventurous, it can be a great bread to practice your scoring!
Here’s the video of how I scored this loaf:

I used my wiremonkey bread lame that you can purchase here.
I love this lame, it’s ergonomic, efficient, easy to work with and allows you a range of movement that you don’t have with other lames. And best of all? It’s a family business that throughout the pandemic has been helping bakers in need. Not to mention that Tyler is also environmentally conscious and doesn’t use plastic on his lames.
If you’re into bread art or are looking for a nice bread lame, consider buying a wiremonkey ufo lame. They’re simply amazing!
The ingredients
For this recipe, I used Roma tomatoes because they are less watery, so if you’re using other types of tomatoes, I’d suggest you either reduce the amount of water on the recipe or drain the tomatoes a little.
I decided to make a paste first with all the ingredients so I blended the tomatoes, olive oil, salt, and rosemary leaves together. But if you prefer, you can leave the leaves out and add them whole.
Tomatoes and health
Did you know tomatoes are rich in lycopene? A red carotenoid that it’s known for its anti-cancer properties and powerful antioxidants. Tomatoes are also rich in potassium and magnesium. In other words, tomatoes rock!
Not only they’re healthy, but some studies have found that adding tomatoes to bread increased dough elasticity. That, along with the olive oil makes the dough LOVELY to work with, and it’s one of the reasons the crumb is so nice and velvety. Ahh Science! 🙂
How to make this tomato and rosemary sourdough bread
If you follow me on Instagram you might know by now that I’m leaning towards kneading my loaves rather than doing just stretch and folds. I don’t laminate my dough unless I’m going to add things to it (olives, nuts, cheese…). I don’t do long autolysis either, especially during summer because the higher temperatures really have an impact on dough strength.
What I do is mixing all the ingredients, I give them a 20-60 minutes rest (it depends on how busy I am or what I’m doing at the moment) and then I knead using the slap and fold method. I knead the dough for a few minutes and then let it rest for a little while. Resting periods are very important as you allow the gluten strands to realign and the dough gets stronger; you can read more about it here.
Kneading is just a way to 1) strengthen the gluten and 2) incorporate air in the dough. So, you can use whatever method you’re comfortable with. Manually or using a stand mixer, as long as you develop the gluten well.
Bulk fermentation
Once you’re sure the gluten is well developed, you can add a coil fold if you want. Then let the dough ferment for a few hours. The temperature in my kitchen ranges from 74-77F these days, so usually I don’t leave any dough out for longer than 6h (start to shaping). That’s why I also prefer kneading vs. not kneading. It allows me to develop the gluten faster and have a nice bulk fermentation in just a few hours.
I don’t wait until the dough doubles in size, I tend to cut the bulk fermentation short. With summer temperature and humidity under fermenting the dough a little helps maintain the gluten structure strong throughout the entire process.
The length of the bulk fermentation depends on how much starter you used, the temperature of your kitchen, the condition of your starter etc. If you want to know more about sourdough growth and sourdough starters click here. You can learn the science of sourdough and how that applies to your sourdough bread.
If you’re a bit new to sourdough and are not sure about what to do, you can check other things to make sure the fermentation is going well. For example, after a few hours of bulk fermenting: does the dough feel puffier? Can you see small bubbles forming in the bottom? Did the dough grow a little or can you even see some larger air pockets on the surface? Does it smell just like flour or can you identify some slightly alcoholic/vinegary smell (similar to the smell of your starter)?

Shaping and cold proofing
Alright, so once you consider that the bulk fermentation is done, you just need to shape the bread and put it in a banneton (proofing basket). If you don’t have one, you can use a bowl and a cotton cloth.
I shaped this loaf into a bule, but you can use whichever shaping method you’re comfortable with. Be gentle, don’t push to much or you could tear the outer layer and the loaf will lose structure. If that happens, you might end up with a pancake after baking!
I have this round banneton, and I really like it. 9 in is enough for a medium-size loaf. I also have this oval banneton, I am very happy with both of them.
The overnight cold-proof was a total of 12h. A cold-proof is not mandatory, but it does come handy when it’s time to score the loaf. Colder loaves are firmer, and the blades cut through the dough much better.
Baking
Ideally, the first 15-20 minutes of baking should be with steam. In a house oven, keeping the steam inside is almost impossible, so I prefer to use a dutch oven that I preheat along with the oven at 450F.
I actually have a double dutch oven, I find that it’s much easier to load the dough without burning yourself if you can set the dutch oven upside down 😉
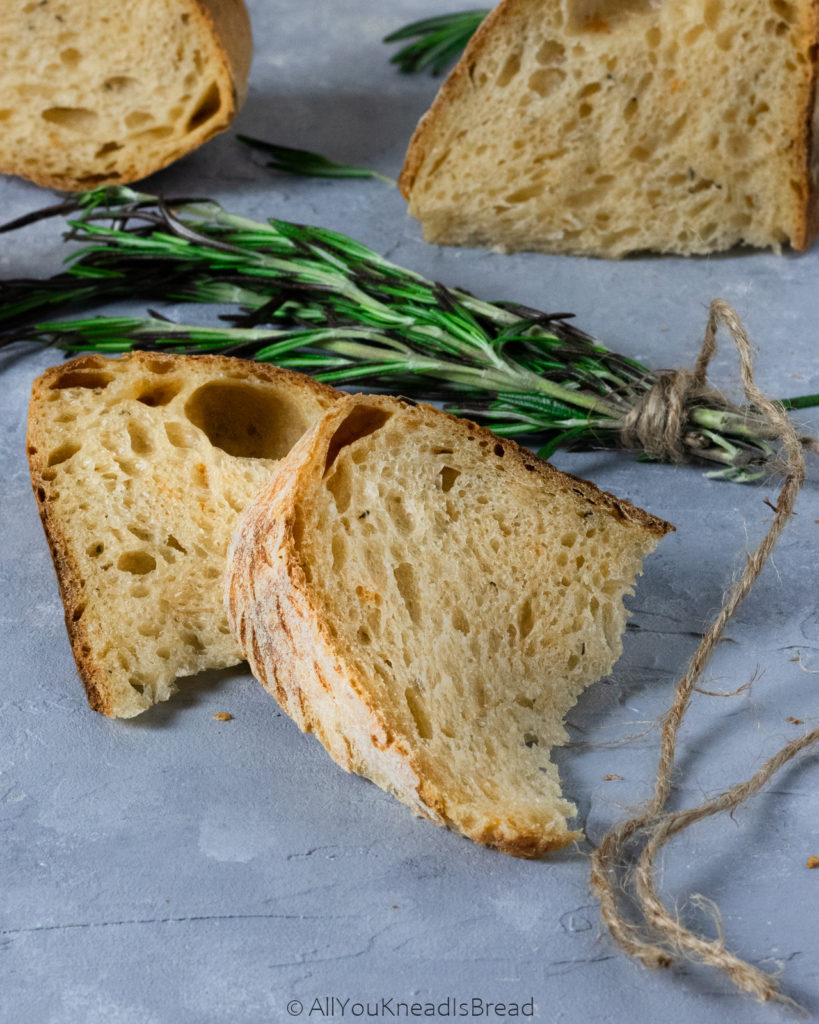
When I put the loaf in the dutch oven I also add the rosemary stalks. I’m telling you… the stalks end up roasted but the loaf is baked in those aromas and the crust ends up with a nice rosemary kick!.
After baking, try to wait for the bread to cool down to room temperature. It helps to set the crumb and all the aromas. Thanks to the tomato and the oil, the bread will be very soft, and it’ll keep fresh at least a couple of days.
Let me know if you make this loaf! I love to see what you bake and what you experiment with. You can use #allyoukneadisbread on Instagram.
You can find me on Instagram, Facebook, and Pinterest, and you can also subscribe to my Youtube channel.
Happy baking!!
This post contains affiliate links and any sales made through such links will reward me a small commission – at no extra cost for you – that allows me to keep running this blog.

Tomato and rosemary sourdough bread
An amazing bread, full of flavor and ideal for summer dinners!
Ingredients
- 300 g bread flour
- 150 g water
- 45 g sourdough starter at its peak of activity
- 75 g roma tomatoes
- 20 g extra virgin olive oil
- 6 g salt
- 2 stalks rosemary
Instructions
-
Blend the tomatoes, olive oil, salt, and the rosemary leaves together until you have a paste (you don't have to blend the rosemary leaves, you can add them whole or chopped to the dough)
-
In a bowl add the flour, make a well in the middle and add the water, the starter, and the tomato paste and combine until there aren't dry flour particles. Let the dough rest 20 minutes (covered)
-
Knead the dough until it's elastic and smooth. You can do it manually or with a stand mixer. I'd recommend you let the dough rest 10-20 mins every 5-10 minutes of kneading
-
When the dough feels smooth and elastic, lightly oil a bowl and place the dough inside to ferment. You can add a coil fold after 30-45mins if you want. At 74-77F (23-25C), my dough was ready after 5h.
-
Turn the dough onto a floured surface and carefully bring the edges toward the center to shape the dough into a ball, flip it upside down cleaning the flour underneath and with your hands, bring the dough ball toward you to create some tension on the outer layer
-
Flour a cotton cloth, place it in a proofing basket and put the dough inside. Cover it with the cloth and put the basket in the fridge overnight.
-
The next day, preheat your oven at 450F (230C) with a pizza stone or a dutch oven if you have , for at least 30-40 minutes
-
When the oven is ready, take your dough out of the fridge, flip it onto a parchment paper, put it in the dutch oven or the pizza stone and score the loaf (make some cuts on the surface). *SEE NOTES
-
Put the loaf in the oven and turn the temperature down to 425F / 220 C. Bake the loaf with a lid on (if you're using a dutch oven) or with steam (if you're using a pizza stone or just a baking tray) for 15-20 minutes. Remove the lid and bake the loaf for another 20-30 minutes or until it's golden brown
-
Take the dough out of the oven and let it cool down in a rack for at least 1h
Recipe Notes
* I like to put the dough on a thin metallic tray lined with parchment paper and then just slip it into the lid of my double dutch oven.
Easy and Delicious Sourdough Challah
Something good about this quarantine? It gave me the time I needed to create more recipes and do experiments with all my starters. I’ve had sourdough challah in my “to-bake” list for the longest time. And I finally have a recipe I’m 100% satisfied with.
I used all-purpose flour with a protein content of 11.7% for this delicious challah recipe. Don’t worry if you can’t find bread flour, I know it’s difficult to find these days.
UPDATE 10/18/2020: Based on the feedback I received, I decided to update this post to talk about the oil and how to easily incorporate it.
About the recipe
This dough is not on the sticky side, however, you need to make sure you develop the gluten very well. If you do so, you will have a delicate and cohesive sourdough challah that will stay fresh for several days. You can check this post for some guidance on how to knead enriched dough based on real bread science.
I can’t stress this enough: make sure you knead the dough well. Do it little by little. Allow the gluten enough rest if you think the dough is not really coming together after a while. If you’re using a stand mixer, the dough shouldn’t stick to the bottom. And if you’re using your hands, the dough shouldn’t stick to the heel of your hands or the counter.
Developing the gluten well takes a bit of time, but the reward will be amazing. You’ll end up with a dough that’s easier to handle (it won’t stick everywhere), a plump braid, and a bread that won’t dry out and harden right after it cools down.
The ingredients
Since this recipe doesn’t have a lot of moisture, I prefer to add all ingredients at once except the oil. I find it’s the best way to ensure salt and sugar dissolve well, and that all ingredients are properly distributed. You want to have a homogeneous dough.
Once you start kneading and the dough acquires certain consistency, add the oil and incorporate it well. This step might be easier to do by hand than with a stand mixer. You can add the oil little by little or all at once, whatever is more comfortable for you.
In the ingredient list, you’ll find a range in the amounts of oil and water. You can decide which type of dough you prefer. A slightly softer dough that leads to a slightly softer bread, or a slightly stiffer dough that’s easier to shape. The range is not large, but those extra 10 or 20g do make a difference, especially using AP flour.
My flour has 11.7% of protein, if yours has more/less, you will need to adjust the amount of water accordingly
What If I can’t eat eggs?
If you can’t eat eggs you can substitute them with pumpkin puree. It’ll give the dough an orangey color, but it’ll make the dough spongey too. Just be careful with the liquid because pumpkin puree does have some extra moisture.
How to incorporate the oil
If you have read some of my posts you know I’m very particular about developing the gluten network. Adding butter when the dough is half-developed is a bit of work but nothing impossible. However, adding oil can be a lot trickier. So here are my tips:
1) Add the oil little by little. If you add it all at once the outer layer of the dough will be covered in oil and won’t let it penetrate.
2) Squeeze the dough as you knead so you can break that outer layer and the oil can penetrate.
3) If you still have problems, cut the dough into smaller pieces to increase the surface area of dough that hasn’t been coated in oil yet (the inside part) and keep squeezing
4) If you work on your counter, squeeze the dough as if you were wringing out a cloth.
5) Be patient, it’ll take a few minutes but it’s not impossible!
The key to incorporate the oil is to make sure it can pass through that outer layer of dough that has been coated in oil and is slippery. You can cut the dough, squeeze it, wring it… Whatever works for you.
But.. Can I just add the oil with the rest of the wet ingredients?
Yes, you can AS LONG AS you make sure the gluten is developed correctly. The reason I encourage you to add it later is that we tend to stop working the dough absorbs the fats. And that leads to denser crumbs and lower quality bread.
But if you make sure you get that beautiful windowpane and a dough that is elastic and nice. Then yes, you can add the oil earlier in the process.
I’d still suggest you add it after mixing everything else, while you have that shaggy mess of dough at the beginning. The reason why is because the flour had at least some time to hydrate without oil getting in the middle. Moreover, the gluten network is still at a very early stage, so it’ll be easier to squeeze the dough and allow the oil to be absorbed.
How to ferment sourdough challah
I found that the temperature range in my house did not affect the fermentation too much. However, the amount of water did. Keep in mind that the temperature didn’t vary that much (68-74F) and wasn’t too warm.
Note: if your house is very warm, the temperature will affect the fermentation more than it affected me. Keep an eye on your dough during bulk fermentation.
While all sourdough challahs turned out great; I found that the recipe with a little more water fermented faster and the dough was a bit slacker; which made the braiding a bit more difficult as the ropes stretched very easily. The dough with slightly less water and oil ended up in very plump braids; (the very first photo), but the bread was slightly drier than I prefer.
I did all bulk fermentations overnight at room temperature (about 8h at 68-74F depending on the day). The recipe with more water over-proofed a little and developed a slightly sour taste (at both temperatures, even at 68F). However, you can fix this easily by reducing the bulk fermentation.
The recipe with less water didn’t get to rise that much but was still puffy and the taste was sweeter. After shaping, all loaves proofed for 3-4 h (until they were puffy, not until they doubled). The loaves with less water held the shape better.
You should take these experiments as a guide. But what you’re looking for is a puffy dough that still feels stiff (not sticky). If you press carefully, you should leave a mark that springs back slowly. You can adapt the fermentation to your own kitchen conditions.
What I’d suggest is to not rush the bulk fermentation. If your dough didn’t ferment enough, then it could tear open during baking.
Find the balance between temperature and fermentation
In any case, try not to over ferment the dough, or it might turn sour and slacker. It should feel puffy, it should smell like sourdough but not too acidic with slightly but pleasant acetic hints. Same for the final proof, let it get puffy but don’t wait until it doubles.
It’s very difficult to see when it doubles unless the dough is in a container. Waiting for it to double might end up in an over-fermented dough that will flatten during or after baking and won’t taste as nice.
How to braid this sourdough challah
Divide the dough into as many portions as you want strands in your braid. Let them rest 10 minutes before you make the ropes.
To make the ropes, flatten the dough balls into a 2 in/10 cm oval. Then starting on the long side roll the oval onto itself giving it some tension as you go. Once you shaped the log seal the seam.
Let the logs rest a few minutes; then starting from the middle towards the outside stretch the logs and make the ropes. If the ropes keep shrinking let them rest. The gluten it’s pulling and if you continue to stretch the dough you’ll end up breaking the gluten structure.
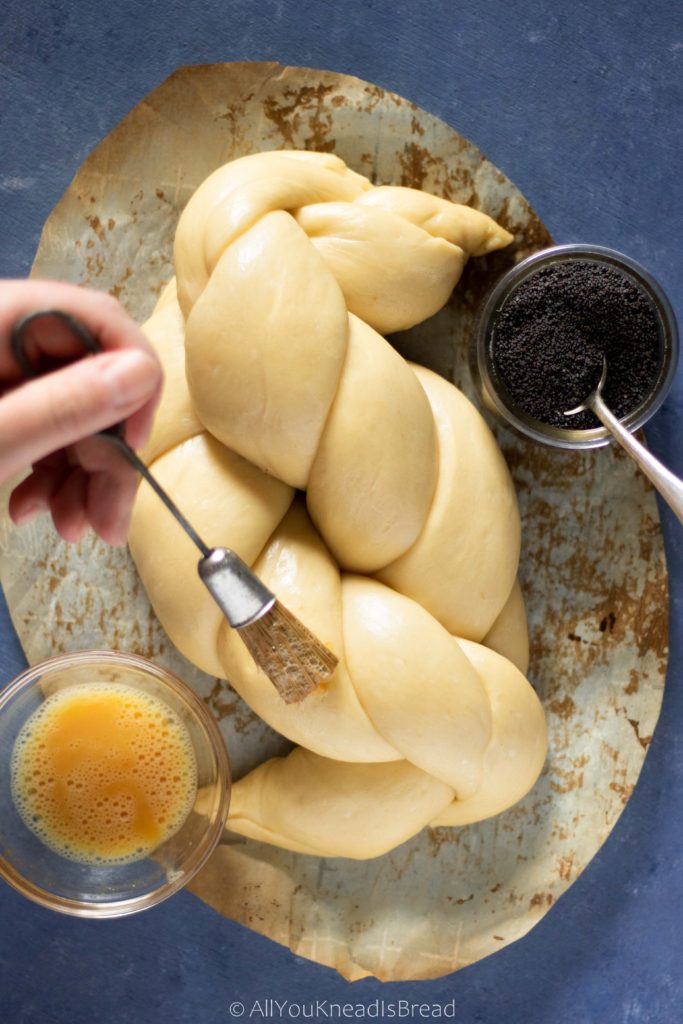
Braiding the challah a little loose will allow it to tighten as it proofs. It will puff up during baking and be very plump. If the braid is too tight from the beginning, it could tear during baking
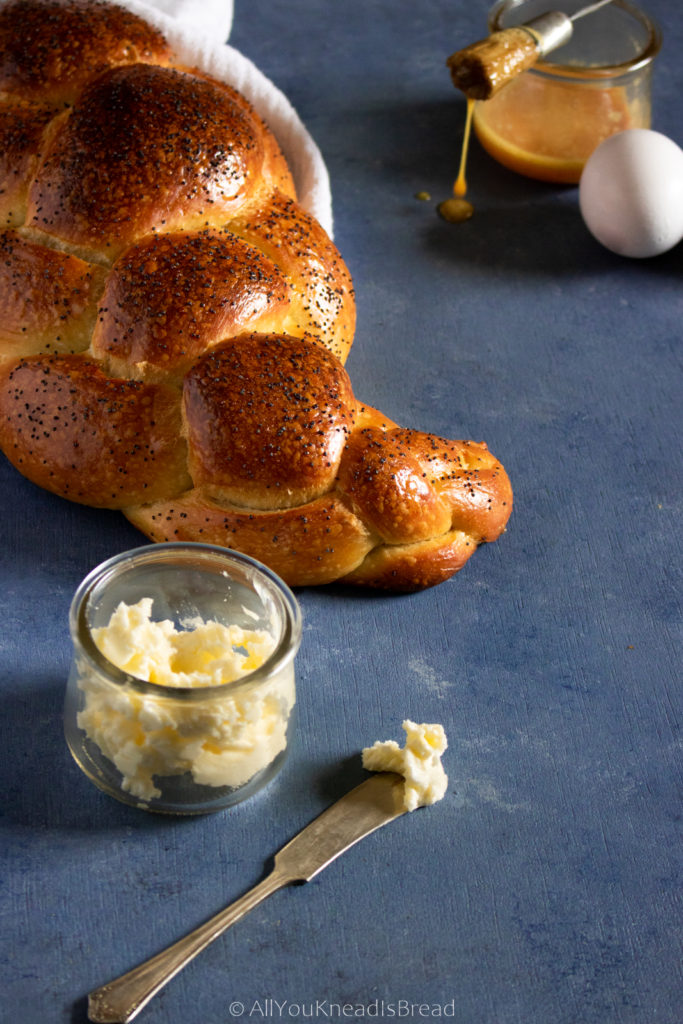
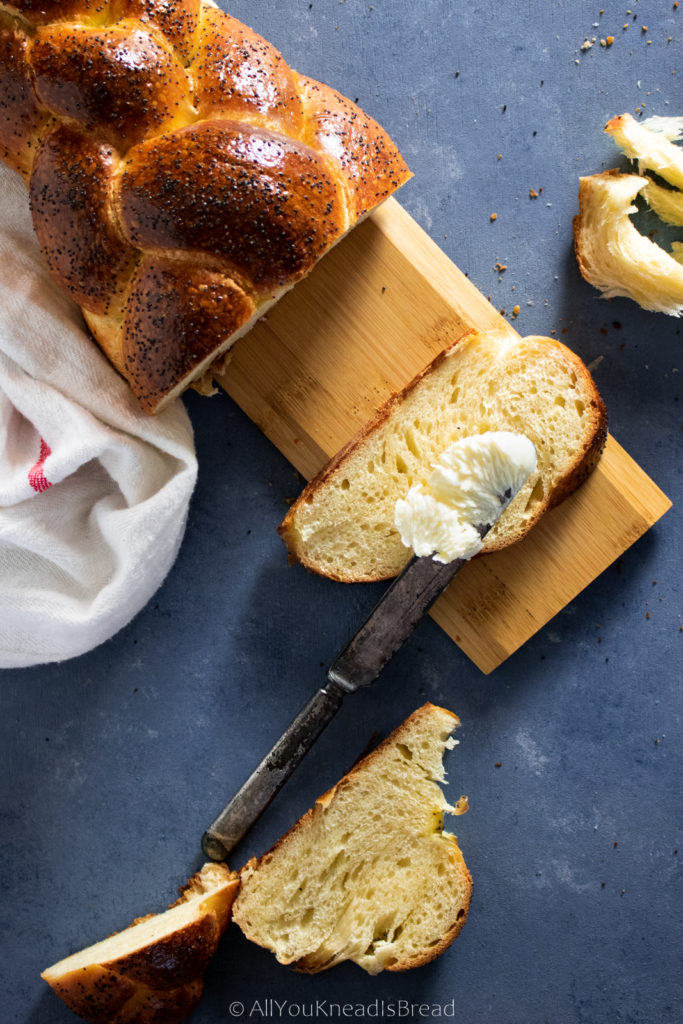
After you brush your challah with the egg white, you can sprinkle some poppy or sesame seeds to decorate it!
Here you have a video for an 8 strand challah:

The good thing about challah dough is its versatility when it comes to shapes and braiding. If you’re looking for a beautiful shape but are a bit intimidated by braids, I’d suggest you try your hand at a round challah. It’s very easy to braid and you won’t get lost.
The baking
Since every oven is a bit different, bake your challah until it’s golden brown. If it gets too dark on top you can tent it with aluminum foil until it’s done inside. If you have trouble knowing if the bread is done, check the inside temperature. It should register at least 200F / 94C.
I have this thermometer and I’m very happy with it. It’s fast and accurate and it can hold the max/min temperature. What I like the most is that it has a magnet! So I can leave it stuck on the fridge while I’m baking for easy use.
After baking let the challah cool down for a while. It will help set the crumb and aromas!
I hope you enjoy this wonderful sourdough challah!

If you make this easy sourdough challah, let me know what you think and tag me on your creations! I love to see what you guys make!
You can find me on Instagram or Facebook and you can also subscribe to my Youtube channel.
For suggestions or want me to adapt a yeast-based recipe into a sourdough one, etc. please contact me and I’ll try my best to respond and plan a recipe!
Happy baking!
This post contains affiliate links and any sales made through such links will reward me a small commission – at no extra cost for you – that allows me to keep running this blog.

Easy and Delicious Sourdough Challah
A delicious sourdough challah with a very fluffly crumb. Perfect to eat plain, to make toasts, or even french toasts.
Ingredients
- 345 g king arthur all purpose flour (11.7% protein content)
- 110 g sourdough starter at its peak of activity
- 70-80 g water room temperature
- 1 Large egg
- 1 Large yolk (save the white for final egg wash)
- 50 g granulated sugar
- 80-90 g vegetable oil
- 6 g salt
- 1 tsp poppy or sesame seeds optional
Instructions
-
Add the water and the sourdough starter to a bowl and with a whisk bread down the starter
-
Add the egg, the yolk, and the sugar and combine everything
-
Sift the flour and salt together and add them to the dry ingredients
-
Combine everything until you don't see dry flour particles and let it rest 30-60 mins
-
Start kneading, if using a stand mixer you can use the paddle attachment
-
When the dough starts developing the gluten add the oil and keep kneading until it's completely absorbed (see notes)
-
Knead 4-5 minutes and let it rest another 5-7 minutes. Continue doing thes until it's ready (Let the dough rest as much as necessary).
-
When the dough passes the windowpane test and it's smooth and elastic, put it in a lightly oiled container and let it ferment until it doubles or almost doubles and feels puffy (at 68-74F it takes tops 8h, typically overnight)
-
Degas the dough and let it rest a few minutes. Then divide it in as many strands as you want for your braid, shape them into dough balls and let them rest (covered) for 10 minutes
-
Take one piece of dough and with the heel of your hand flatten it. Use a rolling pin to roll the dough into a 7 x 4 inches oval. Starting from the longe side roll the dough into itself and form a log. Pinch the seam closed and gently roll from the center outwards lengthening the log
-
Repeat with all the dough pieces, if it's difficult to stretch the log, let it rest a few minutes
-
Braid the challah and place it on a piece of parchemnt paper on the tray you'll use to bake it. Cover it with plastic wrap and let it rise until it feels puffy (at 68-74F it takes about 3-4h)
-
Preheat the oven for 20 minutes at 350 F. When the challah is ready, brush it with the egg white and sprinkle poppy or sesame seeds. Bake it for 35-40 minutes or until it has a nice golden brown color
-
Let the challah cool down to room temperature before slicing it
Recipe Notes
- If you’re kneading with a stand mixer you might find it easier to incorporate the oil by hand. Squeezing and twisting the dough will work faster.
- If you think the challah getting too dark but the inside is not done, tent it with a piece of aluminum foil.
- Kept it in a plastic bag or airtight container, it can last fresh and soft several days.