
One thing that I remember dearly from my childhood is eating milk buns with a small chocolate bar. It was something so simple that brought so much happiness into my days. Those milk buns were very soft and fluffy and had the perfect structure so you could buy the ones filled with whipped cream and they wouldn’t be soggy. I think the simplicity of these milk buns is what makes them so special, they’re such a delicious treat!
What are milk buns?
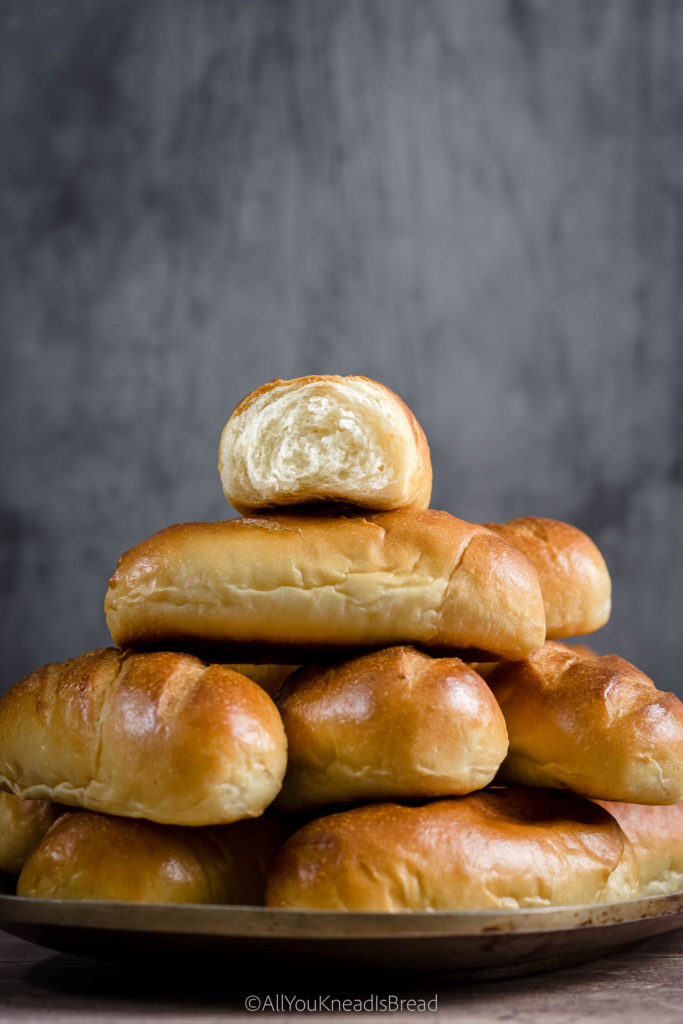
When you talk about milk buns these days, people usually think about a pull-apart style of buns. But today I bring a Spanish version of milk buns (Or at least the milk buns from my childhood). They have a slightly thicker (not crunchy) crust with a very spongy and slightly moist crumb. They’re usually shaped into an oblong shape and they don’t touch each other while they bake. Many times you could find milk buns filled with whipped cream or custard, those were some chubby buns!
About this milk buns recipe
Before we start, I want to emphasize how important gluten development is in this recipe. These milk buns should stay soft and fresh for several days, and proper gluten formation is crucial. I’ve tested this recipe many times and the yudane (I’ll talk about it later) definitely helps, but good ole’ elbow grease is what’s going to help you take these buns from good to amazing!
Activate the yeast in milk
I find that scalding the milk always helps when making bread. What I like to do is boil part of the milk (exact measurements in the recipe card), and let it cool down as I prepare the rest of the ingredients. Once the milk is warm and nice to the touch I add the yeast and let it rest a few minutes to activate.
Try acid whey for extra milkiness
I’ve been making my own yogurt for a few months and I found a perfect way to use the leftover acid whey: Bread making! Check this sandwich loaf recipe. I also found that whey gives the bread a more intense aroma than milk, so if you like your bread extra milky, and you have leftover whey, you can also use it for this recipe.
How to make the buns super soft
The key to ultra-soft milk buns is gluten development. By gluten development, I don’t mean *just* gluten formation. But developing a gluten network that is reinforced by fats and starch. Those are the key components to any soft bread. Different recipes will have a slightly different gluten network organization, but the idea is to have these three ingredients create a sturdy network (a good foundation starts with gluten) that is elastic and malleable (fats, they act as a lubricant among the gluten chains), and that makes a bread that is very spongy and fluffy (starch helps with setting the crumb and creating a more cohesive and less crumbly texture).
What is the yudane method?
One of the things that happen in breadmaking is the gelatinization of starch. The liquids in the recipe hydrate the starch in the flour. The hydrated starch granules swell and burst open when the temperature increases while the bread is baking. This is called gelatinization. The yudane method is based on the incorporation of pre-gelatinized starch into the bread recipe. Adding pre-gelatinized starch means two things: 1) more gelatinized starch will increase the fluffiness of the bread, and 2) pre-gelatinized starch will avoid “stealing” part of the moisture of the recipe for starch swelling, rather than gluten building. So we end up with a bread that is fluffier and has a stronger gluten network.
How does yudane look like
It is basically a 100% hydration dough. It looks sticky! Don’t worry, the main purpose of yudane is to gelatinize as much starch as possible. At this point, we don’t care about kneading the dough perfectly.
Later, when you put all the ingredients together, the yudane will incorporate into the dough and you wouldn’t tell it’s there
How to make the yudane
In order to keep the flavor of the milk buns, I like to prepare my yudane with milk. For these buns, I boiled the other part of the milk (careful with spills!) and prepare the yudane with it. You can do this the day before, but I prefer to use my yudane fresh to make sure there is no starch retrogradation. You can learn more about it in this post
If you use a stand mixer, you can put the flour for yudane in the bowl beforehand. Once the milk starts boiling turn the stand mixer on, add the milk, and knead the dough using the paddle attachment. If you prefer to do it by hand use a heavy bottom bowl that can stand the heat and allows you to stir somehow vigorously. Add the flour and when the milk is boiling aff it to the bowl and start stirring until you form a dough. Knead until you can touch the dough and don’t get burnt.
When the yudane is done, wrap it with plastic wrap and let it cool down to room temperature. In the meanwhile prepare the rest of the ingredients.
Fermenting these milk buns
You have two options here, 1 bulk fermentation and 1 proof, or 2 bulk fermentations and 1 proof. What I like to do with these buns is to ferment the dough until it almost doubles in size, then knead it for a minute to deflate it and let it ferment again until it doubles in size. Only then do I deflate it for a second time and divide it to shape the buns.
I find 2 bulk fermentations help develop more flavor. This is a yeasted dough, so any extra aroma is always welcome! And if you’re wondering if longer fermentation will make this dough sour the answer is no! It’s not sourdough, so don’t worry about that. It’ll just have a more bready and less yeasty flavor.
However, if you prefer to do one single bulk fermentation, let the dough ferment until it doubles or almost triples. Then proceed with the shaping and proofing.
How to shape these milk buns
After the dough is ready and has fermented. Divide it into 20-25 pieces of similar weight, shape them into a ball, and let them rest for 10 or 15 minutes. I like smaller and chubbier buns, but you can make larger buns. In that case, divide the dough into 10 or 12 pieces.
Then, with your hands or a rolling pin, flatten the balls, one at a time, into an oval of 15-20 cm long and 15-10 cm wide. This depends on how you like your buns. (shorter and chubbier, or thinner and longer. I like the chubbier version better!)
Then starting from the narrow side roll the dough into a little log, seal the edges and place it on the baking tray you will use. Leave enough separation amount the buns so they don’t touch each other while fermenting or baking.
If you’re making small buns you will need 2 or 3 trays to proof them or they might be too close to each other and will end up touching each other in the oven.
Score the buns!

One of the times I was testing this recipe I asked my Instagram community which scoring pattern they liked better, and the majority responded that they liked better 3 cuts across the buns. I had tried no cuts and also one cut lengthwise. I like 3 cuts better, as well. But, of course, you can choose whatever pattern.
How to bake the milk buns
If you choose to make small buns, be careful because they will be done fast and they can go from almost brown to dark brown in a matter of minutes. I don’t use steam while I bake these milk buns but that’s also an option to consider if you have an oven with a fan. The fan always dries out the crust much faster.
If you decide to make larger buns, then adding some steam can be a good idea, to allow the buns to rise a bit more in the oven.
The power of a good egg wash
Egg wash is not only the last touch for some shiny buns, it also develops a crust that seals part of the moisture inside to the buns can last fresh for a bit longer.
Questions you might have
How long do milk buns last?
I made 25 small buns and, at room temperature, they lasted fluffy and nice for 3-4 days. On days 5 and 6 the buns were a bit dryer but still edible. Nothing some butter or mayo couldn’t fix!
Can you freeze milk buns?
Yes! I reserved some of the buns for freezing. The best way for me was a ziplock bag, but you could wrap them in plastic wrap individually as well. Then I cut them lengthwise before freezing and when I wanted to eat one I just popped it in the toaster. You could also let them thaw at room temperature or steam them. Although this last technique can be tricky if there’s water condensing and dripping on top of the buns.
How do you eat milk buns?
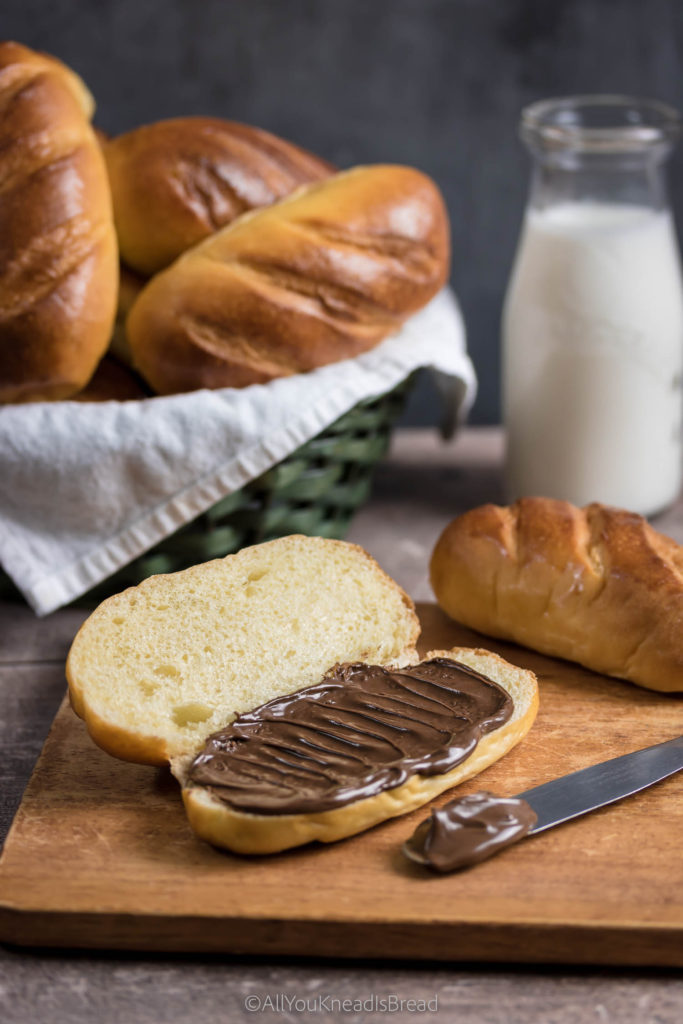
As mentioned before, these milk buns are probably a bit different than other styles of buns. They are perfect for sliders, hotdogs… whatever savory filling you prefer. But my favorite is with a chocolate bar. This combination just takes me back to my childhood and I see myself in that small pastry shop, unwrapping the chocolate bar and putting it inside the bun. As an adult, I found that Nutella can also be an amazing filling!
Are milk buns sweet?
Yes! These buns are sweet, not crazy sweet but you can taste the sweetness. That, along with the milky flavor, is what makes these buns so versatile! They go well with sweet or savory fillings. And if you’re like me and dunk everything in your morning coffee… you can do that too!

Are these milk buns the same as brioche?
Not quite! While brioche is mostly eggs and butter, these buns have more milk, not as much butter, and not that much egg. They are also sweeter than brioche.
Other uses for this milk dough
This dough is amazing to work with! Unless I don’t have a lot of time I like to knead it by hand because it’s truly nice to work with! And it’s also very versatile. If you don’t want long buns you can you can make buns for burgers, or cinnamon rolls, or a babka… You can also shape it into thinner and longer buns for hot dogs. You can even use it to make a tin loaf. This recipe is a keeper!
If you liked this recipe you might also like these
Super fluffy nuts and cardamom babka
Orange and cinnamon sourdough rolls
Sourdough donuts with rose cream
If you make any of my recipes let me know what you think! As always you can find me on Instagram, Pinterest, and Facebook. And I also have a few videos up on my Youtube channel (which I hope I can resume soon!)
Starting on breadmaking but don’t know where to start? Check my amazon store to see my favorite and affordable utensils you will need. You can make the best bread with simple and affordable tools! (This is an affiliate link if you purchase something from this link I will make a small commission that helps me run this blog, but you will not be charged any extra money 😉 )

Super soft milk buns
Ingredients
Yudane
- 150 g bread flour
- 150 g boiling milk
Main dough
- 300 g yudane
- 600 g bread flour 12.7% protein
- 300-335 g Whole milk (scalded, lukewarm) (start with the lesser amount and add more if your flour requires it)
- 75 g heavy whipping cream
- 3 egg yolks
- 7 g active dry yeast
- 90 g sugar
- 12 g salt
- 75 g softened butter
Instructions
Yudane
-
Add 150g of bread flour to your bowl.
-
Heat a bit over 150g of whole milk and when it comes to a boil weigh 150g and quickly add it to the flour.
-
With a wooden spoon or with a stand mixer mix the flour and milk until it forms a sticky dough. Wrap it in plastic and keep it at room temperature until you're ready to start the dough.
Main dough
-
Mix the lukewarm milk, the whipping cream, the yeast, and the egg yolks, and let the mixture sit for 10 minutes.
-
Add the sugar to the egg mixture and give it a whisk.
-
In the bowl where you have your yudane add the egg mixture and break up the yudane a little bit.
-
Add flour and salt to the bowl where you have the yudane and pour the wet ingredients. Mix everything until you don't have dry flour particles. Cover and let it sit for 20 minutes.
-
After 20 minutes start kneading, if the dough feels too stiff and you didn't add all the milk, add a bit more. Once the dough starts coming together add the softened butter and continue kneading to incorporate it.
-
Knead until the dough becomes smooth and elastic. It shouldn't stick to your fingers and it should feel nice to the touch.
-
Place the dough in a lightly oiled container, cover it and let it ferment at room temperature for 2h or until it almost doubles in size
-
Deflate de dough gently and let it ferment again for 1 hour or until it almost doubles the size
-
After 1h or when the dough is ready deflate it gently and let it rest, covered, for 10 minutes.
-
Divide the dough into as many buns as you'd like, shape the pieces into small balls and let them rest covered for 10 minutes. This recipe can make 25 small buns, 12 medium buns, or 6 large buns.
-
Take one dough ball and flatten it with your hands or a rolling pin into an oval of half centimeter thick (1/4 in). For small-size buns, the oval will be 15x7cm. Starting from the short side roll the dough into a log and seal the edges.
-
Put the buns on baking trays separate enough they won't touch each other while they bake, cover them loosely with plastic wrap and let them ferment until they get puffy and have grown in size.
-
Before the buns finish proofing preheat your oven at 360F/180C (lower to 340F if you're making larger buns).
-
When the buns are ready, brush them with a mix of milk and the leftover egg white, make three cuts across the surface of each bun and bake them at 360F/180C for 25-35 minutes or until they have a nice golden brown color.
-
Let the buns cool down to room temperature. You can keep them in a seal-tight container or ziplock bag at room temperature. You can also freeze them and defrost them in the toaster.
I need milk for buns
you can use soy milk, or even water. the flavor might change a bit but all you need is a source of moisture 🙂
Hi there I just wondered if buttermilk could be used or if you have any buttermilk recipes? Thank you.
This week a sourdough banana muffin recipe that uses buttermilk will be up, stay tuned! 🙂 You can subscribe on this link: https://subscribepage.io/breadnewsletter
Hi I came across your site searching for what to do with my whey, after making Greek yoga, and I’ve been making your whey bread with great success! Thank you.
Just wondering if I could make these milk buns with buttermilk as I have a glut of it. Do you happen to have any other buttermilk recipes? Many thanks
Hi! Sorry for my late reply. I have a recipe for Russian kefir bread, you can try to make it with buttermilk, but as a first approach I’d reduce the amount a bit, in case the dough turns out too sticky!
Can I make it without using eggs? Also can I use whole wheat flour? Thanks in advance
You can check this post for vegan hokkaido milk bread, I explain how to properly replace the eggs in bread 🙂
As for the flour, you can use whole wheat, but keep in mind the dough will need more liquid and the buns won’t be as fluffy. It’s the downside of using whole wheat. There are a series of reactions between compounds found in cereal bran and the gluten proteins that make the gluten network a bit weaker and the breads tend to turn out denser than the white bread.
Let me know how they turn out if you make them with whole wheat! 🙂
This looks intriguing… at what point do you add the whipping cream? Step 4? thank you!
I add it with the rest of the wet ingredients. I find it makes the bread very fluffy and it also adds another layer of milkiness 🙂