
Lately, I’ve been focusing on my Pasta Madre a lot. While studying it and playing around with different flours I generated a considerable amount of pasta madre discards. Of course, I found a way to repurpose them instead of throwing them away. I made this fantastic sourdough fougasse with olives and thyme that is going to blow your taste buds! This is the most aromatic sourdough fougasse I’ve ever made! It’s definitely a delicious treat to share and a fantastic appetizer to keep your guests happy while dinner is finishing cooking!
What is fougasse bread?
In a world full of focaccias, baguettes, and sourdough loaves it’s easy for this incredibly delicious bread to go unnoticed. Let me tell you a bit about it!
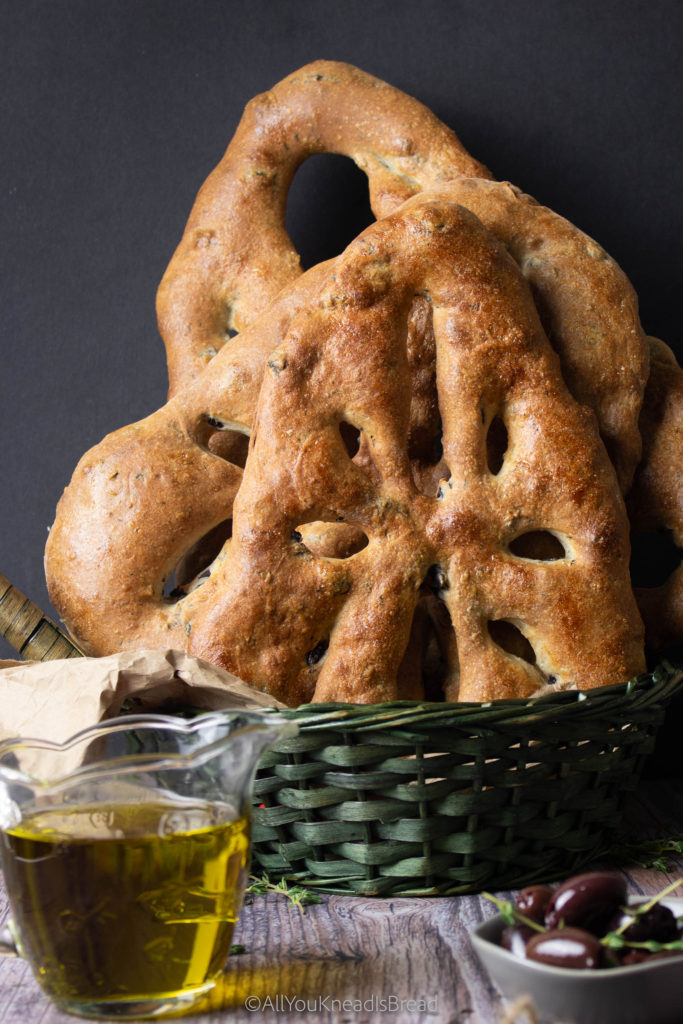
Fougasse is a French bread typical from Provence although it has more variants in other regions of France. It’s somehow a flatbread and it’s shaped in an irregular shape with slits in the middle. In France is very common to add fillings such as olives, cheese, anchovies…
FUN FACT! this bread was originally used to test the temperature of the wood fire ovens they had back in the day. The bakers could estimate the temperature based on how long it took to bake a fougasse. So there you have it, delicious bread full of tradition!
What is pasta Madre?
In case you’re not familiar with it, let me make a quick summary of what pasta madre is: It’s a special stiff starter used in the making of Grandi Lievitati products, namely Panettone, Pandoro, Colomba… I said special because it’s not *just* a stiff stater. Pasta madre, (or lievito madre, or lievito naturale in some cases) is typically maintained under pretty specific conditions and methods. The method I use is the one where the starter is kept in water. The other method wraps the pasta madre and keeps it tied.
If you want to learn more about it you can check this post to learn how to create your own lievito madre, this post for information about the 3 preparatory refreshments before making panettone, and this post for a mini-guide to troubleshoot your pasta madre.
Stiff starter vs. Pasta Madre, two different things
Social media has done a very poor job of explaining what Pasta Madre is. And frequently people use starters at 60% hydration and call them Pasta Madre. But a real pasta madre s about 35-45% hydration (depends on the flour). And it has a very controlled maintenance process in order to keep a healthy ratio of bacteria and yeasts and promote specific types of LAB. The purpose of this special maintenance is to make a panettone (Grandi lievitati) that is very very very soft, packed with flavor, that can stay fresh for many days and that has not a single hint of acidy nor acidifies over time. Not just to leaven the dough.
Why do I generate so many pasta madre discards?
The thing is… because Pasta Madre is kept either in water or tied up, you can’t really use small amounts of flour because otherwise it’d disintegrate in the water very quickly or it’ll completely dry out in the cloth. My normal maintenance amounts are:150-200g of pasta madre, 150-200g of very strong flour, and 70-80g of water.
Basically, I generate about a pound of pasta madre discards every 24h. And that is a lot of perfectly fine and very strong pasta madre that could be used for other things. I usually keep it in the fridge and accumulate it over a few days and use it to make crackers. I also use it for sourdough loaves, or to make these delicious orange and cinnamon rolls.
And now we have another recipe! This sourdough fougasse is good! Trust me on this! And it uses about all the discard from one refreshment.
If you are using pasta madre discards, I recommend you start the fougasse dough right after the last maintenance refreshment. That is when the pasta madre is at its peak of activity.
Is this a sourdough discard recipe?
Yes, because pasta madre is still sourdough, and a very active one! It’s still a dough packed with wild yeasts and bacteria. And like sourdough discards, you can use it in pretty much anything! It’s also great for stiffer dough, you can use it to make bread like this sourdough challah, or my sourdough burger buns… The options are endless here!
What if I don’t have pasta madre?
Don’t worry! If you don’t have pasta madre you can either create a stiff starter and use it, or use your liquid sourdough starter (100% hydration), I got you!
How to create a stiff starter with your 100% hydration starter
I’m going to show you how to make a shortcut stiff starter at 55% hydration because if we lower the hydration too much, your bacteria will end up a bit stressed and there’s a chance it won’t be active enough to use. You can read all about adaptation periods and water content on this post. It’s about the science of your sourdough starter (without fancy words and easy to follow).
A 55% hydration starter would be very easy to make by mixing 100g of flour with 55g of water. But this will make a total of 155g of starter. We don’t need that much, so we need to scale it down to a total of 100g. So we need to scale down.
| Ingredients | For 155g of starter | For 120g of starter | For 100g of starter |
| Total Flour | 100g | 77.4g | 64.5g |
| Total Water | 55g | 42.6g | 35.5g |
Pay attention to the water
Now, water is our limiting factor here because we just need a little amount. Since we’re using our 100% hydration starter, that means that whatever weight of this starter is made of 50% flour and 50% water.
So, let’s say you want to make 120g of stiff starter (just to play safe). That starter will have 42.6g of water. This water comes ONLY through your liquid starter. Since water is only 50% of the liquid starter, we will need twice the amount. And then to make it stiffer we just add the flour difference. Let me show you!
Twice the amount of 42.6g (of water we need) is 85.2g. We need to take 85.2g of liquid starter (42.6g of water, and 42.6g of flour). And according to the table above, to make 120g of stiff starter we need a total of 77.4g of flour. From our liquid starter, we already have 42.6g of flour. The difference we need to add is: 77.4 – 42.6 = 34.8g
Let me do the math for you!
Too much math for a beautiful day such as this one? Then let me do the numbers and just pick on the table below the amount of starter you prefer to make:
| Ingredient | For a total of 120g of stiff starter | For a total of 100g of stiff starter |
| 100% hydration starter | 85.2g | 71g |
| Extra flour | 34.8g | 29g |
You can now pick how much stiff starter you want and mix the ingredients. Knead the dough by hand for a couple of minutes. You don’t need to develop the gluten perfectly but make sure there aren’t dry flour particles or dry chunks of dough. The idea is to have a dough that is stiff but workable and not sticky. Aim for a bagel dough kind of consistency.
Once mixed put it in a container with a loose lid and wait until at least doubles in size. It’d be helpful to have a narrow and taller container rather than a wider and shorter one. That way it’ll be easier to see how much it grows. Once you see it doubles wait for a while, if it stalls then it’s at the peak, if it continues growing then it’s not at the peak yet. Wait a bit longer and test again.
You also need an active starter to make sure the stiff starter can grow fast and you don’t need to refresh it again to make it stronger. Remember, the purpose of this recipe is to reduce waste 😉
If this is not a method you like, I got you! You can go ahead and use your liquid starter
How to make sourdough fougasse with liquid starter
If you just don’t really care about making a stiff starter or don’t have pasta madre, you can still make this delicious sourdough fougasse with your liquid starter. Just add 100g of the starter and then 21g LESS of water and 21g MORE of flour to the base recipe and you’re good to go! (This is to keep the total dough hydration the same regardless of the starter you’re using).
About this sourdough fougasse recipe
For this fougasse, I chose strong-flavored fillings because pasta madre doesn’t have the sour punch that liquid sourdough has. It’s a milder flavor that I wanted to balance with something savory. Olives and thyme are a combination that I love and along with olive oil and the bread (once is baked) is just perfect.
You can use other ingredients of your preference, although traditionally fougasse has more savory and umami fillings. This can also be an opportunity to let your creativity flow and experiment with how you cut the slits when you’re shaping your bread. Fougasse is truly a gorgeous bread that can just be the perfect centerpiece for a table.

How to prepare this sourdough fougasse
As with any other sourdough bread, we need to start mixing the ingredients. If you know my baking style, you know that I add starter and salt all at the same time. And this case is no different. However, due to the nature of pasta madre, you probably can’t dissolve it in the water the same way you do with a liquid starter.
What I like to do is hold back about 20% of the water to start with a bit of stiffer dough, and then progressively add the rest of the water and finally the wet fillings. This is what works for me, but if you want to add all the water right away and just knead directly it’s fine too.
This is a lovely dough to work with, honestly. You can use your stand mixer but if you want to try doing it by hand, I think it’s a beautiful recipe to do so!
If you’re using a liquid starter just dissolve it in water and proceed with the rest of the ingredients. You don’t need to add water slowly.
When should I add the fillings?
I like to classify fillings into two groups: wet and dry. Wet fillings are those that carry a considerable amount of moisture with them and that could, potentially, alter the dough. These are things like olives, roasted peppers, capers… Dry are those that don’t carry with them much moisture like spices, herbs, cured cheese, dry things preserved in oil (sundried tomatoes, caramelized onion…).
Why this classification? When we need the dough we usually apply pressure to the ingredients that are in the dough. Wet ingredients will release that moisture if we “squeeze” them as we knead the dough. And our somehow stiff dough can become sticky in no time!
What I like to do is add the dry ingredients mixed with the flour and wait until the dough is developed to add the wet, then I just have to knead enough to incorporate the fillings, and not for incorporating them filings and developing the gluten at the same time.
For this sourdough fougasse, I used black olives and thyme. Thyme is not a problem, it’s a “dry” ingredient (even though I used fresh herbs, but you get the idea), you can add it at the beginning with the flour and the other ingredients. Olives, on the other hand, are preserved in brine, they carry quite an amount of moisture. So I added them at the very end. Once the dough was ready and the gluten was where I wanted it to be, I added the olives and kneaded just enough to incorporate them.
Don’t worry if by doing this you still have a couple of olives that aren’t incorporated, just put them on top of the dough, after they bake they’ll give your fougasse a rustic look!
How to ferment this sourdough fougasse
Since fougasse is a flatbread of sorts, it’s okay if the dough is not super strong. In other words, it’s okay if we over ferment it a little if that’s going to fit our schedule better. Here you have a couple of options:
Same day fougasse
Start the dough early in the morning, knead it well, add all the fillings, and let it ferment (bulk ferment) until it doubles in size and gets a bit puffy. Depending on your temperature, this might be anywhere between 3-5h. If you’re using a clear bowl you should see some fermentation bubbles in the bottom but nothing too crazy. Try not to over ferment it or when you want to shape it and cut the slits it’ll be tricky.
Then proceed to divide the dough into as many fougasses as you wish to make, shape them, and let them proof. We’re not looking for super chubby fougasses here. So when you start seeing them rising a bit turn the oven on and continue proofing while the oven preheats.
If you’re an early bird you might have them ready by lunchtime, if you’re a sleepyhead like me, maybe aim for dinner to be safe 🙂 *giggles as she writes this sentence*
Overnight fougasse
This method is based on cutting the bulk and keeping the dough in the fridge until you’re ready to continue. So, let’s say you refresh your pasta madre in the early evening or your stiff starter is not ready until later in the day. Maybe you don’t have time to bake your fougasse the same day. In this case, what you can do is prepare the dough and start the bulk fermentation. Then 1 and a half or two hours later put the bowl in the fridge and keep it there overnight. Then the next morning take the dough out of the fridge and divide it into the number of pieces you want. This way the dough will come to room temperature a bit faster
How to shape your sourdough fougasse
Either if you are following the same-day method or the overnight method. After dividing the pieces shape them into a ball, cover them with a cloth or plastic wrap, and let them rest for 20 minutes or so.
After the rest period is over… Unleash your inner creativity! The basics of shaping a fougasse are:
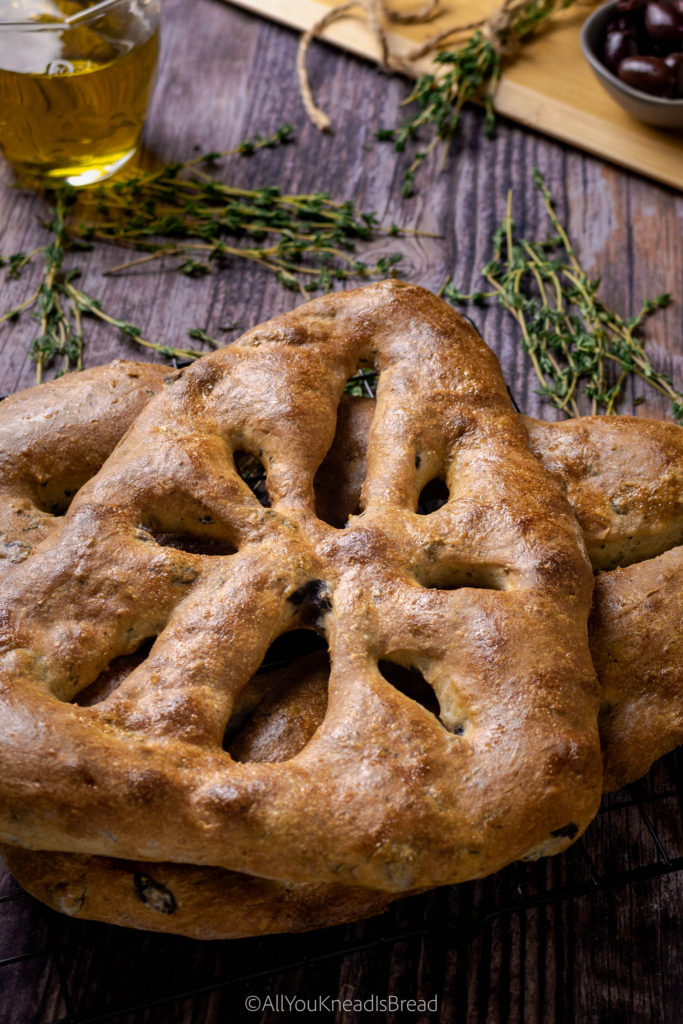
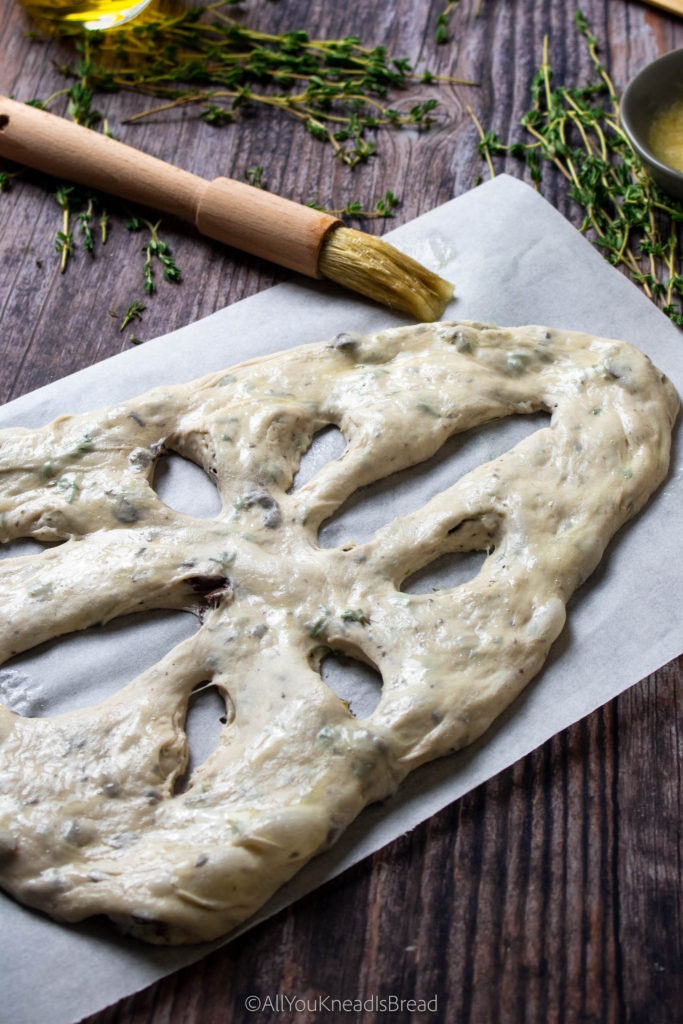
Flatten the piece of dough into an oval-ish/triangular-ish/leafy-ish shape, then cut slits with a bench scraper or a pizza cutter (bench scraper works better for me), loosen up the slits, and done!
Don’t try to make them perfect, the beauty of a good fougasse is in that rustic touch! I personally like a triangular/leafy kind of shape. I think they look really nice and if you have a bread basket they will look very cute in it. Also, feel free to use plenty of flour to avoid the dough from sticking to the counter. Cutting the slits can be tricky.
Baking your sourdough fougasse
Once you’re done shaping the fougasses, cover them and let them proof at room temperature until they start getting puffy, but didn’t necessarily grow much. At that moment turn your oven on at 425F/220C. The proofing stage will continue as the oven preheats. If you have an old metallic tray, put it in the bottom part oven, you will use it to create steam.
When the oven is ready put your fougasses in the middle part of the oven and throw a cup of boiling water into the bottom tray. This will create a nice touch of steam for the first few minutes.
After 10 minutes or so, you can retrieve the bottom tray and continue baking until your fougasses have a nice golden brown color. Let them cool down on a rack until you can hold them with your hands without burning yourself and enjoy!
A few tips about this sourdough fougasse recipe
For a shiny touch, I like to brush my fougasses with egg wash. This also allows the crust from drying out too quickly. This bread is pretty thin, so a bit of extra moisture is always helpful.
If you don’t want to brush your fougasses with egg wash, you can spray some water before putting them in the oven. This, along with the steam we create with the boiling water, it’ll be enough.
Fougasse is best consumed right away. When it’s crispy outside and soft inside. It’s even better when it’s still warm. This bread is thin, most of the moisture scapes as it bakes, so it goes stale faster than other types of sourdough bread.

Can I use other fillings?
Absolutely! You can use other flavor combinations that you like. I love fresh herbs combined with something extra savory or umami (like olives, blue cheese…). But I also love caramelized onions and nuts together. The sky is the limit here!
Do I really need steam to bake it?
You don’t need it, but I think it’ll be a good idea. I always get better results when I add steam during the first 10 minutes of baking. Since these are pretty thin, the crust will dry out quickly. A bit of steam will help to create a fluffy interior and crispy crust! But if you can’t create steam don’t worry, your fougasse will still turn out delicious!
How big should my fougasse be?
With this recipe, you can make one mega-fougasse, 2 large fougasses, 3 medium fougasses, 4 small ones, or 5 tiny ones. Just be careful when you bake them because the small ones will bake faster.
That is all for today! If you liked this recipe, you might also like these other ones, give them a try and let me know what you think!
Brie and olive sourdough rolls
Tomato and rosemary sourdough bread
Gorgonzola and apple sourdough bread
If you make any of my recipes let me know what you think! As always you can find me on Instagram, Pinterest, and Facebook. And I also have a few videos up on my Youtube channel (which I hope I can resume soon!)
Starting on breadmaking but don’t know where to start? Check my amazon store to see my favorite and affordable utensils you will need. No need to buy a $200+ baking pot. You can make the best bread with simple and affordable tools! (This is an affiliate link if you purchase something from this link I will make a small commission that helps me run this blog, but you will not be charged any extra money 😉 )
Happy Baking!

Sourdough Fougasse with pasta madre discards
Make this incredibly aromatic bread typical from the Provence using your pasta madre discards!
Ingredients
- 500 g bread flour
- 100-120 g pasta madre discards see notes
- 300-350 g water see notes
- 50 g extra virgin olive oil
- 8-10 g salt see notes
- 135 g sliced black olives drained and patted dry
- 10 g fresh thyme leaves chopped
- 1 egg for brushing optional
Instructions
-
Mix salt, chopped thyme, and flour in a bowl and set aside
-
Cut the pasta madre into smaller pieces and add them into the bowl that has the flour mix
-
Add about 80% of the water, the olive oil, and start kneading until you feel the pasta madre is incorporating well into the dough. Then add the rest of the water
-
Knead the dough until the gluten is almost developed and add the drained olives
-
Do a set of stretches & folds to help incorporate the olives. If the dough feels tight and you can't incorporate them, let the dough rest for 20 minutes to relax the gluten. Then proceed again to finish incorporating the olives
-
Once ready lightly oil your bowl and put the dough inside, let it proof at room temperature until it doubles or almost doubles and you see some fermentation bubbles at the bottom (Refer to the post to see how you can do a cold retard of this dough)
-
When the bulk fermentation is over, lightly flour your counter and divide the dough in as many fougasses as you want (3-4 pieces will have a nice medium-small size). Shape the pieces into dough balls, cover them and let them rest 10 minutes
-
Take one dough ball and flatten it with your fingers giving it an oval or semi triangular shape. With your fingertips stretch the dough into a larger piece of about 1cm/0.5in thickness. Use as much flour as needed to avoid the dough from sticking
-
Once you have shaped all pieces cover them and let them rest for 10 minutes
-
Place the pieces on the trays you will use to bake them and with the narrow side of a bench scraper cut slits into the fougasse pieces and stretch them a little so the cuts don't close while the dough proofs and bakes
-
Cover the fougasses and let them proof until you see them getting puffy, then turn on the oven at 425F/220C and finish proofing while the oven preheats. If you want to create some steam place an old metallic tray in the bottom part of the oven
-
When the oven is ready brush the pieces with egg wash for a shinier touch (optional) or just spray some water. Bake them for about 30 minutes or until they get a nice golden brown color. If you are creating steam in the oven you can add a cup of boiling water into the tray that has been preheating in the bottom of the oven.
Recipe Notes
*If you are adding wet fillings (like olives) start with the lesser amount of water, if the fillings are dry (like herbs or cheese), add the greater amount of water
*Use just 8g of salt if you’re using very salty/umami fillings like olives, anchovies… otherwise use 10g