

Hello friends!
I hope you’re having a wonderful summer! I’m definitely enjoying my well-deserved break! Since I have time, I’m baking almost every day. Nothing makes me happier than having fresh bread on the table!
I’m also taking this time to look for new recipes, try flavor combinations… And also, to look into how bread science can help your baking.
Lately, I’ve seen several brioche recipes and from the pictures, I could tell that the crumb wasn’t what brioche crumb should be. In other words, most likely, the dough wasn’t developed properly.
Why is brioche usually labeled as a “difficult” bread to make? Well, adding solid butter is challenging, and developing dough with that amount of fat takes extra time. So, it’s easy to give up
But let me tell you something, brioche = patience, that’s it. That’s the secret.
Sometimes we’re tempted to melt the butter and make the whole process easier
Or we stop kneading because we’re just tired of waiting for the dough to be ready…
Both butter and kneading, are strongly related when we make brioche.
On this post, I explain why we should use solid butter and how to knead brioche to achieve the PERFECT texture.
I hope that once you understand the science behind, it’ll be easier for you to achieve better results and not to get discouraged when handling enriched dough.
Also, on this recipe, I show you a way to use sourdough discards.
If you’re beginning your brioche journey, this recipe is for you because the butter content is not too high. Practice with this recipe and feel free to increase the amount of butter later on.
This is not a 100% sourdough brioche, it also has commercial yeast. But the sourdough enhances its aroma, and the long fermentation times improve its texture considerably. Speaking of texture….

How to get the best texture in your brioche
First things first. When making brioche we need to have one thing in mind: the fat content is very high, not just because of the butter, but also the eggs, therefore, developing the dough is going to take time and patience.
Although this brioche has a relatively low flour:butter ratio, all the explanations apply to higher butter content brioche and other enriched doughs.
How does fat affect the dough?
The first thing you need to know is that melted butter and softened butter (which is still in solid-state) are two completely different things.
The structure of solid butter is made of little crystals that interact with other ingredients and are essential for developing a nice gluten network. When you melt butter, those crystals are destroyed, so the structure of the butter is different, therefore, the way it interacts with other ingredients it’s also different.
Although the role of solid fats is not fully understood yet, scientists have agreed in a three-parts mechanism to explain what happens when we add butter or shortening to bread dough:
- Wheat proteins have bound phospholipids in their structure which are essential for gluten elasticity. These lipids interact with the crystals found in the butter to create gluten-fat complexes (structures) that strengthen the gluten network and give it more elasticity.
- Butter (or solid fats) can act as a lubricant between the gluten structure and starch matrix, improving the gas retention capacity of the dough. As a result, dough that has a higher content of solid fat has the ability to rise more due to an improved gas retention capacity.
- Solid fat melts during baking and seals pores that are present in the dough through which the gas would, otherwise, scape. CO2 eventually leaves the dough, but the butter retards this process and, again, helps the expansion of the dough during baking, the famous “oven spring”.
You can see that a proper redistribution of the fats within the dough is very important. And the way to achieve it is…. By kneading! Of course 😉
How to knead dough with high-fat content
Developing the gluten network of enriched dough consists of two major steps: One is the development of the gluten-starch matrix the other is the development of the gluten-butter complexes.
First, we need to develop the gluten-starch matrix, so then, the butter has a place to start forming the complexes I mentioned before. That’s why we don’t add the butter at the beginning, we knead the dough a little bit until it has a good consistency.
After that is when we start adding the butter.
Think of it as building a house. First, you need the main structure, then you start building up the walls.
However, how many times have you tried to develop the dough and it looks as it will never come together?
That’s because the long strands of gluten proteins, as they form, they get all tangled. If you force them too much (knead too much) you might end up breaking them, or in other words: over-kneading the dough. There’s a simple solution though… Let the dough rest!
Letting the dough rest while kneading can go a long way and reduce the kneading time. Whenever you have troubles to bring the dough to full development stop for 5-10 minutes so the gluten strands have time to detangle.
What do you achieve with this?
- You avoid over-working the dough having better control over it.
- You can develop a better gluten network, with organized gluten strands that are more elastic. This will improve the cohesiveness and strength of the final product. The crumb of your bread will be AMAZING!
- You avoid increasing the temperature of the dough to the point where the fats will melt. Either if you’re using your hands or a stand mixer.
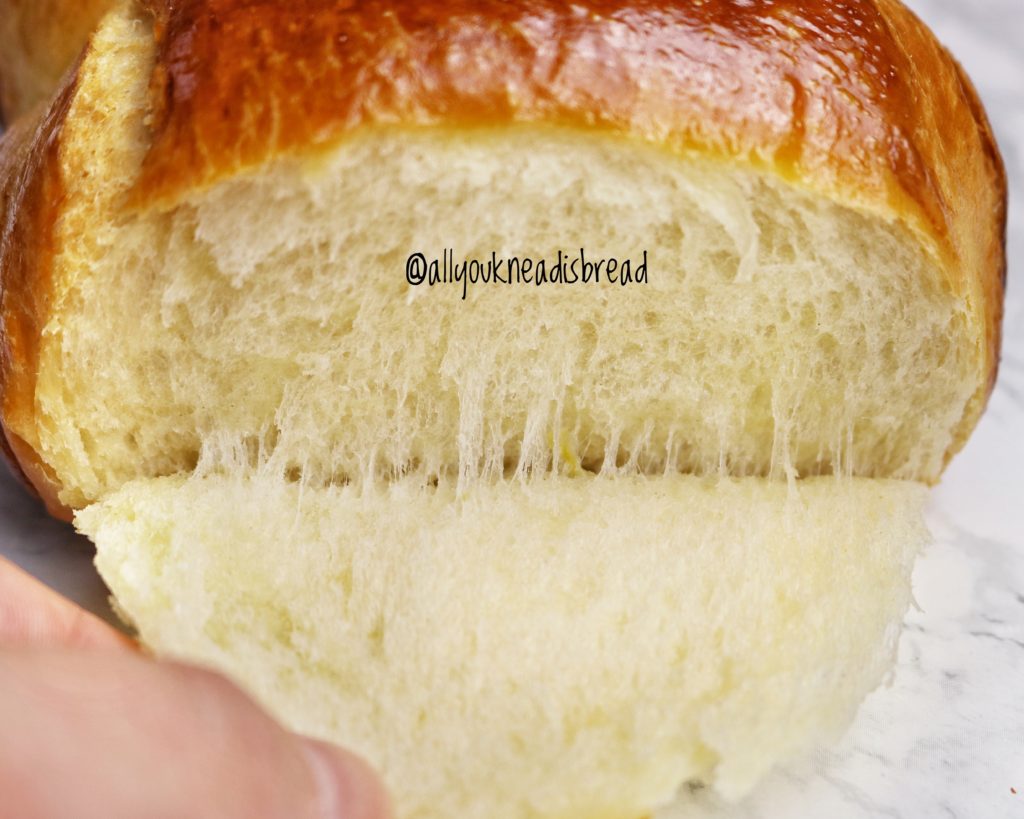
The texture of your brioche should NOT look like cake or banana bread. It should NOT be crumbly. It should be cohesive, soft, spongy and springy. You should be able to pull apart strands of crumb. If not, most likely, the dough wasn’t properly developed
Although there can be many other reasons to explain why the texture didn’t come out right, I believe dough development is, usually, the main cause.
As you can see, breadmaking is pure science. And I hope that by understanding better what goes on when you mix the ingredients, you can succeed and make better and better brioche!
And now… let’s go to the recipe!
For this brioche, I wanted to play with aromas a little bit because one of the loaves was going to be a gift. So I added blossom water, orange syrup, and lemon zest. But feel free to skip these ingredients or add other you like better
POSSIBLE SWAPS
- If you don’t have sourdough starter, just add half of the weight in milk or eggs and the other half in flour. You can also make the day before “pâte fermentée” (also known as old dough).
- If you don’t have orange syrup you can substitute if for honey, molasses, agave… Whatever you have at home.
- If you don’t have lemons, you can add any other type of citric zest.
- If you don’t have orange blossom water, you can add orange juice or brown liquor (rum would give a really nice aroma).
DAY 1 – Late Afternoon
In the morning I fed my starter to bake a sourdough loaf, I always make more than I need just in case! So, I use some for the loaf, some to keep and the rest… I used it in this recipe.
I started mixing my ingredients at 3 pm.
First, I mix all the wet ingredients and the sourdough discards to dissolve them a little. Then add the sugar and the yeast, combine everything well and let it rest a few minutes.

Sift the flour and add it to the wet ingredients along with the salt and lemon zest. Mix everything until you don’t see dry flour particles and let it rest for 20-30 minutes to allow the hydration of the flour.


After the autolysis period, start kneading the dough until it reaches certain consistency.

Start adding butter little by little. It’s better to use it at room temperature (softened butter) so it can be incorporated easier. Otherwise, you might have chunks of butter in the dough and it will be difficult to incorporate it.
I find easier to incorporate the butter by hand, what I do is squeeze the dough and twist it until the butter is absorbed. You can see how I do it on my Belgian waffles video
Then continue kneading the dough at low speed. After 15 minutes stop, cover the bowl and let it rest for 5 minutes. Knead again for another 10 minutes, stop and let it rest for 5 minutes. Continue again for another 10 minutes, stop and let it rest 5 minutes.
At this point your dough should be almost ready, it should start coming up the dough hook of your stand mixer and separating from the sides of the bowl. After this last resting period, keep kneading until the dough is ready, it shouldn’t take much longer.
If you live in a cold and dry environment, you might need more time. So pay attention to your dough, let it tell you what it needs 😊
It took me almost 50 minutes to have the dough fully developed (without resting time).

A fully developed dough should not be sticky, should come out of the bottom of the bowl without tearing and should pass the windowpane test.
To check the windowpane test, let the dough rest a few minutes first. Otherwise, you coul have a “false negative”. The dough could tear because the gluten strands are tangled, not because they’re not ready.
When your dough is ready, let it ferment at room temperature until it almost doubles in size, after that, put in the fridge, and leave it there overnight. Mine was in the fridge for 18 h
Turn the dough onto your work surface and deflate it. Be gentle, but make sure there aren’t big air pockets.
This recipe yields one 9 in (22-23cm) springform pan and one 9.75 x 6 in (25 x 15 cm) loaf pan. If you just want the brioche in the circular pan, multiply all the ingredients by 0.75
Separate 8 pieces of 130-140 g each and shape them into balls and place them into the pans. Then shape the rest of the dough in 4 logs as wide as your pan or 2 longer logs and cut them in half (this is what I did 😉)


And now time to wait! Let the dough rise until it’s puffy; if you poke it with your finger, the dough will spring back but not immediately. That means the dough has enough gas trapped inside. Sometimes, the dough can be ready but does not necessarily double its size.


20 minutes before the brioche is ready, preheat your oven at 350 F (175 C)
Before baking, brush the brioche with egg wash. I like to use an egg yolk and a Tbsp of milk. This egg wash helps soften the crust and the brioche it’s like the one you buy in the store, but better because you made it!

Bake the brioche for 30 – 40 mins, keeping an eye on it. Bake it until it has a nice golden-brown color.


Before you dig into this tasty treat, let the brioche cool down to room temperature. This step is very important because to let the crumb finish baking, set aromas, etc. But after it cools down… oh boy!
If you can see these strands, you worked the dough well. The gluten was properly developed, the fats were successfully incorporated, and the structure of the baked brioche is very cohesive.


Brioche with sourdough discards
Ingredients
Dough
- 500 g bread flour
- 2 eggs large
- 140 g milk
- 160 g 100% hydration SD starter
- 4 g active dry yeast
- 100 g sugar
- 5 tsp orange blossom water
- 2 tbsp orange syrup optional
- zest of 2 lemons
- 10 g salt
- 1 ½ sticks unsalted softened butter
Egg wash
- 1 egg yolk
- 1 tbsp milk
Instructions
Day 1 – late afternoon
-
Add the eggs, milk, sugar, salt, dry yeast, orange blossom water, orange syrup, and the sourdough discards to your stand mixer bowl and give it a good whisk.
-
Sift the flour and add it to the wet ingredients. Combine until there are no dry flour particles.
-
Let the dough rest for 20-30 minutes to allow the flour particles to hydrate.
-
Start kneading the dough at low speed for about 10 minutes or until the dough gets a bit elastic
-
Add the butter in 3 or 4 times, making sure it's completely incorporated before you add more.
-
Knead the dough at medium speed until it's very elastic, shiny, the surface has blisters and it's not sticky. You shouldn't need to add more flour. It should pass the windowpane test
-
Cover the bowl and let the dough rise at room temperature until it doubles in size
-
Place the dough in the fridge for a cold fermentation for at least 15 h. You can leave the dough in the fridge for up to 2 days
Day 2
-
Remove the dough from the fridge and gently deflate it. Cover it and let it rest for 10 minutes
-
For the round pan: take 8 pieces of dough of 130 – 140 g (4 – 5 oz) shape them into balls, and place them into your round baking pan.
-
For the rectangular pan: divide the rest of the dough into 4 equal pieces. Flatten them and roll them into logs as wide as your baking pan.
-
Cover the two pans and let the dough rise unti it's almost at the border of the pans.
-
Preheat your oven at 350 F
-
Before baking, whisk the egg yolk and the milk together and brush the brioche with it.
-
Bake the brioche until it's golden brown or has an internal temperature of at least 96C
-
For best results, let the brioche cool down to room temperature before cutting through it.
Recipe Notes
- Let the dough rest for 5-10 minutes before performing the windowpane test.
- You can shape the brioche in any way you prefer. Just make sure that the dough fills half of the container you use.
Happy baking!

Please clarify the sourdough discard: the recipe uses the discard from a freshly fed starter and not from discard saved/kept in the refrigerator? I have plenty of discard from a sourdough starter (100%) fed every 10 days and kept in fridge (it triples when freshly fed and left on counter for baking/ levain prep). Thanks for the detailed explanation in this recipe. Most educational.
I wouldn’t use starter that’s too old mostly because this is for a brioche and you need a very elastic dough. And old starter has all the gluten strands broken, so that could affect the development of your brioche dough. As a rule of thumb, if the starter is too liquid, I wouldn’t use it 🙂
Hi, María. If I don’t want to use commercial yeast, could it be enough to use a fed and bubbly starter? I read in the comments that someone tried the recipe with double the amount of starter for this purpose, and just wanted to clarify if active instead of discard would be the key to avoiding active dry yeast.
Hi, María! This recipe is awesome!
So, I had to do some tweaks: I used a fed and bubbly starter only (no dry yeast), and I left the dough fermenting overnight on the counter. I didn’t have milk, so I used plain yogurt diluted in water. Instead of orange syrup, I added molasses (not blackstrap). And finally, I had no eggs left for the wash and still didn’t have milk, so I sprinkled water over the dough before placing it in the oven. I used a 10″ round spring pan instead of a 9″ incho one, and could only fit 7 pieces of 130 grams in it. The rest of the dough was not much for the loaf pan, but still I placed it in it like you said.
I followed timing and temperature, and the result was lovely!! The bread rose a lot!!!
I got all those beautiful strings when pulling apart the pieces!!!
Would definitely keep it in my recipe book, thank you so much for sharing!
The dough is so nice and fluffy one the glutten has developed! thank you for the recipe, i have too much discard and this is an aweseome recipe to make. May I know how long do you suggest to final proof in room temperature (27 deg C)
Thank you
Hi Olivia! I’m so glad to hear that! The time for proofing really depends on how the dough is doing. It doesn’t necessarily need to double in size again, but it does need to feel puffy and not “tight”. If you poke it carefully it should spring back slowly. That means it’s springy and soft. If it bounces back fast it means the dough is still a bit tight and therefore not ready to bake. On the contrary, if you poke the dough and the indentation stays, it’s probably over-proofed. Hope this helps!
Hi, i would like to know if it is possible to skip the cold fermentation step and proceed to shape the broiches when it has risen double after proofing for at least 8 hours? Or it needs more time for gluten to form? Trying to avoid refrigeration due to space shortage? Your kneading method seems to work well!
Hi there! Since this brioche uses sourdough discards to add some flavor, you can skip the cold fermentation (that’s usually meant to add flavor), I like to add at least 2h to cool down the dough before I shape it because I find it’s easier to shape when the dough is cold. You won’t need to ferment it for 8h though, it has yeast so at room temperature it’ll rise a bit faster than just sourdough. Once it doubles, you can just shape it and then bake it once it’s puffy and has grown in size a bit 🙂
I also wanted to ask how long does it take you to make yr SD from scratch so that you may eventually use the disregard in your brioche?
For a fully mature starter I’d say at least 2 weeks. But you don’t have to create a sourdough starter just to make the brioche. You can substitute the starter for half the weight in water and the other half flour and just use yeast. This recipe was an idea to use the discards but still have a yeasted brioche 🙂
In Step 8 we let the brioche dough rise and in Step 9 we put it in the refrigerator. You don’t mention punching it down before it goes in the refrigerator for the cold rise/flavour development so I assume that it goes in the refrigerator in the risen state…correct?
Since the dough didn’t rise too much by the time it went to the fridge I didn’t deflate it. However, if the temperature of your dough is a bit high, you might want to deflate it because it will continue rising in the fridge until it cools down. So to avoid an over-stretching of the dough, I’d deflate it. But if the temperature is ok (18-23C ish), and the gluten well developed, it’s really up to you. If you prefer to deflate it a bit, go ahead! It won’t change the flavor 🙂
have you ever made this without added commercial yeast- only with sourdough levain?
Hi Judi, no I haven’t. When I made this brioche I was trying to use up some of my discards. But as long as you control de fermentation you can definitely skip the yeast!
Hi there! This post couldn’t be written any better! Reading through this post reminds me of my previous room mate! He always kept chatting about this. I will forward this page to him. Pretty sure he will have a good read. Thank you for sharing!
Hi GuQin! Thank you so much for your kind words. I’m glad you enjoy the read! 🙂
Hi maria what do you mean by Hadration SD
It means the water content of your sourdough. A 100% hydration starter means it has equal amounts of flour and water
This recipe, and especially the explanation/instructions, are excellent!
Mine turned out delicious first try. I doubled the starter in place of the instant yeast, and it still worked really well. Many thanks!
If I want to make only the round pan how much ingredients do I need ? It seems that the amount of the round pan is more Than the loaf one .thanks
Hi! If you only want to use the round pan you can multiply all the ingredients by 0.75. That will give you the amount you need 🙂