
One thing that I remember dearly from my childhood is eating milk buns with a small chocolate bar. It was something so simple that brought so much happiness into my days. Those milk buns were very soft and fluffy and had the perfect structure so you could buy the ones filled with whipped cream and they wouldn’t be soggy. I think the simplicity of these milk buns is what makes them so special, they’re such a delicious treat!
What are milk buns?
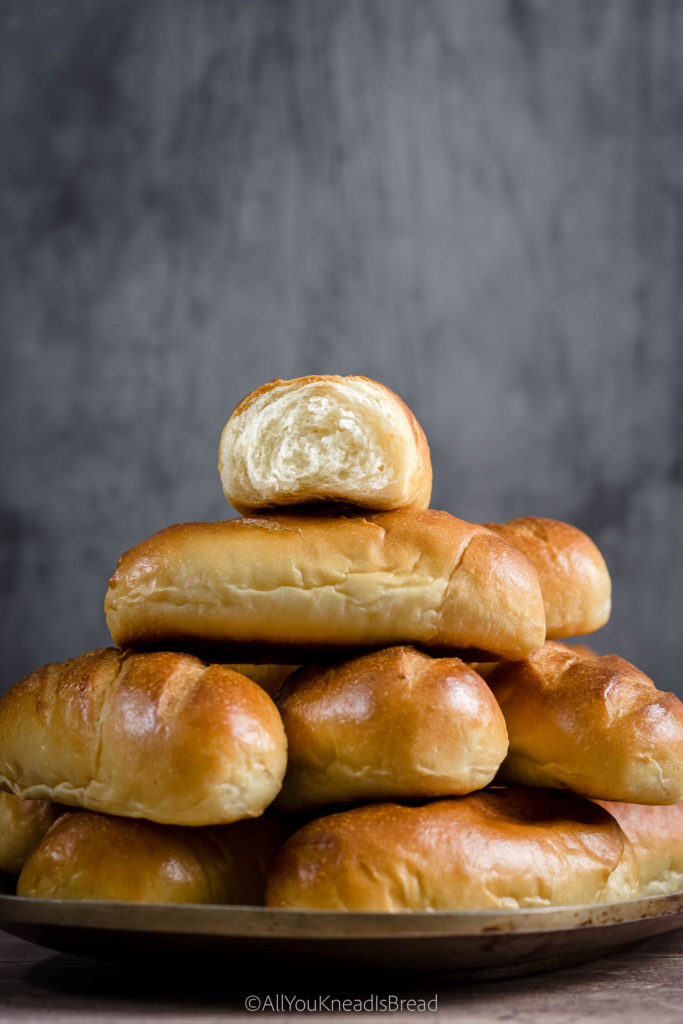
When you talk about milk buns these days, people usually think about a pull-apart style of buns. But today I bring a Spanish version of milk buns (Or at least the milk buns from my childhood). They have a slightly thicker (not crunchy) crust with a very spongy and slightly moist crumb. They’re usually shaped into an oblong shape and they don’t touch each other while they bake. Many times you could find milk buns filled with whipped cream or custard, those were some chubby buns!
About this milk buns recipe
Before we start, I want to emphasize how important gluten development is in this recipe. These milk buns should stay soft and fresh for several days, and proper gluten formation is crucial. I’ve tested this recipe many times and the yudane (I’ll talk about it later) definitely helps, but good ole’ elbow grease is what’s going to help you take these buns from good to amazing!
Activate the yeast in milk
I find that scalding the milk always helps when making bread. What I like to do is boil part of the milk (exact measurements in the recipe card), and let it cool down as I prepare the rest of the ingredients. Once the milk is warm and nice to the touch I add the yeast and let it rest a few minutes to activate.
Try acid whey for extra milkiness
I’ve been making my own yogurt for a few months and I found a perfect way to use the leftover acid whey: Bread making! Check this sandwich loaf recipe. I also found that whey gives the bread a more intense aroma than milk, so if you like your bread extra milky, and you have leftover whey, you can also use it for this recipe.
How to make the buns super soft
The key to ultra-soft milk buns is gluten development. By gluten development, I don’t mean *just* gluten formation. But developing a gluten network that is reinforced by fats and starch. Those are the key components to any soft bread. Different recipes will have a slightly different gluten network organization, but the idea is to have these three ingredients create a sturdy network (a good foundation starts with gluten) that is elastic and malleable (fats, they act as a lubricant among the gluten chains), and that makes a bread that is very spongy and fluffy (starch helps with setting the crumb and creating a more cohesive and less crumbly texture).
What is the yudane method?
One of the things that happen in breadmaking is the gelatinization of starch. The liquids in the recipe hydrate the starch in the flour. The hydrated starch granules swell and burst open when the temperature increases while the bread is baking. This is called gelatinization. The yudane method is based on the incorporation of pre-gelatinized starch into the bread recipe. Adding pre-gelatinized starch means two things: 1) more gelatinized starch will increase the fluffiness of the bread, and 2) pre-gelatinized starch will avoid “stealing” part of the moisture of the recipe for starch swelling, rather than gluten building. So we end up with a bread that is fluffier and has a stronger gluten network.
How does yudane look like
It is basically a 100% hydration dough. It looks sticky! Don’t worry, the main purpose of yudane is to gelatinize as much starch as possible. At this point, we don’t care about kneading the dough perfectly.
Later, when you put all the ingredients together, the yudane will incorporate into the dough and you wouldn’t tell it’s there
How to make the yudane
In order to keep the flavor of the milk buns, I like to prepare my yudane with milk. For these buns, I boiled the other part of the milk (careful with spills!) and prepare the yudane with it. You can do this the day before, but I prefer to use my yudane fresh to make sure there is no starch retrogradation. You can learn more about it in this post
If you use a stand mixer, you can put the flour for yudane in the bowl beforehand. Once the milk starts boiling turn the stand mixer on, add the milk, and knead the dough using the paddle attachment. If you prefer to do it by hand use a heavy bottom bowl that can stand the heat and allows you to stir somehow vigorously. Add the flour and when the milk is boiling aff it to the bowl and start stirring until you form a dough. Knead until you can touch the dough and don’t get burnt.
When the yudane is done, wrap it with plastic wrap and let it cool down to room temperature. In the meanwhile prepare the rest of the ingredients.
Fermenting these milk buns
You have two options here, 1 bulk fermentation and 1 proof, or 2 bulk fermentations and 1 proof. What I like to do with these buns is to ferment the dough until it almost doubles in size, then knead it for a minute to deflate it and let it ferment again until it doubles in size. Only then do I deflate it for a second time and divide it to shape the buns.
I find 2 bulk fermentations help develop more flavor. This is a yeasted dough, so any extra aroma is always welcome! And if you’re wondering if longer fermentation will make this dough sour the answer is no! It’s not sourdough, so don’t worry about that. It’ll just have a more bready and less yeasty flavor.
However, if you prefer to do one single bulk fermentation, let the dough ferment until it doubles or almost triples. Then proceed with the shaping and proofing.
How to shape these milk buns
After the dough is ready and has fermented. Divide it into 20-25 pieces of similar weight, shape them into a ball, and let them rest for 10 or 15 minutes. I like smaller and chubbier buns, but you can make larger buns. In that case, divide the dough into 10 or 12 pieces.
Then, with your hands or a rolling pin, flatten the balls, one at a time, into an oval of 15-20 cm long and 15-10 cm wide. This depends on how you like your buns. (shorter and chubbier, or thinner and longer. I like the chubbier version better!)
Then starting from the narrow side roll the dough into a little log, seal the edges and place it on the baking tray you will use. Leave enough separation amount the buns so they don’t touch each other while fermenting or baking.
If you’re making small buns you will need 2 or 3 trays to proof them or they might be too close to each other and will end up touching each other in the oven.
Score the buns!

One of the times I was testing this recipe I asked my Instagram community which scoring pattern they liked better, and the majority responded that they liked better 3 cuts across the buns. I had tried no cuts and also one cut lengthwise. I like 3 cuts better, as well. But, of course, you can choose whatever pattern.
How to bake the milk buns
If you choose to make small buns, be careful because they will be done fast and they can go from almost brown to dark brown in a matter of minutes. I don’t use steam while I bake these milk buns but that’s also an option to consider if you have an oven with a fan. The fan always dries out the crust much faster.
If you decide to make larger buns, then adding some steam can be a good idea, to allow the buns to rise a bit more in the oven.
The power of a good egg wash
Egg wash is not only the last touch for some shiny buns, it also develops a crust that seals part of the moisture inside to the buns can last fresh for a bit longer.
Questions you might have
How long do milk buns last?
I made 25 small buns and, at room temperature, they lasted fluffy and nice for 3-4 days. On days 5 and 6 the buns were a bit dryer but still edible. Nothing some butter or mayo couldn’t fix!
Can you freeze milk buns?
Yes! I reserved some of the buns for freezing. The best way for me was a ziplock bag, but you could wrap them in plastic wrap individually as well. Then I cut them lengthwise before freezing and when I wanted to eat one I just popped it in the toaster. You could also let them thaw at room temperature or steam them. Although this last technique can be tricky if there’s water condensing and dripping on top of the buns.
How do you eat milk buns?
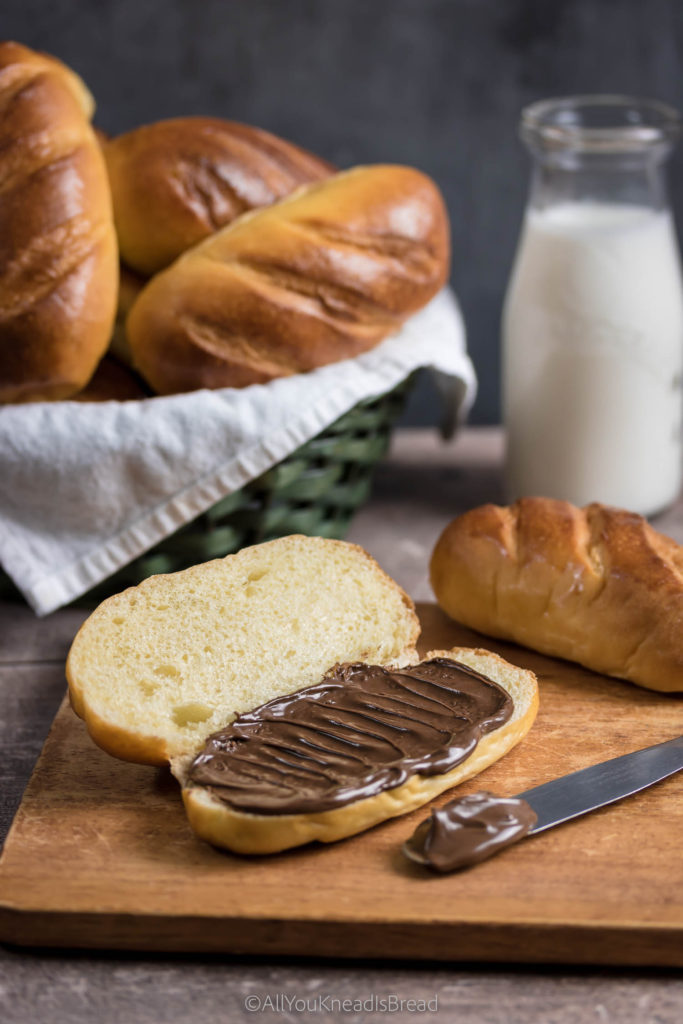
As mentioned before, these milk buns are probably a bit different than other styles of buns. They are perfect for sliders, hotdogs… whatever savory filling you prefer. But my favorite is with a chocolate bar. This combination just takes me back to my childhood and I see myself in that small pastry shop, unwrapping the chocolate bar and putting it inside the bun. As an adult, I found that Nutella can also be an amazing filling!
Are milk buns sweet?
Yes! These buns are sweet, not crazy sweet but you can taste the sweetness. That, along with the milky flavor, is what makes these buns so versatile! They go well with sweet or savory fillings. And if you’re like me and dunk everything in your morning coffee… you can do that too!

Are these milk buns the same as brioche?
Not quite! While brioche is mostly eggs and butter, these buns have more milk, not as much butter, and not that much egg. They are also sweeter than brioche.
Other uses for this milk dough
This dough is amazing to work with! Unless I don’t have a lot of time I like to knead it by hand because it’s truly nice to work with! And it’s also very versatile. If you don’t want long buns you can you can make buns for burgers, or cinnamon rolls, or a babka… You can also shape it into thinner and longer buns for hot dogs. You can even use it to make a tin loaf. This recipe is a keeper!
If you liked this recipe you might also like these
Super fluffy nuts and cardamom babka
Orange and cinnamon sourdough rolls
Sourdough donuts with rose cream
If you make any of my recipes let me know what you think! As always you can find me on Instagram, Pinterest, and Facebook. And I also have a few videos up on my Youtube channel (which I hope I can resume soon!)
Starting on breadmaking but don’t know where to start? Check my amazon store to see my favorite and affordable utensils you will need. You can make the best bread with simple and affordable tools! (This is an affiliate link if you purchase something from this link I will make a small commission that helps me run this blog, but you will not be charged any extra money 😉 )

Super soft milk buns
Ingredients
Yudane
- 150 g bread flour
- 150 g boiling milk
Main dough
- 300 g yudane
- 600 g bread flour 12.7% protein
- 300-335 g Whole milk (scalded, lukewarm) (start with the lesser amount and add more if your flour requires it)
- 75 g heavy whipping cream
- 3 egg yolks
- 7 g active dry yeast
- 90 g sugar
- 12 g salt
- 75 g softened butter
Instructions
Yudane
-
Add 150g of bread flour to your bowl.
-
Heat a bit over 150g of whole milk and when it comes to a boil weigh 150g and quickly add it to the flour.
-
With a wooden spoon or with a stand mixer mix the flour and milk until it forms a sticky dough. Wrap it in plastic and keep it at room temperature until you're ready to start the dough.
Main dough
-
Mix the lukewarm milk, the whipping cream, the yeast, and the egg yolks, and let the mixture sit for 10 minutes.
-
Add the sugar to the egg mixture and give it a whisk.
-
In the bowl where you have your yudane add the egg mixture and break up the yudane a little bit.
-
Add flour and salt to the bowl where you have the yudane and pour the wet ingredients. Mix everything until you don't have dry flour particles. Cover and let it sit for 20 minutes.
-
After 20 minutes start kneading, if the dough feels too stiff and you didn't add all the milk, add a bit more. Once the dough starts coming together add the softened butter and continue kneading to incorporate it.
-
Knead until the dough becomes smooth and elastic. It shouldn't stick to your fingers and it should feel nice to the touch.
-
Place the dough in a lightly oiled container, cover it and let it ferment at room temperature for 2h or until it almost doubles in size
-
Deflate de dough gently and let it ferment again for 1 hour or until it almost doubles the size
-
After 1h or when the dough is ready deflate it gently and let it rest, covered, for 10 minutes.
-
Divide the dough into as many buns as you'd like, shape the pieces into small balls and let them rest covered for 10 minutes. This recipe can make 25 small buns, 12 medium buns, or 6 large buns.
-
Take one dough ball and flatten it with your hands or a rolling pin into an oval of half centimeter thick (1/4 in). For small-size buns, the oval will be 15x7cm. Starting from the short side roll the dough into a log and seal the edges.
-
Put the buns on baking trays separate enough they won't touch each other while they bake, cover them loosely with plastic wrap and let them ferment until they get puffy and have grown in size.
-
Before the buns finish proofing preheat your oven at 360F/180C (lower to 340F if you're making larger buns).
-
When the buns are ready, brush them with a mix of milk and the leftover egg white, make three cuts across the surface of each bun and bake them at 360F/180C for 25-35 minutes or until they have a nice golden brown color.
-
Let the buns cool down to room temperature. You can keep them in a seal-tight container or ziplock bag at room temperature. You can also freeze them and defrost them in the toaster.
How to make sourdough Roscón de Reyes – Traditional Spanish Bread
Happy and healthy New Year! I want to start 2021 with one of my favorite Spanish types of bread: The Roscón de Reyes. It’s a brioche-style, citrusy, sweet bread that’s usually consumed on January 6th; the Epiphany day, and the official last day of Christmas in Spain (and many other countries).
January 6th is known as “Día de Reyes”, the Three Kings day; it refers to the 3 Wise Men who visited Jesus when he was born, bringing gold, incense, and myrrh as gifts.
What is the tradition during Día de Reyes?
When the Christmas season starts, kids in Spain write a letter to Their Majesties the Three Wise Men. In their letters, they ask for the presents they’d like to receive.
Now… If they behaved well during the year, they will get the gifts on their list. But if they didn’t… They’ll receive a bag of coal!! And depending on how mischievous they were, the bag might have candy coal or real coal!
On January 5th almost every town has a parade with the Reyes Magos and their pages. During the parade, the kids get to see the Reyes Magos and collect lots of candy the pages throw away. There’s music, laughter, and a final speech from Their Majesties encouraging the kids to go to bed early, so they can sneak into their homes and leave the gifts.
Then, that night, Melchor, Gaspar, and Baltasar, (Those are the names of the 3 wise men) or “Los Reyes Magos” as we call them in Spanish (The literal translation from Spanish is “the Magic Kings”), will go home from to home, riding their camels and leaving gifts for the family.
In our tradition, instead of using stockings, we leave shoes in the living room or close to the tree. One shoe per person. And you best believe that my sister and I always chose very carefully which shoes we were leaving!
Of course, as hosts, we need to leave some treats for our royal guests and their camels! In my family, we always left 3 glasses with sherry wine and a tray with turrón and polvorones (traditional Spanish Christmas treats). Then, we’d leave a big bucket with water and some carrots on the balcony for the camels.
The next morning we’d wake up early because… who can sleep when you know who’s visiting in the wee hours!?, and run to check our shoes and all the presents underneath.
The tradition behind the Roscón de Reyes
On January 6th it’s tradition to have one last feast with your family, as it is the last official day of the holidays. A big lunch to say goodbye to Christmas and a good Roscón as dessert.
Typically, people buy the Roscón de Reyes, and it comes with 3 things: a fava bean and a figurine hidden in the bread, and a golden paper crown. Let me explain…
I’m sure different places will have different customs, but where I grew up this is how we did it:
The person that gets the hidden fava bean will pay for next year’s Roscón, and the person who gets the figurine will be crowned king or queen of the table with the paper crown.
There are different types of Roscón, you can buy it plain, or with fillings (whipped cream or pastry cream being the most popular). My family used to buy the whipped cream one, but a homemade Roscón… I believe fillings just distract you from the fantastic flavors that this bread packs!
What are the ingredients of a rosca de reyes?
The flour
The flour I use for this Roscón is brioche flour with 14% of protein. If you live in the US this is the flour I use and I like the results. It absorbs fats and liquids very well and the dough is very elastic.
If you have flour with less protein content, you will need less liquid in your recipe. The texture of the dough should be soft but not super slack. It’s not quite as slack as brioche dough but not as stiff as my sourdough challah dough.
As a rule of thumb for me, for every 1% less protein in my flour, I decrease liquid and butter by 10% (less protein, less liquid, and fats). Then I adapt as needed.
The milk and other dairy-free options
The source of moisture in this recipe is milk. I like to scald it before I add it to the dough. It helps temper the other ingredients if they are cold when I prepare the dough (add it warm, not hot). It also makes developing the gluten a bit easier; some proteins are denatured and possible interactions with the gluten proteins are also reduced.
You don’t have to scald the milk, but if you do, measure more than what the recipe calls for because some moisture will evaporate.
You can use soy milk or other vegetable beverage, but I’d go for liquids with a viscosity similar to whole milk, not something watery as rice milk. I wouldn’t use oat milk, oat beta-glucan can affect the dough and be a tremendous impediment when building the gluten.
The sourdough
If you’re making the sourdough version, you might want to prepare a levain with the brioche flour if that’s not the flour you typically feed your starter (just take a portion of your starter and prepare a new one using the flour you will use for this bread). This will help the growth and adaptation period of the microorganisms once you make the dough. If you want to know more about sourdough science check this post!
The aromatics
Although flour is important for obvious reasons, the key ingredients in a good Roscón de Reyes are the aromatics. The key aromatics are orange zest, lemon zest, and orange blossom water (This is the one I use and I love it!). The smell doesn’t disappear after baking, it’s awesome).
The aroma must be balanced between citrusy flavors and sweet flavors. Make sure your orange blossom water is not expired or the dough won’t keep the aroma at all.
You can also add some dark rum or Cointreau for an extra kick and if you candy your own orange, the syrup is an excellent aromatic too! (and if it has some pulp even better!). If you use any booze, don’t use more than 1-1.5 tbsp. Alcohol can affect the texture of the bread and if using sourdough, it can affect the growth of the microorganisms.
Vanilla extract is optional, I decided to leave it out because I think the orange blossom water and orange syrup are enough. I love orange blossom and I don’t think it needs to be mixed with anything else.
How to make Roscón de Reyes
The pictures on this post are of a sourdough Roscón but I have also included a yeasted version. I explain the differences between both methods in the following paragraphs.

Sourdough Roscón de Reyes
Since I’m using brioche flour, the day before I started the dough I prepared the levain using my regular sourdough starter, water, and the brioche flour. I needed 135g so I calculated the quantities to end up with about 150g, just in case I lost something on the walls of the container etc.
With winter temperature in my kitchen being around 20C/68F, I can feed my starter 1:2:2, and the growth cycle is about 18-20h. So, I prepared the levain in the evening before going to bed. The levain was ready early next evening. You know your starter better, you can decide which feeding schedule suits you better.
When my starter was ready I prepared the dough and it fermented overnight. The next morning I divided the dough into 2 equal pieces, shaped it, and let it proof for about 3h-4h (at 68F/20C)
I prepared the levain in a way that I could leave the dough fermenting overnight. That way it could proof during the morning and we had a fresh Roscón de Reyes for dessert.
Yeasted Roscón de Reyes
For the yeast version, you need to adapt the recipe. First, you need to avoid the starter and then update the flour and milk quantities.
Since I use a 100% hydration starter, half of the weight is water, and half of the weight is flour. This recipe calls for 135g of starter, which means 67.5g are water, and 67.5 flour.
To update the recipe you just need to add 67.5g of flour to the total flour and 67.5g of milk or water to the total milk.
How to twitch the recipe to use yeast
How much yeast should I use? That’s a question that I get asked pretty often. I would recommend no more than 1% of the weight of the flour, which is about 6 g for the full recipe. You can even use less yeast, it’ll just take a bit longer to ferment.
You can always add more yeast but to the detriment of the flavor and dough structure. The faster the bread ferments, the faster it’ll dry out once baked, and the easier it’ll be for the dough to over ferment, loose structure, and end up with a dense pancake.
A way to improve the flavor profile of a yeasted bread is to slow down the fermentation. You can do that by reducing the amount of yeast, or by adding a cold bulk step (or both if the yeast amount is low but not too low).
A good schedule for a yeasted Roscón is to start in the afternoon. Let it ferment until it almost doubles in size, then put it in the fridge overnight. The next morning take it out of the fridge and let it come to room temperature for about 1h, or to a dough consistency that’s comfortable to work with. Then proceed as with the sourdough version. Keep in mind that it will prove faster, and instead of 3-4 h, it might take 1-2 (depending on the internal temperature).
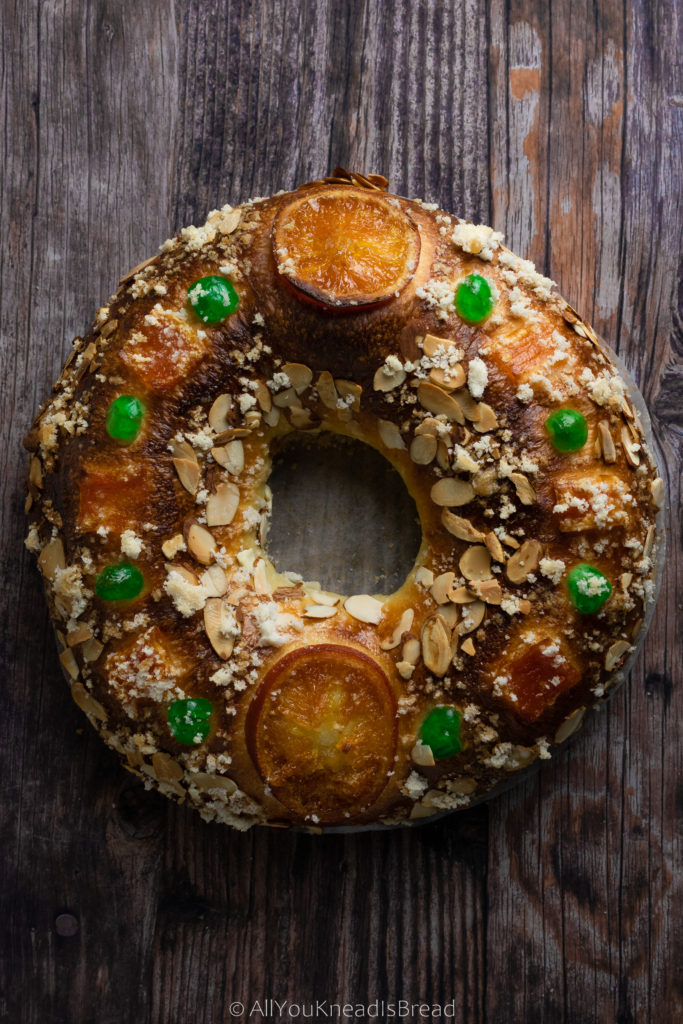
How to shape your Roscón de Reyes
Some people shape it in an oval, some people make a circle with individual bun-like portions… But if you want to shape it like a big donut (either circular or oval shape), you need to shape the dough into a ball. Add a bit of tension to the surface. Then let the dough rest for about 15 minutes (covered) on an oiled surface to avoid it from sticking.
Oil your hands and with your index finger make a hole in the center and move it around to enlarge the hole enough so you can lift the dough and with your other index finger you roll the dough around making the hole larger and larger.
You basically move the dough aroung and gravity does the stretching!
Be careful, don’t push the dough. If it’s not stretching anymore, put it back on the counter, cover it, and let it rest for 10-15 minutes to allow the gluten to relax. Then continue with the same circular motions until you have a hole of at least 15cm/6in.
It might look like the hole is too large, but as the dough proofs and then bakes it’ll puff up and the hole will decrease in size. Once you’re happy put the Roscón on parchment paper and arrange it well because you won’t be able to re-shape it later on. Put it on the tray you’ll use to bake, cover it with film and let it proof!
How to decorate your Roscón de reyes
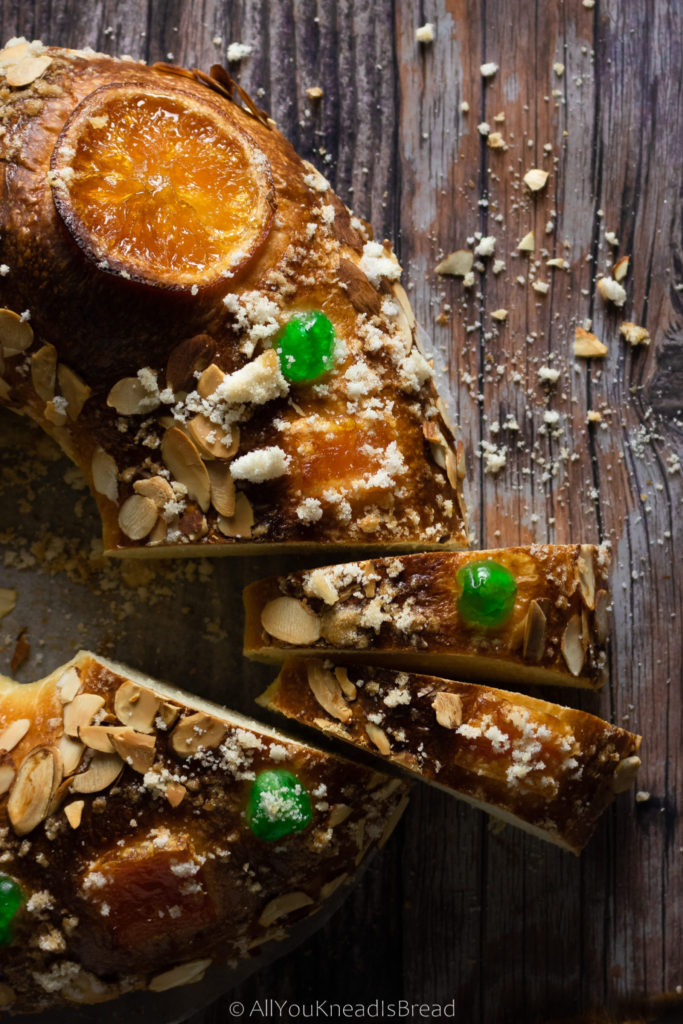
Although the options here are endless, traditionally, the ingredients you’ll always find in a Roscón are: Candied pumpkin, candied orange, candied cherries, pearled or aromatic sugar, sliced almonds, or other nuts.

Candied pumpkin is typically dyed with red and green colors. I made my own candied butternut squash because I didn’t find the white pumpkin I wanted, so I left the orange color as it was. I also made my own candied orange slices. Since everything was a bit too orange, I bought green candied cherries to give it that je ne sais quoi.
When it comes to Roscón de Reyes, I prefer aromatic sugar rather than pearled sugar, for that, I mixed ¼ cup of white sugar with 1 tsp of orange blossom water and mixed well. The sugar should feel like moist sand but it shouldn’t dissolve. Once it’s well mixed you just sprinkle it on top of the Roscón.
How to bake a Roscón de reyes
Preheat the oven to 350F. As the oven preheats brush your Roscón with either egg wash or with the leftover whites. Brush it twice so it’ll get that nice brown color, and start decorating it. If your candied fruits are too dry consider soaking them in boiling water for a couple of minutes.
Start decorating it with the candied fruits, then the nuts (if using), and top it with the sugar.
Bake it for about 30-40 minutes; this really depends on your oven, mine is acting crazy these days so in your oven it might be ready earlier.
If you think it’s getting dark too fast you can cover it with a piece of foil with a hole inside. You can also measure the internal temperature. If it reads 94C/201F then it’s ready!
Once your Roscón is ready take it out of the oven and let it cool down to room temperature.
Your Roscón de Reyes will be best the day is baked but if you keep it in an airtight container or bag, it can stay fresh for about a week (the sourdough version) or a couple of days if you made it with yeast.
Regardless of what you use, SD or yeast, knead the dough very well. The better the dough, the more moisture it can retain, and the longer it’ll take to dry out. However, this is particularly important if you use commercial yeast since yeasted bread tends to dry out quicker.
How to add the filling
If you want to add a filling, you need to cut the Roscón crosswise making two layers. Basically, you’re making a sweet sandwich! Make sure the Roscón has completely cooled down to room temperature. You can even put it in the fridge for 15 mins or so before you slice it. This way you’ll get a clean cut and the fillings won’t melt.
The fillings should be thick enough to sustain the weight of the top layer without leaking everywhere.
Let me know if you make the Roscón de Reyes or any other recipe! If you do, use #allyoukneadisbread on Instagram, I’d love to see what you bake and what you experiment with!
You can find me on Instagram, Facebook, and Pinterest, and you can also subscribe to my Youtube channel.
Feliz Día de Reyes!
This post contains affiliate links and any sales made through such links will reward me a small commission – at no extra cost for you – that allows me to keep running this blog.

Spanish Roscón de Reyes
Roscón de Reyes is a brioche-style, citrusy, sweet bread that’s usually consumed on January 6th, the day known as “Día de Reyes”
Ingredients
- 600 g brioche flour (add up to 50 g more if necessary)
- 200 g milk see notes *
- 135 g mature sourdough starter/levain
- 135 g caster sugar
- 135 g softened butter see notes for dairy free options *
- 3 M eggs
- 2 M yolks
- 12 g salt
- 2.5 tbsp orange blossom water
- zest of 1 orange
- zest of one lemon
- assorted candied fruits
- 4 tbsp sliced almonds
- 50 g aromatic sugar or pearled sugar see notes*
Instructions
-
In the bowl of your stand mixer combine the milk, eggs, yolk, sourdough starter, and the aromatics and mix thoroughly. If you scald the milk wait for it to cool down to at least 36C/97F
-
Add the flour and the salt and mix until you don't see dry flour particles. Cover the bowl and let it rest 20-30 minutes
-
Knead the dough at low speed (speed 2 in a KitchenAid stand mixer) until it has a nice consistency and starts getting elastic
-
Incorporate the butter and knead until you develop the gluten completely (windowpane test). If necessary, allow the dough rest a couple of times for a few minutes.
-
Once the dough is ready transfer into a lightly oiled container and let it ferment overnight (about 10-12h at 68F). It should double or almost double in volume and you should see fermentation bubbles on the bottom of the container.
-
Divide the dough into two equal pieces for two medium roscones or 3 equal pieces for 3 small ones.
-
Shape each piece into a ball and let it rest 10 minutes
-
With an oiled finger poke a hole in the middle of one of the pieces of dough and slowly open the hole until you can grab the dough and swirl it around with your hands to open the hole of at least 15cm/6in and get the same thickness all around (check the article for a full explanation)
-
Place the roscones on parchment paper and on the tray you'll use for baking. Cover them with plastic wrap and let them proof for 3-4h or until they have grown and the dough feels puffy
-
Preheat your oven to 350F/175C and while it's preheating brush the dough twice with egg wash or with the egg whites leftovers and decorate it with candied fruit, nuts, and sugar (check the text for a full explanation on the order of the toppings)
-
Bake for 30-40 minutes or until the roscones have a slight dark golden brown and the internal temperature reads 94C/200F
-
Let cool down to room temperature before slicing (check the article if you want to fill the roscón, check the article to know how)
Recipe Notes
* Scalding the milk is optional, on the post I explain why I do it
* For dairy-free options you can substitute the milk with soy milk and use vegan butter instead of butter.
* To make the aromatic sugar mix 1 tsp of orange blossom with 1/4 cup (50g) of sugar and mix until it has a moist sand consistency
Tomato and rosemary sourdough bread
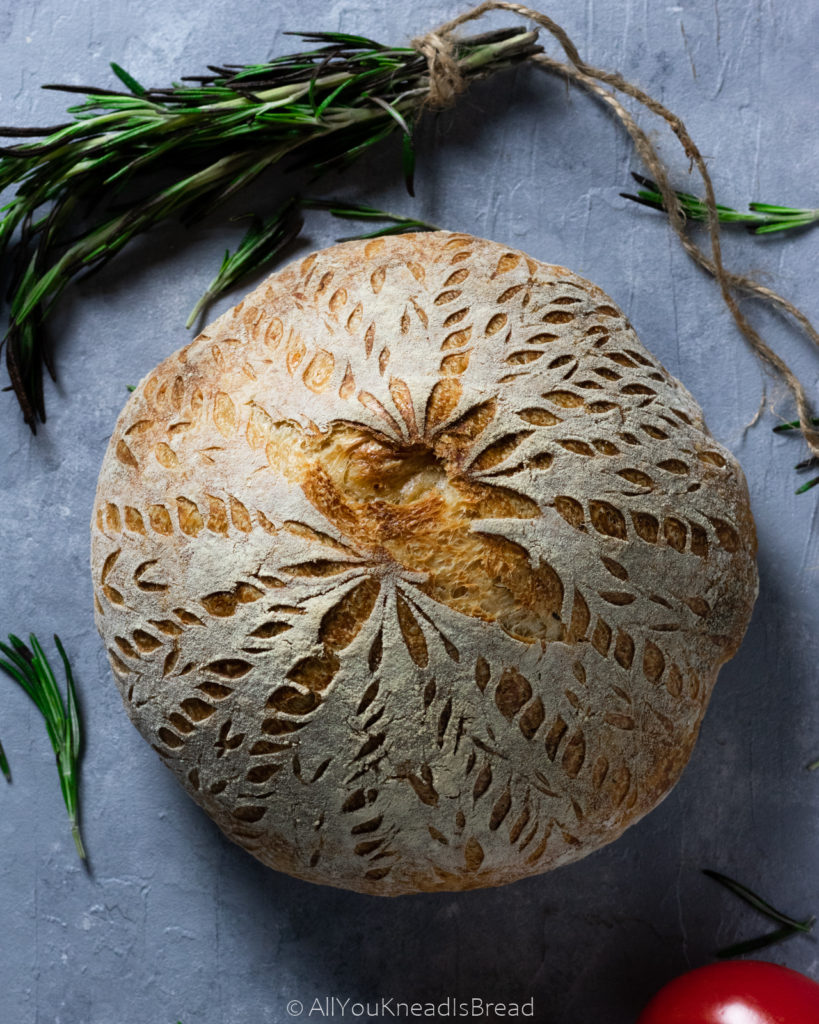
One of the most typical summer lazy dinners I used to grow with was “Pa amb tomàquet” (or commonly referred to as “pan tumaca”). It translates to “bread and tomato”. It is basically a toast with rubbed tomato and olive oil, I wanted to introduce my husband to this dish and that’s when I had an idea… What if… What if I add the tomato to the dough? And what if I add some other herbs? So I did… And that’s how this tomato and rosemary sourdough bread was born!
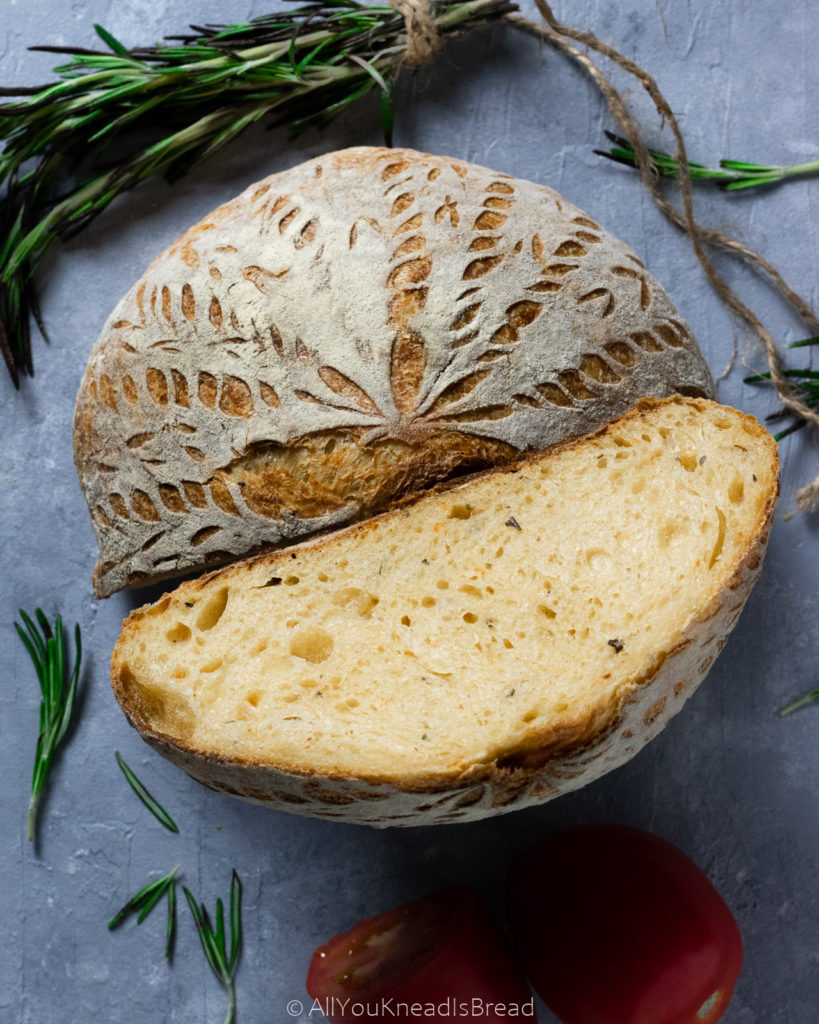
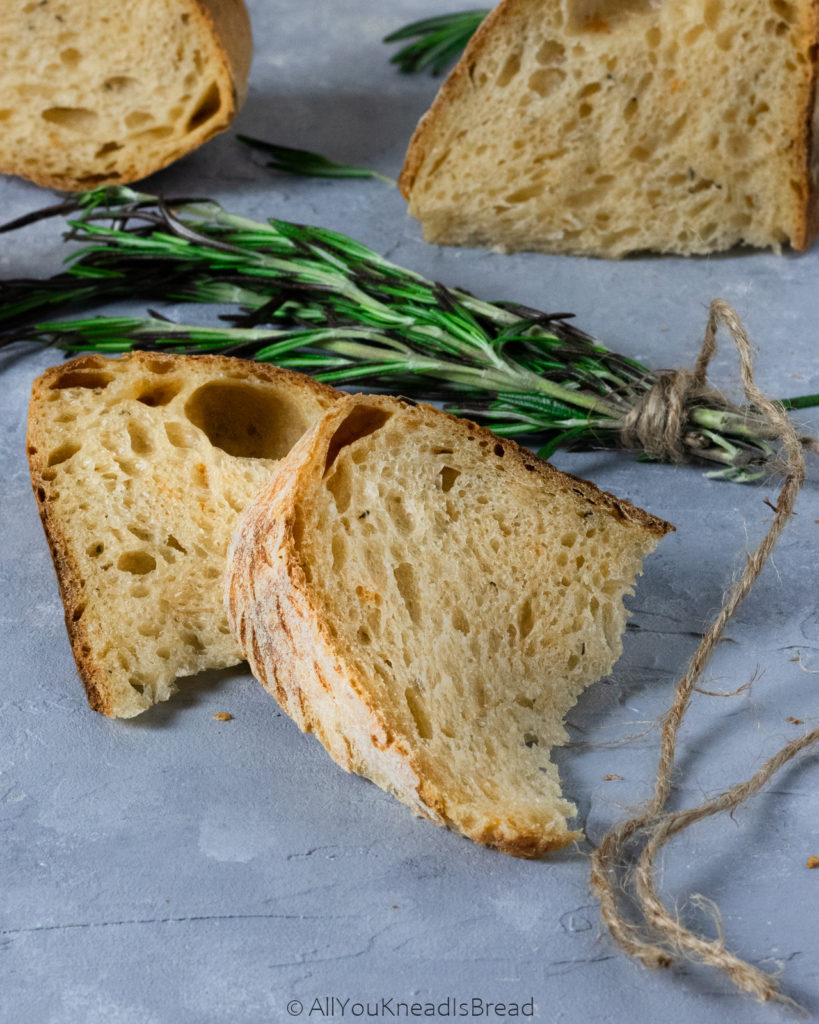
The result was amazing! This tomato and rosemary sourdough bread was so flavorful! The ingredients balanced each other perfectly and the loaf turned out super soft. The crumb was very soft and delicate.
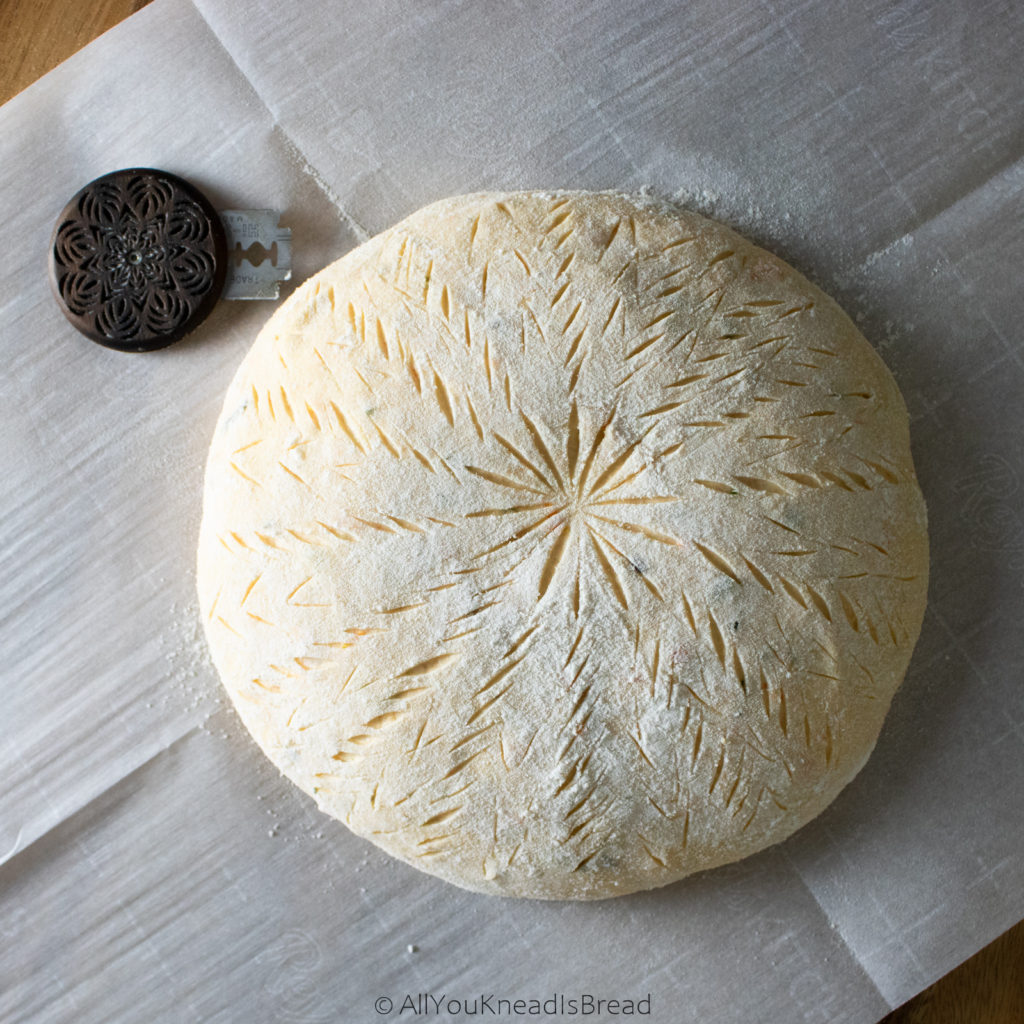
Since the hydration is not too high, the dough is lovely to work with. If you’re feeling adventurous, it can be a great bread to practice your scoring!
Here’s the video of how I scored this loaf:

I used my wiremonkey bread lame that you can purchase here.
I love this lame, it’s ergonomic, efficient, easy to work with and allows you a range of movement that you don’t have with other lames. And best of all? It’s a family business that throughout the pandemic has been helping bakers in need. Not to mention that Tyler is also environmentally conscious and doesn’t use plastic on his lames.
If you’re into bread art or are looking for a nice bread lame, consider buying a wiremonkey ufo lame. They’re simply amazing!
The ingredients
For this recipe, I used Roma tomatoes because they are less watery, so if you’re using other types of tomatoes, I’d suggest you either reduce the amount of water on the recipe or drain the tomatoes a little.
I decided to make a paste first with all the ingredients so I blended the tomatoes, olive oil, salt, and rosemary leaves together. But if you prefer, you can leave the leaves out and add them whole.
Tomatoes and health
Did you know tomatoes are rich in lycopene? A red carotenoid that it’s known for its anti-cancer properties and powerful antioxidants. Tomatoes are also rich in potassium and magnesium. In other words, tomatoes rock!
Not only they’re healthy, but some studies have found that adding tomatoes to bread increased dough elasticity. That, along with the olive oil makes the dough LOVELY to work with, and it’s one of the reasons the crumb is so nice and velvety. Ahh Science! 🙂
How to make this tomato and rosemary sourdough bread
If you follow me on Instagram you might know by now that I’m leaning towards kneading my loaves rather than doing just stretch and folds. I don’t laminate my dough unless I’m going to add things to it (olives, nuts, cheese…). I don’t do long autolysis either, especially during summer because the higher temperatures really have an impact on dough strength.
What I do is mixing all the ingredients, I give them a 20-60 minutes rest (it depends on how busy I am or what I’m doing at the moment) and then I knead using the slap and fold method. I knead the dough for a few minutes and then let it rest for a little while. Resting periods are very important as you allow the gluten strands to realign and the dough gets stronger; you can read more about it here.
Kneading is just a way to 1) strengthen the gluten and 2) incorporate air in the dough. So, you can use whatever method you’re comfortable with. Manually or using a stand mixer, as long as you develop the gluten well.
Bulk fermentation
Once you’re sure the gluten is well developed, you can add a coil fold if you want. Then let the dough ferment for a few hours. The temperature in my kitchen ranges from 74-77F these days, so usually I don’t leave any dough out for longer than 6h (start to shaping). That’s why I also prefer kneading vs. not kneading. It allows me to develop the gluten faster and have a nice bulk fermentation in just a few hours.
I don’t wait until the dough doubles in size, I tend to cut the bulk fermentation short. With summer temperature and humidity under fermenting the dough a little helps maintain the gluten structure strong throughout the entire process.
The length of the bulk fermentation depends on how much starter you used, the temperature of your kitchen, the condition of your starter etc. If you want to know more about sourdough growth and sourdough starters click here. You can learn the science of sourdough and how that applies to your sourdough bread.
If you’re a bit new to sourdough and are not sure about what to do, you can check other things to make sure the fermentation is going well. For example, after a few hours of bulk fermenting: does the dough feel puffier? Can you see small bubbles forming in the bottom? Did the dough grow a little or can you even see some larger air pockets on the surface? Does it smell just like flour or can you identify some slightly alcoholic/vinegary smell (similar to the smell of your starter)?

Shaping and cold proofing
Alright, so once you consider that the bulk fermentation is done, you just need to shape the bread and put it in a banneton (proofing basket). If you don’t have one, you can use a bowl and a cotton cloth.
I shaped this loaf into a bule, but you can use whichever shaping method you’re comfortable with. Be gentle, don’t push to much or you could tear the outer layer and the loaf will lose structure. If that happens, you might end up with a pancake after baking!
I have this round banneton, and I really like it. 9 in is enough for a medium-size loaf. I also have this oval banneton, I am very happy with both of them.
The overnight cold-proof was a total of 12h. A cold-proof is not mandatory, but it does come handy when it’s time to score the loaf. Colder loaves are firmer, and the blades cut through the dough much better.
Baking
Ideally, the first 15-20 minutes of baking should be with steam. In a house oven, keeping the steam inside is almost impossible, so I prefer to use a dutch oven that I preheat along with the oven at 450F.
I actually have a double dutch oven, I find that it’s much easier to load the dough without burning yourself if you can set the dutch oven upside down 😉
When I put the loaf in the dutch oven I also add the rosemary stalks. I’m telling you… the stalks end up roasted but the loaf is baked in those aromas and the crust ends up with a nice rosemary kick!.
After baking, try to wait for the bread to cool down to room temperature. It helps to set the crumb and all the aromas. Thanks to the tomato and the oil, the bread will be very soft, and it’ll keep fresh at least a couple of days.
Let me know if you make this loaf! I love to see what you bake and what you experiment with. You can use #allyoukneadisbread on Instagram.
You can find me on Instagram, Facebook, and Pinterest, and you can also subscribe to my Youtube channel.
Happy baking!!
This post contains affiliate links and any sales made through such links will reward me a small commission – at no extra cost for you – that allows me to keep running this blog.

Tomato and rosemary sourdough bread
An amazing bread, full of flavor and ideal for summer dinners!
Ingredients
- 300 g bread flour
- 150 g water
- 45 g sourdough starter at its peak of activity
- 75 g roma tomatoes
- 20 g extra virgin olive oil
- 6 g salt
- 2 stalks rosemary
Instructions
-
Blend the tomatoes, olive oil, salt, and the rosemary leaves together until you have a paste (you don't have to blend the rosemary leaves, you can add them whole or chopped to the dough)
-
In a bowl add the flour, make a well in the middle and add the water, the starter, and the tomato paste and combine until there aren't dry flour particles. Let the dough rest 20 minutes (covered)
-
Knead the dough until it's elastic and smooth. You can do it manually or with a stand mixer. I'd recommend you let the dough rest 10-20 mins every 5-10 minutes of kneading
-
When the dough feels smooth and elastic, lightly oil a bowl and place the dough inside to ferment. You can add a coil fold after 30-45mins if you want. At 74-77F (23-25C), my dough was ready after 5h.
-
Turn the dough onto a floured surface and carefully bring the edges toward the center to shape the dough into a ball, flip it upside down cleaning the flour underneath and with your hands, bring the dough ball toward you to create some tension on the outer layer
-
Flour a cotton cloth, place it in a proofing basket and put the dough inside. Cover it with the cloth and put the basket in the fridge overnight.
-
The next day, preheat your oven at 450F (230C) with a pizza stone or a dutch oven if you have , for at least 30-40 minutes
-
When the oven is ready, take your dough out of the fridge, flip it onto a parchment paper, put it in the dutch oven or the pizza stone and score the loaf (make some cuts on the surface). *SEE NOTES
-
Put the loaf in the oven and turn the temperature down to 425F / 220 C. Bake the loaf with a lid on (if you're using a dutch oven) or with steam (if you're using a pizza stone or just a baking tray) for 15-20 minutes. Remove the lid and bake the loaf for another 20-30 minutes or until it's golden brown
-
Take the dough out of the oven and let it cool down in a rack for at least 1h
Recipe Notes
* I like to put the dough on a thin metallic tray lined with parchment paper and then just slip it into the lid of my double dutch oven.