
Something good about this quarantine? It gave me the time I needed to create more recipes and do experiments with all my starters. I’ve had sourdough challah in my “to-bake” list for the longest time. And I finally have a recipe I’m 100% satisfied with.
I used all-purpose flour with a protein content of 11.7% for this delicious challah recipe. Don’t worry if you can’t find bread flour, I know it’s difficult to find these days.
UPDATE 10/18/2020: Based on the feedback I received, I decided to update this post to talk about the oil and how to easily incorporate it.
About the recipe
This dough is not on the sticky side, however, you need to make sure you develop the gluten very well. If you do so, you will have a delicate and cohesive sourdough challah that will stay fresh for several days. You can check this post for some guidance on how to knead enriched dough based on real bread science.
I can’t stress this enough: make sure you knead the dough well. Do it little by little. Allow the gluten enough rest if you think the dough is not really coming together after a while. If you’re using a stand mixer, the dough shouldn’t stick to the bottom. And if you’re using your hands, the dough shouldn’t stick to the heel of your hands or the counter.
Developing the gluten well takes a bit of time, but the reward will be amazing. You’ll end up with a dough that’s easier to handle (it won’t stick everywhere), a plump braid, and a bread that won’t dry out and harden right after it cools down.
The ingredients
Since this recipe doesn’t have a lot of moisture, I prefer to add all ingredients at once except the oil. I find it’s the best way to ensure salt and sugar dissolve well, and that all ingredients are properly distributed. You want to have a homogeneous dough.
Once you start kneading and the dough acquires certain consistency, add the oil and incorporate it well. This step might be easier to do by hand than with a stand mixer. You can add the oil little by little or all at once, whatever is more comfortable for you.
In the ingredient list, you’ll find a range in the amounts of oil and water. You can decide which type of dough you prefer. A slightly softer dough that leads to a slightly softer bread, or a slightly stiffer dough that’s easier to shape. The range is not large, but those extra 10 or 20g do make a difference, especially using AP flour.
My flour has 11.7% of protein, if yours has more/less, you will need to adjust the amount of water accordingly
What If I can’t eat eggs?
If you can’t eat eggs you can substitute them with pumpkin puree. It’ll give the dough an orangey color, but it’ll make the dough spongey too. Just be careful with the liquid because pumpkin puree does have some extra moisture.
How to incorporate the oil
If you have read some of my posts you know I’m very particular about developing the gluten network. Adding butter when the dough is half-developed is a bit of work but nothing impossible. However, adding oil can be a lot trickier. So here are my tips:
1) Add the oil little by little. If you add it all at once the outer layer of the dough will be covered in oil and won’t let it penetrate.
2) Squeeze the dough as you knead so you can break that outer layer and the oil can penetrate.
3) If you still have problems, cut the dough into smaller pieces to increase the surface area of dough that hasn’t been coated in oil yet (the inside part) and keep squeezing
4) If you work on your counter, squeeze the dough as if you were wringing out a cloth.
5) Be patient, it’ll take a few minutes but it’s not impossible!
The key to incorporate the oil is to make sure it can pass through that outer layer of dough that has been coated in oil and is slippery. You can cut the dough, squeeze it, wring it… Whatever works for you.
But.. Can I just add the oil with the rest of the wet ingredients?
Yes, you can AS LONG AS you make sure the gluten is developed correctly. The reason I encourage you to add it later is that we tend to stop working the dough absorbs the fats. And that leads to denser crumbs and lower quality bread.
But if you make sure you get that beautiful windowpane and a dough that is elastic and nice. Then yes, you can add the oil earlier in the process.
I’d still suggest you add it after mixing everything else, while you have that shaggy mess of dough at the beginning. The reason why is because the flour had at least some time to hydrate without oil getting in the middle. Moreover, the gluten network is still at a very early stage, so it’ll be easier to squeeze the dough and allow the oil to be absorbed.
How to ferment sourdough challah
I found that the temperature range in my house did not affect the fermentation too much. However, the amount of water did. Keep in mind that the temperature didn’t vary that much (68-74F) and wasn’t too warm.
Note: if your house is very warm, the temperature will affect the fermentation more than it affected me. Keep an eye on your dough during bulk fermentation.
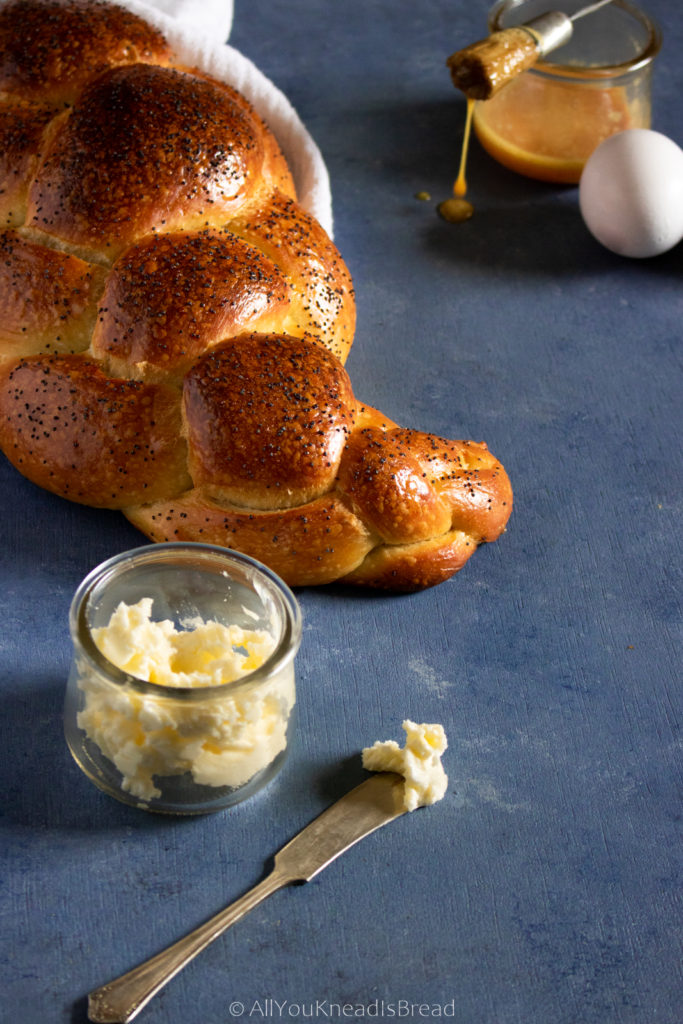
While all sourdough challahs turned out great; I found that the recipe with a little more water fermented faster and the dough was a bit slacker; which made the braiding a bit more difficult as the ropes stretched very easily. The dough with slightly less water and oil ended up in very plump braids; (the very first photo), but the bread was slightly drier than I prefer.
I did all bulk fermentations overnight at room temperature (about 8h at 68-74F depending on the day). The recipe with more water over-proofed a little and developed a slightly sour taste (at both temperatures, even at 68F). However, you can fix this easily by reducing the bulk fermentation.
The recipe with less water didn’t get to rise that much but was still puffy and the taste was sweeter. After shaping, all loaves proofed for 3-4 h (until they were puffy, not until they doubled). The loaves with less water held the shape better.
You should take these experiments as a guide. But what you’re looking for is a puffy dough that still feels stiff (not sticky). If you press carefully, you should leave a mark that springs back slowly. You can adapt the fermentation to your own kitchen conditions.
What I’d suggest is to not rush the bulk fermentation. If your dough didn’t ferment enough, then it could tear open during baking.
Find the balance between temperature and fermentation
In any case, try not to over ferment the dough, or it might turn sour and slacker. It should feel puffy, it should smell like sourdough but not too acidic with slightly but pleasant acetic hints. Same for the final proof, let it get puffy but don’t wait until it doubles.
It’s very difficult to see when it doubles unless the dough is in a container. Waiting for it to double might end up in an over-fermented dough that will flatten during or after baking and won’t taste as nice.
How to braid this sourdough challah
Divide the dough into as many portions as you want strands in your braid. Let them rest 10 minutes before you make the ropes.
To make the ropes, flatten the dough balls into a 2 in/10 cm oval. Then starting on the long side roll the oval onto itself giving it some tension as you go. Once you shaped the log seal the seam.
Let the logs rest a few minutes; then starting from the middle towards the outside stretch the logs and make the ropes. If the ropes keep shrinking let them rest. The gluten it’s pulling and if you continue to stretch the dough you’ll end up breaking the gluten structure.
Braiding the challah a little loose will allow it to tighten as it proofs. It will puff up during baking and be very plump. If the braid is too tight from the beginning, it could tear during baking
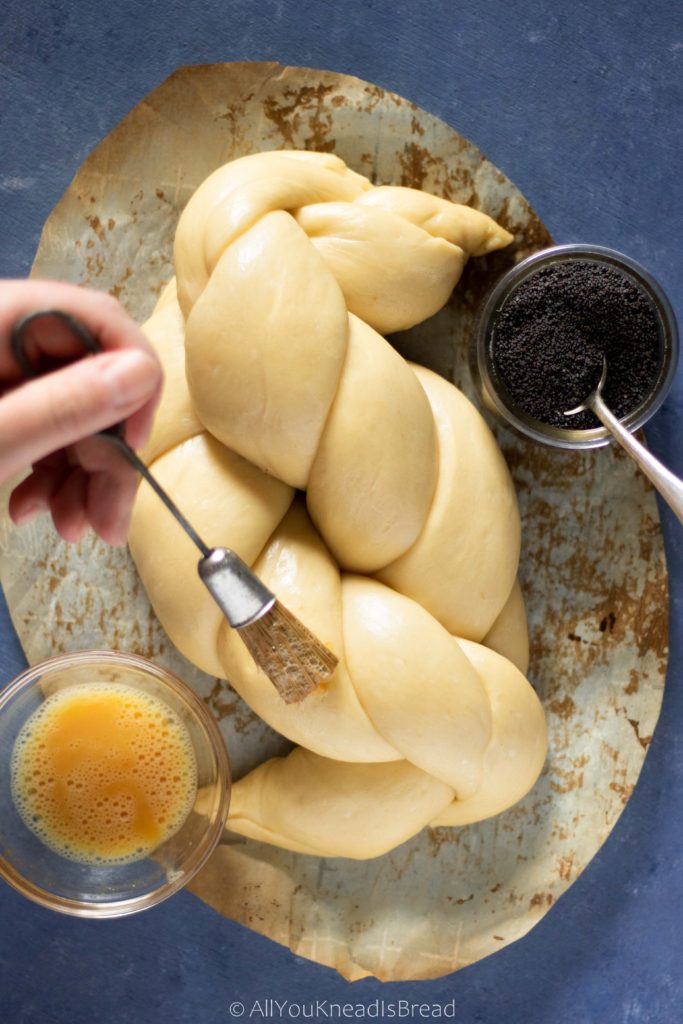
After you brush your challah with the egg white, you can sprinkle some poppy or sesame seeds to decorate it!
Here you have a video for an 8 strand challah:

The good thing about challah dough is its versatility when it comes to shapes and braiding. If you’re looking for a beautiful shape but are a bit intimidated by braids, I’d suggest you try your hand at a round challah. It’s very easy to braid and you won’t get lost.
The baking
Since every oven is a bit different, bake your challah until it’s golden brown. If it gets too dark on top you can tent it with aluminum foil until it’s done inside. If you have trouble knowing if the bread is done, check the inside temperature. It should register at least 200F / 94C.
I have this thermometer and I’m very happy with it. It’s fast and accurate and it can hold the max/min temperature. What I like the most is that it has a magnet! So I can leave it stuck on the fridge while I’m baking for easy use.
After baking let the challah cool down for a while. It will help set the crumb and aromas!
I hope you enjoy this wonderful sourdough challah!

If you make this easy sourdough challah, let me know what you think and tag me on your creations! I love to see what you guys make!
You can find me on Instagram or Facebook and you can also subscribe to my Youtube channel.
For suggestions or want me to adapt a yeast-based recipe into a sourdough one, etc. please contact me and I’ll try my best to respond and plan a recipe!
Happy baking!
This post contains affiliate links and any sales made through such links will reward me a small commission – at no extra cost for you – that allows me to keep running this blog.

Easy and Delicious Sourdough Challah
A delicious sourdough challah with a very fluffly crumb. Perfect to eat plain, to make toasts, or even french toasts.
Ingredients
- 345 g king arthur all purpose flour (11.7% protein content)
- 110 g sourdough starter at its peak of activity
- 70-80 g water room temperature
- 1 Large egg
- 1 Large yolk (save the white for final egg wash)
- 50 g granulated sugar
- 80-90 g vegetable oil
- 6 g salt
- 1 tsp poppy or sesame seeds optional
Instructions
-
Add the water and the sourdough starter to a bowl and with a whisk bread down the starter
-
Add the egg, the yolk, and the sugar and combine everything
-
Sift the flour and salt together and add them to the dry ingredients
-
Combine everything until you don't see dry flour particles and let it rest 30-60 mins
-
Start kneading, if using a stand mixer you can use the paddle attachment
-
When the dough starts developing the gluten add the oil and keep kneading until it's completely absorbed (see notes)
-
Knead 4-5 minutes and let it rest another 5-7 minutes. Continue doing thes until it's ready (Let the dough rest as much as necessary).
-
When the dough passes the windowpane test and it's smooth and elastic, put it in a lightly oiled container and let it ferment until it doubles or almost doubles and feels puffy (at 68-74F it takes tops 8h, typically overnight)
-
Degas the dough and let it rest a few minutes. Then divide it in as many strands as you want for your braid, shape them into dough balls and let them rest (covered) for 10 minutes
-
Take one piece of dough and with the heel of your hand flatten it. Use a rolling pin to roll the dough into a 7 x 4 inches oval. Starting from the longe side roll the dough into itself and form a log. Pinch the seam closed and gently roll from the center outwards lengthening the log
-
Repeat with all the dough pieces, if it's difficult to stretch the log, let it rest a few minutes
-
Braid the challah and place it on a piece of parchemnt paper on the tray you'll use to bake it. Cover it with plastic wrap and let it rise until it feels puffy (at 68-74F it takes about 3-4h)
-
Preheat the oven for 20 minutes at 350 F. When the challah is ready, brush it with the egg white and sprinkle poppy or sesame seeds. Bake it for 35-40 minutes or until it has a nice golden brown color
-
Let the challah cool down to room temperature before slicing it
Recipe Notes
- If you’re kneading with a stand mixer you might find it easier to incorporate the oil by hand. Squeezing and twisting the dough will work faster.
- If you think the challah getting too dark but the inside is not done, tent it with a piece of aluminum foil.
- Kept it in a plastic bag or airtight container, it can last fresh and soft several days.
Hi! Can I use honey instead of sugar??
You can try but I’m not sure about the substitution ratio. Honey is sweeter than sugar and it might also change the consistency of the dough a little. If you add too much it could slow down the fermentation a bit too. Keep these things in mind and experiment! 🙂
How do we add raisins to this recipe?
I would add them towards the end of kneading and I’d partially rehydrate them the night before with 1 or 2 tbsp of the liquid of your choice. You can also add aromatics such as vanilla extract, citrus zest…
Doubled the recipe, used about 1/3 Whole Wheat flour, about 100g of bread flour, and the remainder APF, all King Arthur. (My starter is rye and about 140% hydration.)
Followed the instructions exactly in the KitchenAid, used the maximal amount of water but minimal amount of oil. Took a while to incorporate the oil and almost gave up, but let it rest for a few minutes and cut into it with a knife while still in the mixing bowl, and then voila! Magically came together into a lovely dough. Overnight rise on the counter (8/9 hours), then braided into two loaves and let rest for 4 hours. Beautiful and puffy just as described!
Just came out of the oven and they are stunning, possibly my most beautiful challahs ever. I plan to let them cool and then freeze until Shabbat (3 days), will defrost at room temp on the counter. Hope they taste even half as good as they look! Thank you!
Hello! I just tried this recipe for the first time. I normally just make breads with spelt, rye, and einkorn. However, I do buy organic, unenriched, unbleached all-purpose flour at our farmers market. It has always been great quality, but I do not know what the protein count is. It took me about an hour using my KitchenAid mixer to develop the gluten, and everything seemed fine. I started out with 85 g of oil and 75 g of water, since there was some flexibility there. I got the dough to a point to where it passed the window pane test and I could handle it and it was not sticking to my hands, so I put it in a greased Pyrex bowl, and covered to let it rise. However, even after 8 hours, there were some large bubbles coming up on the top, but it was not getting taller. I left it out a full 8 hours, and that ended up being 2:30 a.m., so I just put it in the fridge until morning. I still could not see that it had risen anymore. Do you have any idea why? Was the dough too heavy? I don’t know what determines rise. My starter is always very active and works well in other recipes, but it is made with spelt and rye. So, I pulled out 30 g of my starter, added 40 g of all-purpose flour, and 40 grams of water to make the starter specifically for this recipe, and waited until it had more than doubled in size and was bubbly before starting. I assumed it was active enough! I’m not sure what could have gone wrong. I’m about to make the braid and let it sit out again. I’m just not sure what to do if it doesn’t rise. Thanks!
Hi! I don’t know what could’ve happened. Do you think the temperature was too low? Sometimes a few degrees can go a long way. When my kitchen is cold I have issues sometimes fermenting dough well. Otherwise… I don’t know, sometimes it happens! Our starters sometimes like to act up haha. However, when I change the composition of starters I make sure I feed them with the new flour at least 3 times as if I were “training” the starter. How did it turn out?
I was looking for a recipe like this to avoid buying the traditional braided bread sold in the store for the holidays since now I’m all in for sourdough. Every recipe I found talked about making a levain first, but I really like that this one is much easier! The result: I’M SO NOT BUYING STORE BREAD FOR THE HOLIDAY DINNERS!! I can now enjoy this lovely bread with a healthier option!
Thank you so much!!!!
Whoop whoop!! I hope the result was great!
My method is a bit different, I rarely build a levain unless the bread I’m making has a totally different type of flour. I explain more about adaptation periods and science of your sourdough starter here: The science of your sourdough starter 🙂
Awesome! Thanks for the additional info!
Yes, the bread was lovely and now I have to bake like 4 challahs just for Christmas because I’ve been asked to!
I’ll be making another one for New Year’s Eve as well.
Happy Holidays Maria and readers! 😀
I’m super late for the holidays but… Happy New Year! 🙂 hope those loaves turn out great!! 🙂
Wow! I knew this would be good but was skeptical I would nail it on my very first try. I was wrong. Brilliant! I can’t wait to bring this to a brunch party. It looks amazing and tastes spectacular. Will never go back to store bought challah!
Thank you so much, Rachel! I’m so glad you liked this recipe so much!!! 🙂
Can I use olive oil? Thx
absolutely! the taste might change a bit bit olive oil goes always great with bread 🙂
This is excellent! I made this for the first time (first time making challah ever) today. For those curious, I retarded in the fridge overnight, for like 8 hours after the bulk rise, and it turned out delicious and perfect. I wish I could post a pic. In terms of integrating the oil, I couldn’t do it manually, and at one point was covered in oil, and so was my kitchen, in oil. Once I switched to my electric mixer with dough hook, it was a cinch so highly recommend doing that instead. I otherwise kneaded manually. Thank you so much!
This is great! Thank you so much for your input! I know incorporating the oil can be a bit of a task; I usually to do it by hand because I find squeezing the dough very relaxing, haha, but a stand mixer always helps! If you have Instagram you can tag me on your photo using @allyoukneadisbread I’d love to see your challah! 🙂
I agree I found it much easier to incorporate the oil once I switched to the dough hook in my stand mixer
This is my first recipe comment ever! The challah turned out beautifully.
I used 3 egg yolks, then added and emulsified the oil into the egg yolks a little at a time, until homogenous. Then I whisked in the sourdough starter to the oil and yolks, before adding to dry ingredients. The dough came together beautifully with hand kneading, and was so easy to shape and braid. I will definitely use this method again since the oil incorporates perfectly. Thank you!
Hi Denise! I’m so glad to hear that the Challah turned out great! That’s a very handy tip to incorporate the oil. Thank you for sharing that with us! 🙂
This dough is always way too wet. This is my 4th time, so I figured I needed to go ahead and comment. I’m only adding 70 g of water, The first time I added the max. I always have to add so much extra flour! The final product is delicious, but the measurements are very off. Perhaps it’s my elevation. (1253). It always looks like cake batter. A very carefully add the flour until it actually resembles though and passes the window pain test. I keep using this recipe because I like how the steps are laid out and easy to follow. My only complaint is that it doesn’t seem to be enough flour to water, even when using the minimum.
Hi Leah, I’m sorry to hear that you’re having issues. Could you work me through your process and what flour you use? Maybe we can find out where the problem is? From what you say, you do get to have a windowpane in your dough. Does it feel like cake batter after that? If that’s the case, that means that the gluten at some point breaks after that. That can be because of the flour. My AP flour is actually pretty strong (11.7% protein), in some countries it would even be considered bread flour. Stronger flour can ferment longer times and can undergo intense kneading longer without breaking for longer than other weaker flours. Another thing that can be affecting gluten is the dough temperature. If the dough goes above 28C the gluten starts getting weaker and it starts having issues absorbing fats etc. Let me know a bit more about your process and maybe we can come up with a solution! 🙂
Hello. I had no idea that you replied to me! Well, obviously, I am here again to use the same recipe as I mentioned in my previous comments. I absolutely love how everything is completely laid out. I use King Arthur bread flour. I have learned through trial and error that for me I can only use about half the amount of water and the recipe. Sometimes I also cut back on the oil a little bit. Using my stand mixer helps, but I just assume I’m probably in a more humid environment. Therefore, I don’t need as much water in the dough. I did just go ahead and comment just so that other people who might be in a similar elevation or have some more issues can see that. It’s still a great recipe that I use time and time again, I just can’t use all the water. I wish I could post pictures of my process to show you better!
Thanks and happy baking.
I should add- In the winter it’s not near as bad. It’s usually a lot dryer here in the winter, but when I bake in the summer/spring, it is very humid and does definitely impact the recipe. I still love it overall, just knowing to adjust it makes all the difference.
Is there a reason you flatten the dough with a pin and roll it into a rope for the braid, rather than just rolling it into a round log by hand?
When you flatten the dough and roll it you 1) make sure the strand has the same thickness all along and 2) create some tension on the outer layer that will make the braid look plumper. It’s really up to you, you don’t have to do it that way but for me, I find braiding easier when the strands are smoother and don’t have parts in the middle where they’re thinner (and could break when you’re trying to make them longer).
Thanks for sharing! Does it keep long?
you’re so welcome! I’d say 2-3 days at room temperature and in a sealed container, but it does get a bit drier every day. If you want it for toasts, you can slice it and keep it in the fridge and then pop it in the toaster directly, that way it can last a few more days. I do that for sandwich bread most of the time!
This looks so good! What a fun way to use a sourdough! The weave is so pretty!
Thank you so much!!! 🙂 🙂
Hi, I want to try this recipe but I’m a bit confused by the wording of some of the steps.
For step 6, how would I know when the dough begins to develop gluten?
By step 7, do you mean to repeat the kneading for 4-5 minutes + rest for 5-7 minutes a few times until the dough passes the windowpane test?
Finally, what schedule do you typically use when making this recipe (i.e. do you find it best to start in the morning, afternoon, or evening to best account for all the time the dough has to rest without needing to stay up too late or wake up at crazy hours to continue the process)?
when you first mix the ingredients, the dough is not cohesive, it’s just a sticky mess. As the gluten develops, the dough starts getting some consistency and starts getting smoother and smoother, that’s how you know the gluten is developing.
Usually, I knead enriched dough in batches. I knead for a little bit, then I let it rest. I knead again, then another rest. That way you don’t push the gluten too much. So you knead the dough and give it a rest, until you have a smooth and elastic dough that can be stretched very thin without breaking (the windowpane test)
I like to start the dough in the evening, that way it ferments overnight, and the next morning, when I wake up, I braid it and keep an eye on it so it doesn’t over ferment. Depending on the temperature and when you started it, it might be ready to bake anywhere between later morning and early afternoon 🙂
Hi! Is it possible to omit the egg or to substitute with something else to make it vegan? What would you substitute with? Thanks!
I think we already talked on instagram! hehe
Why do you use the paddle attachment and not the dough hook to knead?
I found that the hook takes longer to knead the dough because ot doesn’t apply enough tension to the dough. Especially at the beginning, the dough is just a sticky mess and sometimes the hook pushes it to the bottom and just spins around it but barely touches it. The paddle, because of its shape, can be in better contact with the dough, even when you have small amounts. Overall, I think the paddle works more efficiently than the hook and heats up the dough less, which is better when it comes to dough that needs longer kneading (brioche, panettone etc.). However, if your stand mixer is more efficient with the hook, by all means! 🙂
Thank you!!
Hi There! I just started making breads with my starter and so excited about this recipe. I’m wondering if you’ve ever left it in the refrigerator to retard?
Hello!! Yay! One more person in the sourdough wagon, whoop whoop!!
I have retarded the dough a few times. Sometimes I start the dough in the morning and when it has almost doubled (usually evening) I keep it in the fridge until the next morning. The dough was fine as far as texture, but I could tell it was a little sourer than usual. I don’t mind it because I’m used to it, but it’s something to keep in mind if you’re not familiar with sourdough aromas and flavors. However… if you don’t like it… it can always turn into bread crumbs or french toasts! 🙂
Hello Maria! Could I retard the dough in the refrigerator once I made the braids and has risen to it´s peak? So the next morning I can directly bake it… Could this work? This could stick better to my work time-schedule. Thank you!
Hello there! I haven’t tried that, but I have tried retarding the dough after bulk. The texture was fine, but the flavor was a bit sour. Anyhow, you can try and see how it goes! Maybe don’t wait until the braid is ready, because it will continue rising a bit in the fridge until it cools down. And I’m thinking maybe it’s a good idea to brush it with egg wash or something before the fridge. The dough tends to try out quick in my fridge, and since you’ll put the challah already braided, I’m guessing you won’t cover it too tightly? Just a thought! But do let me know how it goes! 🙂
Hi Maria, thank you so much for your quick response. I will try this and let you know how it worked 😉
Since the dough has egg, how do you suggest storing this type of breads? Room temperature in linen bag? How many days?
Thanks again.
Pilar
I usually keep the bread at room temperature in a ziplock bag and slice it as I need it. You can always freeze it for later use or if you’re going to make toasts or french toasts (or cook it any other way, after baking) you can also keep it in the fridge, although I don’t like the fridge, it dries the bread out too much. Since you’re going to bake it, the egg shouldn’t be a problem. As for days… I’d say 3-4, more than that it’s usually a bit too dry. Hope this helps!!
Are you making this challah with a 100% hydration starter or a stiffer one?I was looking for your sourdough starter recipe to try and figure it out but only found the article on the science of sourdoughs which didn’t give the percentages you are using. Many thanks in advance.
Hey there! Yes, I always use 100% hydration and if not I specify the type I use (like with pasta madre discards, etc). I started my previous SD using Ken Forkish’s method from his book, but the one I have now is a “sister” of my pasta madre that I started using apple yeast water. You have the recipe here: once you have the fermented water you can proceed using the flour mix of your choice, after day 2 you can keep feeding it equal parts of water and flour in the proportions you prefer (1:1:1, 1:2:2… sourdough:flour:water). Hope this helps!!
Thank you for this yummy recipe! Couldn’t find my old recipe and found yours – it is SO much better! Just the right amount of sourdough tang, and lovely rise and texture. Perfect!
Thank you so much!! I’m so glad you liked it! I am in love with the texture of this challah if I say so myself! 🙂
I’ve made this recipe several times and love it. Thank you! I’ve ended up with the following modifications:
(1) after incorporating the dough slowly the first few times I found I could put it all in the mix at the beginning and it still came out fine – and actually seemed to reduce the overall kneading time to get a windowpane.
(2) I use 90 g water and 75 g canola oil.
(3) I use a whole egg for my egg wash and do two washes, one after braiding and one right before topping and baking – just love the deep sheen it gives.
(4) I usually end up doing the bulk fermentation for more like 10-12 hours at around 70º ambient
(5) I bake at 375º for 10 minutes and then lower to 350º for 25 minutes
Thank you so much! And absolutely! All recipes can be adapted to whatever works better for you, we don’t have the same flours, temperatures etc… so it makes absolute sense! I try to give info on dough texture, how to get a better gluten network etc.. but bread making, and particularly sourdough, is never a “one method for all” kind of thing. Cheers!
This was so delicious we ate half the loaf when it came out of the oven. It was the first time I’d tried making challah with sourdough, and I must say that I am not proficient with the starter as yet, so it took 24 hours (overnight) to rise. But it was worth it!!!
I’m so glad to hear that!! If you’d like to know more about the science of your starter check this post it might be useful! This dough is a bit lazy, it doesn’t have a lot of starter (%) compared to other recipes, because I found I could control the fermentation better this way and I liked the texture better. But if you think it’s too slow for you, you can absolutely add more starter, as long as you recalculate the water and flour 😉
Just tried this recipe for the first time. Bread turned out great. The incorporation of the oil was somewhat time consuming. I used a traditional topping – CHARNUSHKAS instead of poppy or sesame seeds and it tasted great
Thank you so much! Yes, the oil is a bit tricky but I found that doing it that way is how I got the best texture! Charnushkas… is that nigella seeds? I’m sure it was delicious too!
This came out amazing the first time. I want it sweeter and yellow-er, more like from my childhood bakery. I tried to make some substitutions but did too many at once on my second try. Also, using the mixer to put the oil in, I’m not finding it’s such a big deal as everyone makes it out to be. Has anyone used margarine instead? I usually use that for my RH loaves. Thanks for this recipe.
Hi Shari, you can absolutely customize the recipe to your taste, maybe add just egg yolk for a yellower crumb? let the consistency of the dough guide you when you’re changing up the wet ingredients. I haven’t used margarine for this particular recipe, but I have used vegan spreads in other dairy-free loaves and I didn’t have any problems. Just pay attention to the water:fat ratio to make sure you’re not introducing too much water 🙂
Thanks, Maria, I am going to try it again today, with 3 yolks instead of one whole egg and one yolk.
I hope it went well!!
Hello! I am looking forward to trying this recipe tonight. My question – what method do you recommend for degassing the dough after the bulk fermentation? Thank you!
Hi Sharon! Sorry for the late reply. I think any method can work as long as you’re careful but I prefer to do it by hand, with no flour. I just work the dough a little on the counter until I don’t feel big air pockets. I also use a rolling pin to flatten the pieces of dough before I roll them to form the strands, so even if I left some air pocket behind, I’d get rid of them when shaping the strands. I hope it helps!
Beautifully explained!
Thank you so much, Rose!
I have made this using your recipe at least 5 times. For me getting the oil in is somewhere between difficult and impossible.
This evening I used the minimum suggested water and oil and added an additional 10 grams of flour.
I have been massaging the dough every 5 minutes for an hour and it’s not completely absorbed completely.
The finished bread is delightful, but what can I do to help get the oil absorbed more easily.
I live at altitude 3,900 feet if that matters.
TIA for your response.
Hi Howard! The reason I encourage people to add the oil later on in the process is to ensure that the gluten is developed properly as fats tend to hinder its development. If you make sure the gluten is properly developed, you can very well add the oil with the water or right at the beginning of mixing the ingredients. Adding the oil earlier/later in the process won’t change the flavor, so don’t worry about that. But if you still prefer to add the oil after kneading a little, you can cut the dough into smaller pieces and add the oil little by little. The reason to cut the dough is that the outer layer is covered in oil and is slippery, so by cutting it, you can let the inside soak in the oil a bit faster. I hope this helps!!
How would the recipe change if I use a bread flour?
Bread flour has more protein and can absorb more liquid than all-purpose flour, so for the same amount of flour, if you want the same dough consistency, you might need to add a bit more liquid and knead a bit more (since it has more protein, there’s more gluten to build the gluten network). Whichever flour you use, look at the protein content to have an idea of how you should adjust the recipe 🙂
I’ve been trying to make sourdough challah for a while. Tried your recipe as written. It came out extremely dense. While it did rise to double overnight, it didn’t really rise much in the next 4 hours after I shaped it. Not sure what’s going on; I’ve tried a couple of times. Room temp is about 70 F.
I’ve made plenty of sourdough bread and that’s worked fine so I think my starter is fine. I’m just hoping for some clue to what I’m doing wrong.
Thanks!
-Steve
Hi Steve. Maybe you can try the opposite approach, do a shorter bulk fermentation, and let it proof for a longer time to make sure is very puffy before baking. If you think it still comes out too dense for your taste, you can increase the water or oil, or even add one more egg yolk to have a dough that’s a bit slacker. I do like my challah dough on the stiffer side because then you can make beautiful braids that urn out very plump.
Just made this and it was great! Just my overall thoughts of the process:
I made a double batch. For some reason, during the first mix of all the ingredients together, the wet ingredients weren’t enough for the amount of flour. I added quite a bit of more water.
Mixing in the oil is a long process! I used my hands. I had given up all hope during this process. Keep mixing! It probably took me 10 mins of hand kneading, squishing, and mixing until the oil fully incorporated.
Found that I needed more flour as the dough was so sticky (probably due to my extra water) and I read online it should be like a soft clay. Added more flour. Took about an hour total to knead.
The rest of the process was a cake walk. Followed the instructions to a T. Did a 4 strand braid. Rested for 4 hours and baked I think 40-45 mins. This was the hit of the Rash Hashana dinner! The double loaf was gone between 10 people and about 10 other dishes.
Thank you so much Virginia for your kind words! Yes, the oil is the tricky part, I always encourage people to add it after everything else because that way you ensure the gluten is properly developed and then you’ll have the best crumb in your challah! Also, our flours and weather might be different, so it’s very normal if you need to change some ingredients a bit. The consistency of the dough is what’s important. L’Shana Tovah!
I love your post and I appreciate your suggestions.
Any worry about leaving a dough with eggs out all night?
Hi Faye, I wouldn’t worry much because typically, the sourdough will keep the dough pH in a range where pathogens can’t grow. Then you’ll bake the bread, and the high temperature will kill any microorganism anyway 😉
Started by dissolving salt and sugar in room temperature water. I added the oil at the beginning. The dough feels great! Can’t wait to for dinner to taste the challah. Recipe is a keeper.
Thank you so much, Melissa! Yes, you can add the oil whenever it’s easier for you, as long as you knead well there shouldn’t be a problem! 🙂
I live at 9000 feet above sea level, so I know I’ll have to add extra moisture to make this work. Do you think subbing honey for the sugar would be okay for this purpose? Any suggestions on how much I should start with? Thanks for the detailed write up! I’m looking forward to trying this tomorrow!
Hi Katrina, I’m sorry for the late reply! You can definitely switch the sugar for honey, especially if you need some more moisture. However, I’d suggest you start with sugar and change the water or oil a little so you can have a feel of the consistency the dough should have (just in case all the honey ends up making the dough too soft). I would increase first the water amount, 15-20 g at a time, until you consider the dough is how it should be. After that, it’ll be easier for you to change things up and adapt the recipe!
I definitely had my doubts when I was incorporating the oil…BUT, the end result was incredible!! I subbed in a bit of heirloom wheat from a small mill, and the combination was delicious!! I did have to set my alarm at 2am to braid the dough, but that’s my own fault for starting late!! I chose to top mine with sesame seeds. Thank you!!
Hi Julie, Thank you so much! The subbed flour sounds like a nice change! I’m sure it gave it an even better taste!
What is the windowpane test?
Hi Carol, the windowpane test is an easy trick to know if the gluten is properly developed. It consists of taking a bit of dough and carefully stretching it to see if you can stretch it into a very thin layer. If it tears easily, the gluten is not ready. It’s better to do this test after the dough has rested a few minutes and the gluten is relaxed 🙂
I made it yesterday and it was so good!! Incorporating the oil did required a bit of patience but nothing too difficult if I’m honest.
Thank you so much for sharing it! I loved it!!
El sabor es Absolutamente espectacular!!
Not sure about oil content. It’s not incorporating into the dough.
Incorporating the oil is a bit tricky and it requires patience. I do it by squeezing the dough. The idea is to tear it a little so the oil gets in contact with the inside part. The reason I always suggest to add fats after having developed the gluten a little is because fats hinder gluten development. They cover the gluten strands and it’s more difficult for them to bind together. If you’re having problems incorporating the oil, you can add it at the beginning as long as you make sure the gluten is properly developed, so you’ll have a challah with a nice and delicate crumb. Adding the oil earlier or later in the process doesn’t affect the flavor, so don’t worry about that, it’s all about the gluten 😉
I’m making this tonight. Love how easy it is!
I find it very difficult to incorporate the oil. I have tried by hand for at least 30 minutes and I have tried using the mixer. Any suggestions?
This was absolutely delicious!! It worked out perfectly, even though I was freaking out that my starter was not at its absolute peak. Thank you!!!
This was absolutely delicious!! It worked out perfectly, even though I was freaking out that my starter was not at its absolute peak. Thank you!!!