
Something good about this quarantine? It gave me the time I needed to create more recipes and do experiments with all my starters. I’ve had sourdough challah in my “to-bake” list for the longest time. And I finally have a recipe I’m 100% satisfied with.
I used all-purpose flour with a protein content of 11.7% for this delicious challah recipe. Don’t worry if you can’t find bread flour, I know it’s difficult to find these days.
UPDATE 10/18/2020: Based on the feedback I received, I decided to update this post to talk about the oil and how to easily incorporate it.
About the recipe
This dough is not on the sticky side, however, you need to make sure you develop the gluten very well. If you do so, you will have a delicate and cohesive sourdough challah that will stay fresh for several days. You can check this post for some guidance on how to knead enriched dough based on real bread science.
I can’t stress this enough: make sure you knead the dough well. Do it little by little. Allow the gluten enough rest if you think the dough is not really coming together after a while. If you’re using a stand mixer, the dough shouldn’t stick to the bottom. And if you’re using your hands, the dough shouldn’t stick to the heel of your hands or the counter.
Developing the gluten well takes a bit of time, but the reward will be amazing. You’ll end up with a dough that’s easier to handle (it won’t stick everywhere), a plump braid, and a bread that won’t dry out and harden right after it cools down.
The ingredients
Since this recipe doesn’t have a lot of moisture, I prefer to add all ingredients at once except the oil. I find it’s the best way to ensure salt and sugar dissolve well, and that all ingredients are properly distributed. You want to have a homogeneous dough.
Once you start kneading and the dough acquires certain consistency, add the oil and incorporate it well. This step might be easier to do by hand than with a stand mixer. You can add the oil little by little or all at once, whatever is more comfortable for you.
In the ingredient list, you’ll find a range in the amounts of oil and water. You can decide which type of dough you prefer. A slightly softer dough that leads to a slightly softer bread, or a slightly stiffer dough that’s easier to shape. The range is not large, but those extra 10 or 20g do make a difference, especially using AP flour.
My flour has 11.7% of protein, if yours has more/less, you will need to adjust the amount of water accordingly
What If I can’t eat eggs?
If you can’t eat eggs you can substitute them with pumpkin puree. It’ll give the dough an orangey color, but it’ll make the dough spongey too. Just be careful with the liquid because pumpkin puree does have some extra moisture.
How to incorporate the oil
If you have read some of my posts you know I’m very particular about developing the gluten network. Adding butter when the dough is half-developed is a bit of work but nothing impossible. However, adding oil can be a lot trickier. So here are my tips:
1) Add the oil little by little. If you add it all at once the outer layer of the dough will be covered in oil and won’t let it penetrate.
2) Squeeze the dough as you knead so you can break that outer layer and the oil can penetrate.
3) If you still have problems, cut the dough into smaller pieces to increase the surface area of dough that hasn’t been coated in oil yet (the inside part) and keep squeezing
4) If you work on your counter, squeeze the dough as if you were wringing out a cloth.
5) Be patient, it’ll take a few minutes but it’s not impossible!
The key to incorporate the oil is to make sure it can pass through that outer layer of dough that has been coated in oil and is slippery. You can cut the dough, squeeze it, wring it… Whatever works for you.
But.. Can I just add the oil with the rest of the wet ingredients?
Yes, you can AS LONG AS you make sure the gluten is developed correctly. The reason I encourage you to add it later is that we tend to stop working the dough absorbs the fats. And that leads to denser crumbs and lower quality bread.
But if you make sure you get that beautiful windowpane and a dough that is elastic and nice. Then yes, you can add the oil earlier in the process.
I’d still suggest you add it after mixing everything else, while you have that shaggy mess of dough at the beginning. The reason why is because the flour had at least some time to hydrate without oil getting in the middle. Moreover, the gluten network is still at a very early stage, so it’ll be easier to squeeze the dough and allow the oil to be absorbed.
How to ferment sourdough challah
I found that the temperature range in my house did not affect the fermentation too much. However, the amount of water did. Keep in mind that the temperature didn’t vary that much (68-74F) and wasn’t too warm.
Note: if your house is very warm, the temperature will affect the fermentation more than it affected me. Keep an eye on your dough during bulk fermentation.
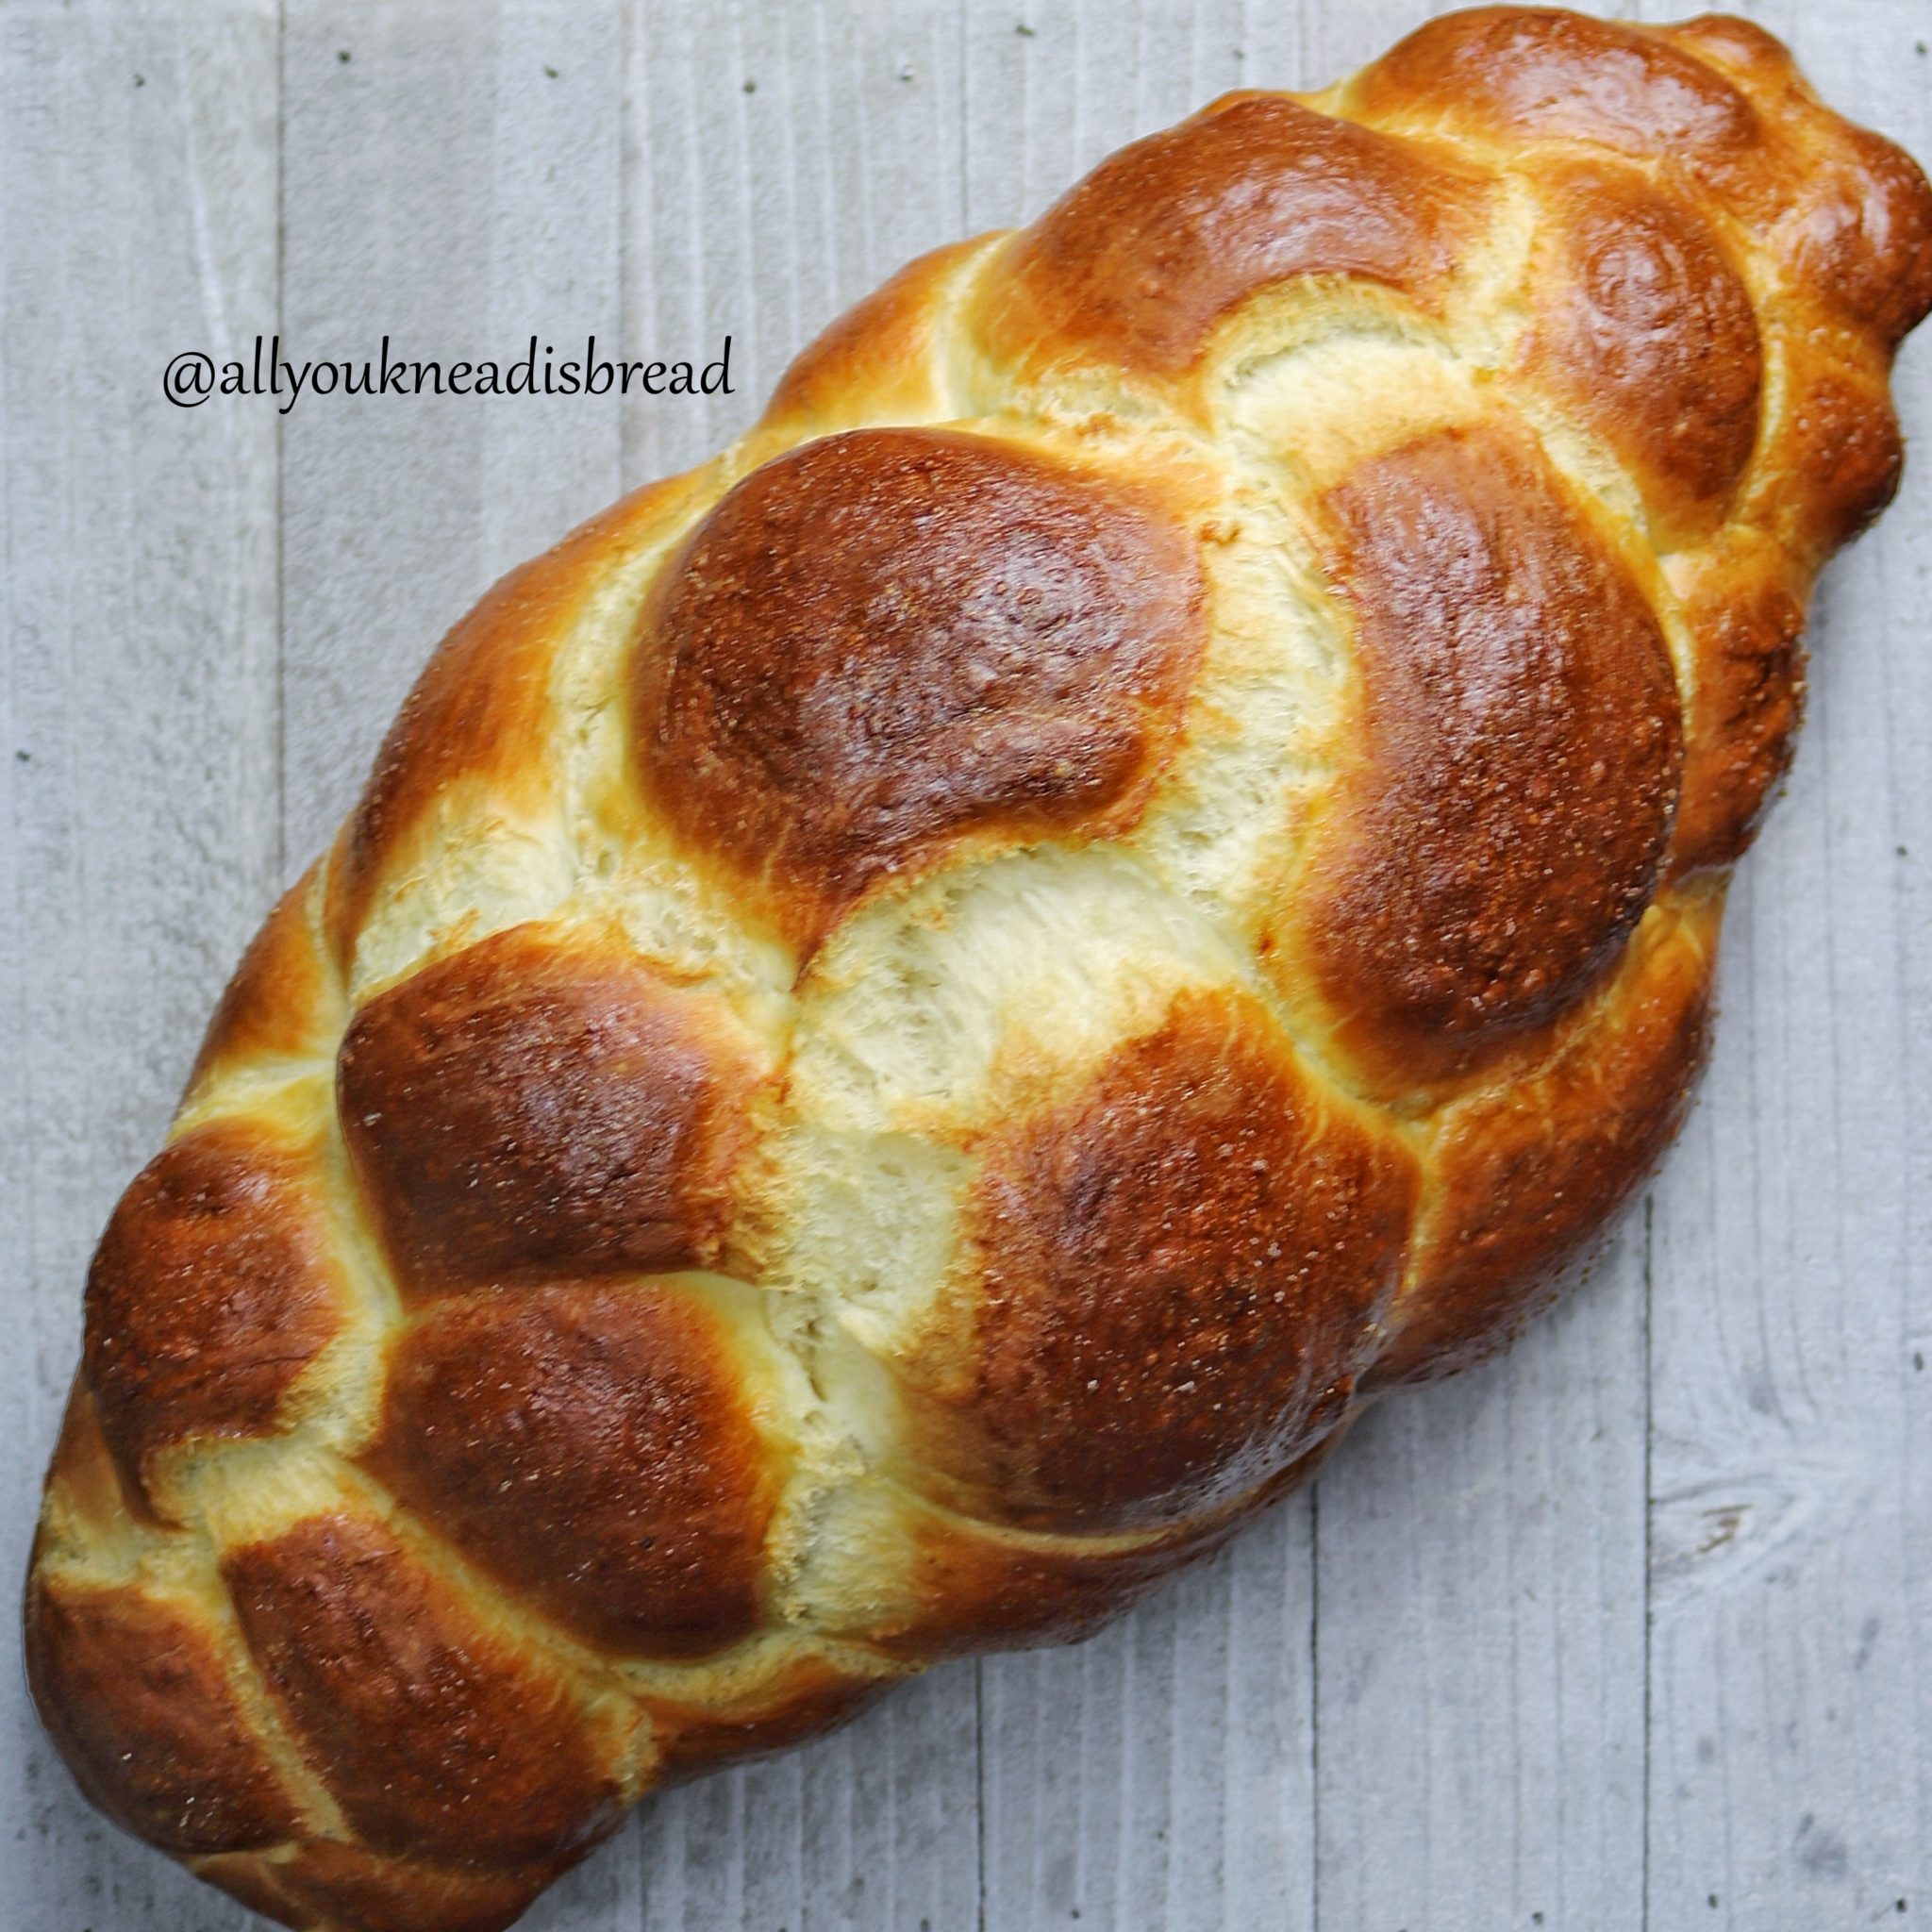
While all sourdough challahs turned out great; I found that the recipe with a little more water fermented faster and the dough was a bit slacker; which made the braiding a bit more difficult as the ropes stretched very easily. The dough with slightly less water and oil ended up in very plump braids; (the very first photo), but the bread was slightly drier than I prefer.
I did all bulk fermentations overnight at room temperature (about 8h at 68-74F depending on the day). The recipe with more water over-proofed a little and developed a slightly sour taste (at both temperatures, even at 68F). However, you can fix this easily by reducing the bulk fermentation.
The recipe with less water didn’t get to rise that much but was still puffy and the taste was sweeter. After shaping, all loaves proofed for 3-4 h (until they were puffy, not until they doubled). The loaves with less water held the shape better.
You should take these experiments as a guide. But what you’re looking for is a puffy dough that still feels stiff (not sticky). If you press carefully, you should leave a mark that springs back slowly. You can adapt the fermentation to your own kitchen conditions.
What I’d suggest is to not rush the bulk fermentation. If your dough didn’t ferment enough, then it could tear open during baking.
Find the balance between temperature and fermentation
In any case, try not to over ferment the dough, or it might turn sour and slacker. It should feel puffy, it should smell like sourdough but not too acidic with slightly but pleasant acetic hints. Same for the final proof, let it get puffy but don’t wait until it doubles.
It’s very difficult to see when it doubles unless the dough is in a container. Waiting for it to double might end up in an over-fermented dough that will flatten during or after baking and won’t taste as nice.
How to braid this sourdough challah
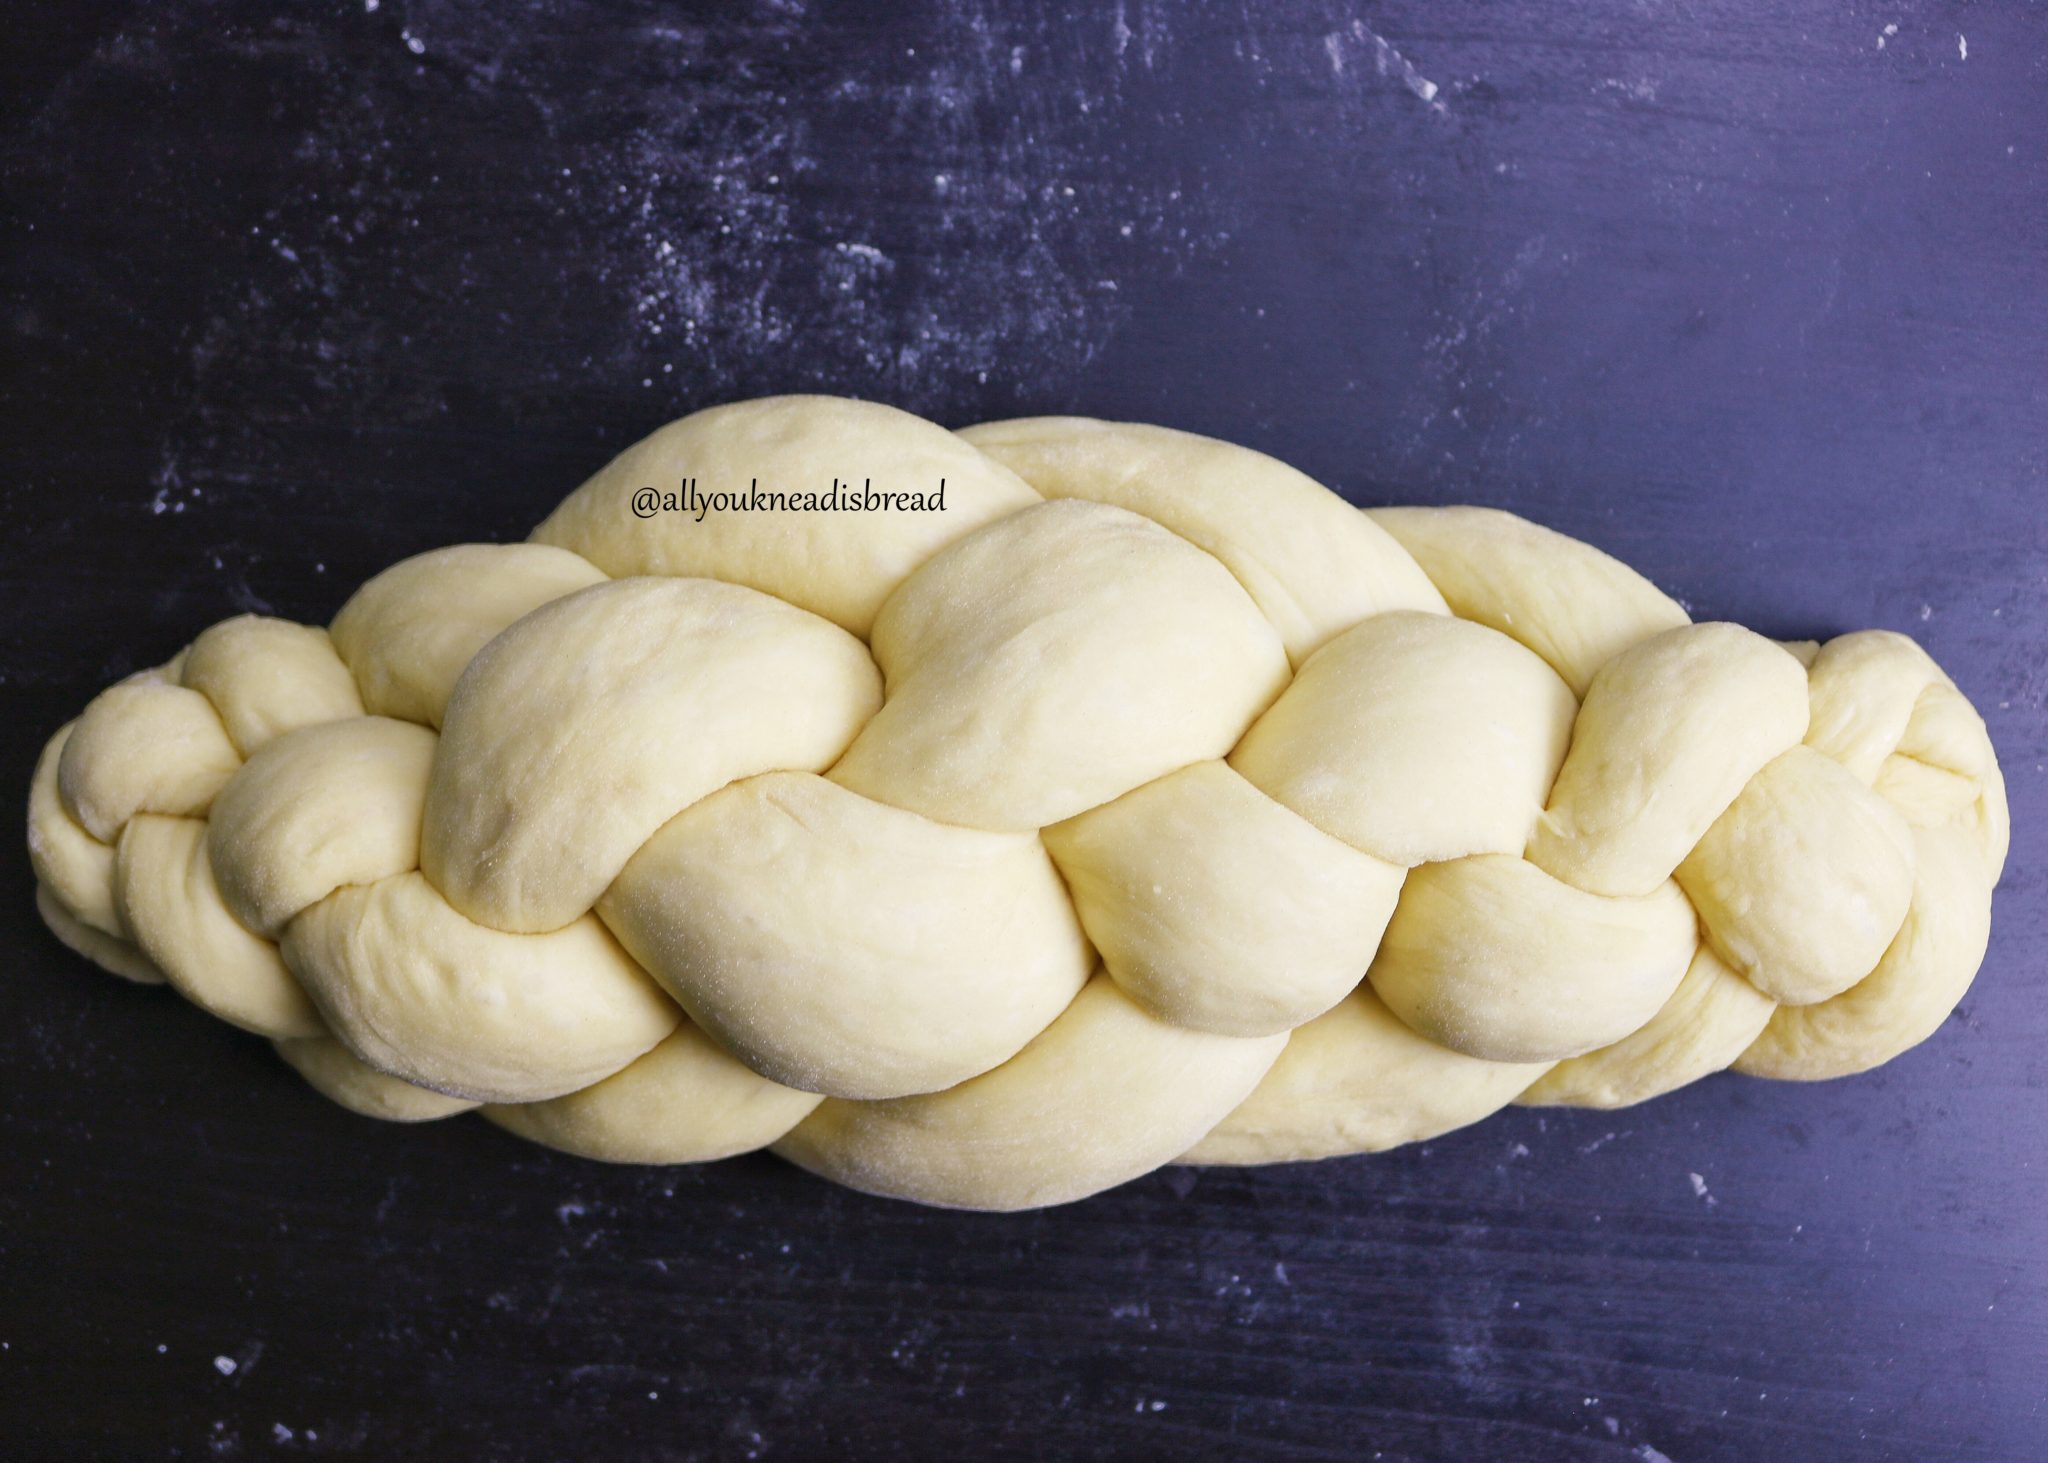
Divide the dough into as many portions as you want strands in your braid. Let them rest 10 minutes before you make the ropes.
To make the ropes, flatten the dough balls into a 2 in/10 cm oval. Then starting on the long side roll the oval onto itself giving it some tension as you go. Once you shaped the log seal the seam.
Let the logs rest a few minutes; then starting from the middle towards the outside stretch the logs and make the ropes. If the ropes keep shrinking let them rest. The gluten it’s pulling and if you continue to stretch the dough you’ll end up breaking the gluten structure.
Braiding the challah a little loose will allow it to tighten as it proofs. It will puff up during baking and be very plump. If the braid is too tight from the beginning, it could tear during baking
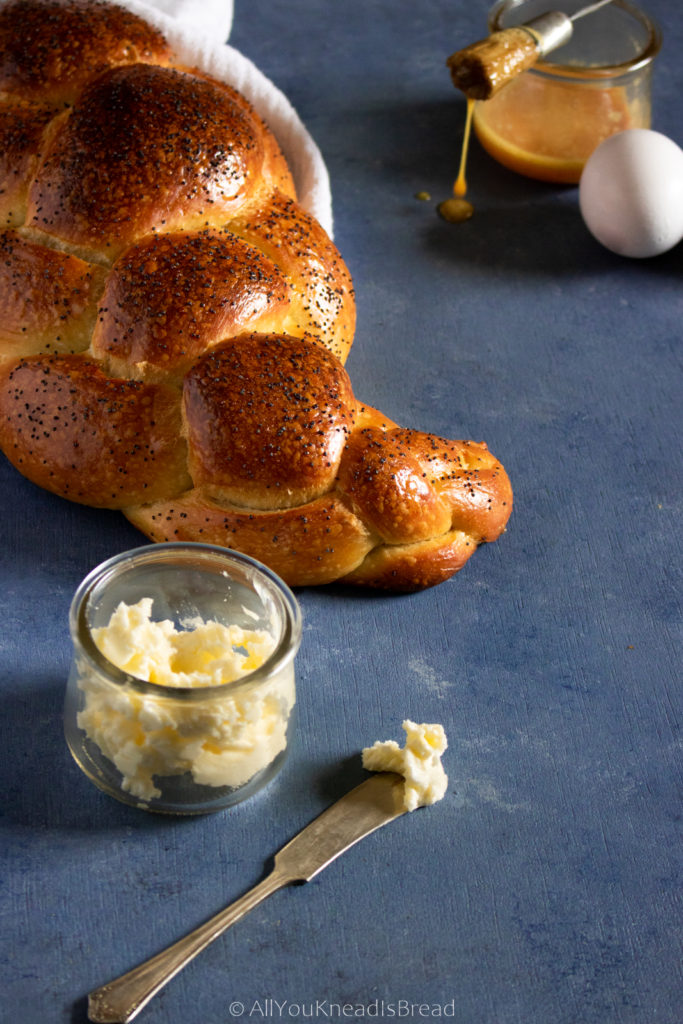
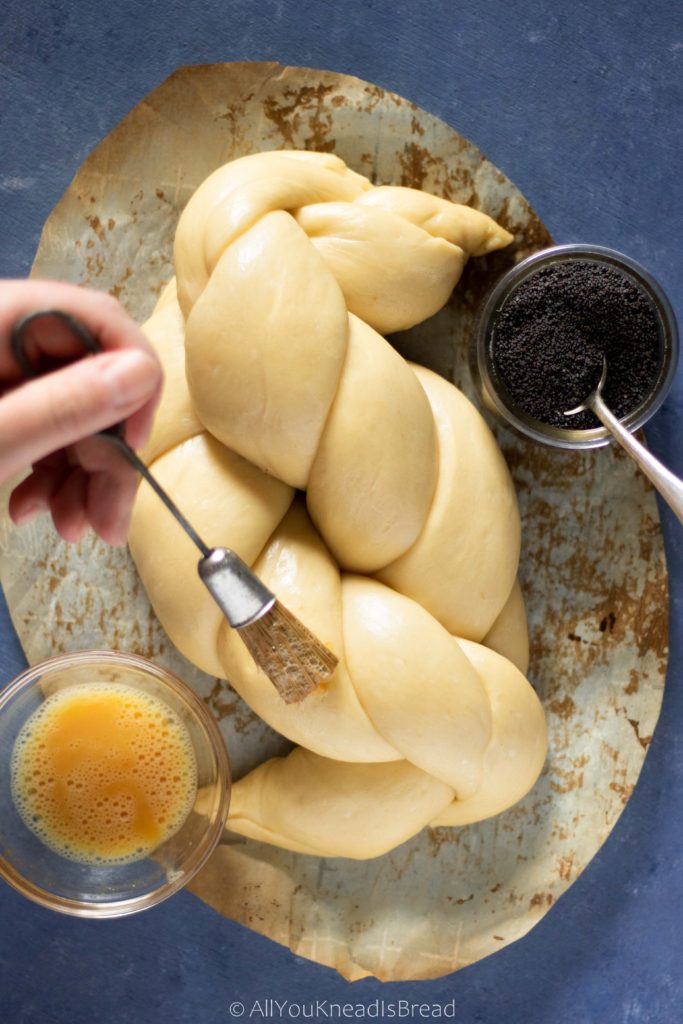
After you brush your challah with the egg white, you can sprinkle some poppy or sesame seeds to decorate it!
Here you have a video for an 8 strand challah:

The good thing about challah dough is its versatility when it comes to shapes and braiding. If you’re looking for a beautiful shape but are a bit intimidated by braids, I’d suggest you try your hand at a round challah. It’s very easy to braid and you won’t get lost.
The baking
Since every oven is a bit different, bake your challah until it’s golden brown. If it gets too dark on top you can tent it with aluminum foil until it’s done inside. If you have trouble knowing if the bread is done, check the inside temperature. It should register at least 200F / 94C.
I have this thermometer and I’m very happy with it. It’s fast and accurate and it can hold the max/min temperature. What I like the most is that it has a magnet! So I can leave it stuck on the fridge while I’m baking for easy use.
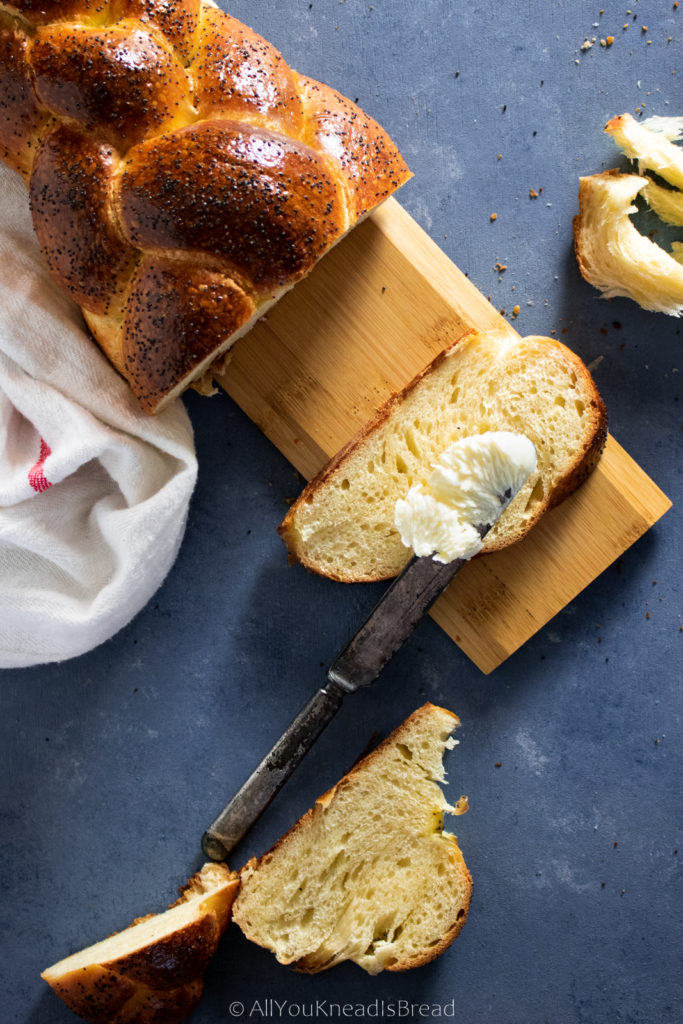
After baking let the challah cool down for a while. It will help set the crumb and aromas!
I hope you enjoy this wonderful sourdough challah!

If you make this easy sourdough challah, let me know what you think and tag me on your creations! I love to see what you guys make!
You can find me on Instagram or Facebook and you can also subscribe to my Youtube channel.
For suggestions or want me to adapt a yeast-based recipe into a sourdough one, etc. please contact me and I’ll try my best to respond and plan a recipe!
Happy baking!
This post contains affiliate links and any sales made through such links will reward me a small commission – at no extra cost for you – that allows me to keep running this blog.

Easy and Delicious Sourdough Challah
A delicious sourdough challah with a very fluffly crumb. Perfect to eat plain, to make toasts, or even french toasts.
Ingredients
- 345 g king arthur all purpose flour (11.7% protein content)
- 110 g sourdough starter at its peak of activity
- 70-80 g water room temperature
- 1 Large egg
- 1 Large yolk (save the white for final egg wash)
- 50 g granulated sugar
- 80-90 g vegetable oil
- 6 g salt
- 1 tsp poppy or sesame seeds optional
Instructions
-
Add the water and the sourdough starter to a bowl and with a whisk bread down the starter
-
Add the egg, the yolk, and the sugar and combine everything
-
Sift the flour and salt together and add them to the dry ingredients
-
Combine everything until you don't see dry flour particles and let it rest 30-60 mins
-
Start kneading, if using a stand mixer you can use the paddle attachment
-
When the dough starts developing the gluten add the oil and keep kneading until it's completely absorbed (see notes)
-
Knead 4-5 minutes and let it rest another 5-7 minutes. Continue doing thes until it's ready (Let the dough rest as much as necessary).
-
When the dough passes the windowpane test and it's smooth and elastic, put it in a lightly oiled container and let it ferment until it doubles or almost doubles and feels puffy (at 68-74F it takes tops 8h, typically overnight)
-
Degas the dough and let it rest a few minutes. Then divide it in as many strands as you want for your braid, shape them into dough balls and let them rest (covered) for 10 minutes
-
Take one piece of dough and with the heel of your hand flatten it. Use a rolling pin to roll the dough into a 7 x 4 inches oval. Starting from the longe side roll the dough into itself and form a log. Pinch the seam closed and gently roll from the center outwards lengthening the log
-
Repeat with all the dough pieces, if it's difficult to stretch the log, let it rest a few minutes
-
Braid the challah and place it on a piece of parchemnt paper on the tray you'll use to bake it. Cover it with plastic wrap and let it rise until it feels puffy (at 68-74F it takes about 3-4h)
-
Preheat the oven for 20 minutes at 350 F. When the challah is ready, brush it with the egg white and sprinkle poppy or sesame seeds. Bake it for 35-40 minutes or until it has a nice golden brown color
-
Let the challah cool down to room temperature before slicing it
Recipe Notes
- If you’re kneading with a stand mixer you might find it easier to incorporate the oil by hand. Squeezing and twisting the dough will work faster.
- If you think the challah getting too dark but the inside is not done, tent it with a piece of aluminum foil.
- Kept it in a plastic bag or airtight container, it can last fresh and soft several days.
Best Basic Challah
Finally! My first post!
I can’t believe it took me this long. Can you imagine that I spent most of the time deciding colors, styles, logos, etc?? It’s the first time for me to design something and let’s say that creativity is not my strength.
Anyways, here we are! Holiday time! A time where I’m sure Pinterest is on fire with people looking for recipes, décor ideas, centerpieces… When setting the table for any event, I like it to be more functional. I don’t like to have things between the people at the table that will make conversations or interactions difficult. I like to make the food be part of the ornaments.
Last week I went to a Friendsgiving dinner, and I was assigned the bread. We all came from different places around the world, many of the guests weren’t used to crusty bread ( as a Spaniard, that would’ve been my first option). So, I decided to make some soft bread. But dinner rolls seemed so not-holiday-worthy. There’s nothing wrong with dinner rolls, but I wanted something different, and tasty but not too sweet either. And I wanted edible decorations! Something to complement the table but that it’ll eventually disappear.
My solution? A nice challah!
I love challah because with simple ingredients you can make amazing things! I particularly enjoy the shaping. The 6 strand braid is my favorite, I think. It took me a bit to learn because I kept getting lost midway!
The loaf was a success! Everyone was taking pictures; some people had never heard of challah before and they were pretty impressed. And all that just because of the shape! Of course, when they actually tried the bread, they were even more impressed with the taste!
This recipe is from “The bread baker’s apprentice”, by Peter Reinhart, it’s my go-to challah recipe. I love this book, it has many different recipes, from different parts of the world. The book has great tips and in general, the ingredient lists are simple. I think it’s a great book for beginners and home bakers.
I just changed the type of flour, the original recipe uses all-purpose flour, but I like bread flour better. Enrich doughs have to be strong to be able to “lift” all the eggs, fats, and sugar. And also, I always bake with the same type of flour, and I can anticipate the amount of water I’d need or how the dough will behave.
But this is up to you really. Changing the flour won’t make the bread better or worse, just different! 😊
The original recipe also calls for vegetable oil. I chose olive oil because I love the combination it makes with eggs. I think both ingredients complement each other perfectly! You can use other shortenings, but I wouldn’t recommend butter. The reason is that it has a strong taste, and challah is all about the egg, I don’t want the butter to hinder the taste of eggs. But again, this is my opinion. You can make it the way you enjoy it most!
To make this challah you’re going to need the following ingredients:

- First, you need to activate the yeast. I like to use active dry yeast, but even when I use instant yeast, I activate it as well. Just to make sure it’s working well.
If your kitchen it’s cold, you can use lukewarm water to activate the yeast. If it’s hot, room temperature water works well. You can even add a teaspoon of sugar to the water. The yeast will feed on it, so it won’t add any extra sweetness.
Your yeast will be ready after a few minutes, and you should see some bubbles on top (maybe not as many as in my picture, I like to use a whisk to make sure the yeast dissolves completely, and that adds extra bubbles).
- While you’re waiting for the yeast, you can sift the flour, sugar, and salt into a bowl and stir it well to mix everything.
- Then add the yeast mixture to your dry ingredients
- And incorporate the eggs. You can whisk the eggs into the yeast mixture, or in a separate bowl and pour them into the flour, or like me, add them directly to your flour and yeast mixture.
Now it’s time for one of the most important steps, the autolysis step.
- Mix everything thoroughly, until you don’ see dry flour particles anymore and you have a sticky mess. If you think your dough is dry, you can add a little bit more water. Just 1 tablespoon at a time. Cover your bowl and leave it there for 20-30 minutes.
This step is important because it’ll allow the flour particles to fully hydrate before you start kneading. That means that the flour will work at full strength and the gluten network will be developed much easier.

After the autolysis step, the fun starts! Kneading time!
- Knead the dough in your most comfortable way. By hand or using a stand mixer with the hook attachment. At the beginning the dough will be sticky but don’t add more flour, keep kneading.
The dough is sticky because it has lots of eggs and sugar, So they get between the water molecules and the gluten proteins. So you must keep kneading to ensure all the gluten proteins get to link with each other and form the gluten network.
Regardless of your kneading method, eventually, you should see your dough coming together, getting more elastic, and getting some consistency.
- Now it’s time to add the oil (or any other fat or shortening).
If you’re not very used to adding the fat content midway, I’d suggest you add the oil little by little. One tablespoon at a time if you have to. Otherwise, you might get very frustrated.
Once the gluten network is halfway developed, it’s difficult to add fats, you have to keep kneading and squeezing the dough. It’ll eventually absorb the oil.
I like to squeeze the dough and turn it around and squeeze it again. I found that by doing this the dough absorbs the oil much faster. Also, trying to knead while everything is covered in oil… is not easy!
- After adding all the oil, keep kneading until the dough is not sticky anymore and the surface is covered by small blisters. At this point, the dough should pass the windowpane test. Remember to let the dough rest 5 minutes before you try to stretch it.
It took me around 20-25 minutes to get the dough ready. Your kneading time can be different, don’t worry. Your kitchen temperature, your skills, the stand mixer you use, or even the flour, play a role in the development of the dough. So don’t aim for time, but for dough consistency.
Look at the difference!

- Now you just need to put your dough in a bowl, cover it and let it ferment until it rises enough to be all puffy and about 1.5 times its original size. If your kitchen is cold, you can put the bowl in the oven with a pot with boiling water to create a warm microenvironment. Be careful not to turn the oven on!
- After the fermentation, deflate the dough and let it rest for a few minutes. Cut 6 pieces of equal weight and make small balls with each one.
You can use a little bit of flour for dusting, but try not to incorporate too much flour or your challah might end up dry.
You can shape your challah the way you like the most, a simple braid, 4 strands braid… you name it!
- Let the dough balls rest for 5 minutes. These resting times are important to let the gluten relax. 5 minutes can make a HUGE difference on your dough and it’ll be much easier to shape.
- After 5 minutes, take the first ball, flatten it with your hand, and with the help of a rolling pin, roll it into a 25 cm long oval (10 in approx) and 0.5 cm thick (1/4 in). Now, with the help of your hands, and starting on the widest part, roll it back to form a log. Repeat with each ball.

- Once the logs are ready, you just need to stretch them and make the strands. They should be about 50 cm (20 in) long. Start with the first log you made, since that one should’ve had more time to rest.
If at any point you feel that the strands keep getting back to their original shape, let them rest and come back a few minutes later. Try to make the strands in a way that is thicker in the middle and thinner on the ends. This way, the challah will have a beautiful shape, bigger in the middle and thinner on the ends.
- Time to braid the challah! I did not include a tutorial on the braiding part because I think it’s easier to understand if you see it in a video, rather than if you read it.
To avoid your challah from having a weird oven spring (meaning: end up with a terrible shape), try not to braid it too tight so you leave some room for the strands to rise.
- Put the challah on a baking tray and cover it with lightly oiled plastic wrap.
If you like a crusty challah, you can brush now once with the leftover egg whites, and a second time right before going into the oven. If you prefer it softer, just brush it once before going into the oven.
- Let the challah rise again until it’s puffy. It doesn’t have to double in size.
- Preheat your oven at 350 F (175 C)
- Once the challah has risen enough, put it in the oven and bake for about 20-25 minutes. After that time, turn the baking tray 180 degrees, so it gets to bake homogeneously.
If you think the challah is browning too fast, you can put aluminum foil on top and reduce the heat to 325 F (165 C).
Depending on your oven, you might need a bit more time, it’s okay. Just make sure that the inside it’s completely cooked.
And here it is!
I’m sorry I cannot show you how the crumb looked, but I can tell you it was awesome! Very soft, cohesive, and beautifully yellow!
I hope you enjoy the recipe. Below you can find a printable version with a detailed step-by-step.

Best Basic Challah
Follow this recipe for a foolproof challah.
Ingredients
- 510 g bread flour (mine has 12.7% protein content)
- 30 g sugar
- 7 g salt *
- 4 g active dry yeast
- 30 g olive oil
- 2 large eggs
- 2 large egg yolks
- 215 ml water **
- 2 egg whites
Instructions
-
Add the yeast to the water and mix well. I like to use a wire whisk to make sure there are no lumps. Let it sit 5 mins to activate.
-
While the yeast is activating. Sift the flour into a bowl and add the salt and the sugar. Mix well with a wire whisk.
-
Once the yeast is active (you should see some bubble on top) add it to the flour mixture
-
Add the eggs and the yolks
-
Mix everything very well until you don’t see dry flour particles. If the dough is not cohesive, you might need to add a little bit more water. Do it half tbsp at a time. You don’t want to add too much water.
-
Let the dough rest for 20 minutes for a short autolysis. You can skip this step if you don’t have time, but I strongly recommend it since it’ll make your life easier when you have to knead the dough.
-
Start kneading the dough until it gets some consistency and elasticity.
-
Add the oil little by little until the dough absorbs it all.
-
Keep kneading until the dough is no longer sticky and you see small blisters covering the surface. It should pass the windowpane test.
-
Once the dough is ready, shape it into a ball. Lightly oil a bowl and place the dough inside. Cover the bowl and let the dough ferment for 1h approx. It doesn’t have to duplicate the size.
-
After 1h, deflate the dough, shape it again into a ball and let it ferment again until it’s about 1.5 times in size or until it’s puffy but not over fermented.
-
Remove the dough from the bowl, deflate it and let it rest 5 mins.
-
Divide the dough into 6 equal parts (if you’re doing a 6-strand challah)
-
Shape each part into a ball, cover them with plastic wrap and let them rest 5 mins.
-
Roll each ball into a 50 cm (20 in) log. Start making short logs and let them rest before rolling them to the final length. It’ll give the gluten time to rest and it’ll be easier for you.
-
Shape your Challah the way you’d like, line a baking sheet with parchment paper and place the Challah there.
-
Brush the Challah with the egg whites wash, cover it with lightly oiled plastic wrap and let it rise until it's puffy.
-
Preheat your oven at 350 F (175 C).
-
Once the Challah is ready, carefully remove the plastic wrap and brush again with the egg whites.
-
Bake in the middle rack for about 20-25 minutes and turn the baking sheet 180 degrees. Bake for another 20mins or until it’s golden brown (we turn the baking sheet halfway to ensure an even baking)
Recipe Notes
* You can omit the salt when you mix the dry ingredients and add it after the autolysis.
** You might need to adjust the water. The range should be anywhere between 200-250 ml.
Happy baking!
