
This past January I decided to bake only vegan
For the past 2 years or so I’ve been following a mostly plant-based diet. Not continuously, but I did reduce significantly the
If you read my previous post, you know fiber is important for me, and a vegan diet it’s full of it! To be honest, I think all these benefits I get from eating vegetables are, in part, related to an improvement in my gut microbiota. My lovely gut bugs are having a feast with all this fiber! Plus, I did lose some weight because I am eating healthier.
NOTE: I have been tracking my diet and protein intake with a nutritionist. So, if you want to change your diet, and especially if you have any health condition whatsoever, you should talk to your doctor or a nutritionist first. A vegan diet works for me and I really feel the benefits, but it doesn’t have to be the same for you. With that being said, and regardless of your diet… eat your veggies! 😊
LET’S VEGANIZE A RECIPE!
Or… You can jump to the Recipe!
Since I started flirting with a plant-based diet I’ve been having the same question in the back on my mind: how do you replace eggs in bread baking? You can always switch butter with a non-dairy option, or vegetable oil… but eggs? Then it kicked me, what are eggs but a mixture of fat (yolk) and liquid protein (whites)? All I had to do was replace the yolks with more fat and add a bit more liquid to make up for the whites. An oil and water emulsion should work perfectly!
The first thing that came to my mind was my Hokkaido bread recipe. It uses whipping cream as part of the liquid and it gives it an incredible crumb texture. I just thought that whipping cream can be easily replaced by coconut milk. My recipe only calls for 1 egg so I thought my experiment shouldn’t go too bad…
WHAT MAKES HOKKAIDO BREAD SPECIAL?
Something that defines Hokkaido milk bread is the Tangzhong method. This method is original from Asian countries (although now it’s widely used) and it really makes a difference in enriched doughs. Essentially, it’s a water roux. You cook a small amount of the flour of the recipe with part of the liquid of the recipe. When you start cooking the flour/liquid mixture, it’s just liquid. The more it heats up, the thicker it gets, until you end up with a paste, the
WHAT HAPPENS TO THE STARCH?
The reason the
WHY DOES TANGZHONG IMPROVE THE TEXTURE?
The role of starch in bread making is important because the particles get stuck to the gluten matrix and
But this method goes beyond that! All the starch in the dough will gelatinize at some point during baking, but the pre-gelatinized starch of the
LET’S GO WITH THE RECIPE!
The first thing you need to do is prepare the
Mix the flour, the cold water, and the cold milk in a saucepan and give it a whisk until you don’t see flour lumps. Then start to heat it at medium heat (my stove has 10 levels of heat, I use the 6). Stir the mixture all the time, after a few minutes you’ll start seeing lumps, like custard-like lumps. Keep stirring, at some point I’d say to do it vigorously to be able to have a homogeneous paste. When you stir and start to see the bottom of the pan, pay attention! It’ll take no time to be ready! (I’m sorry, I Prepared it ahead of time and forgot to take a picture of mine).
Once it’s ready, transfer it to a bowl and cover it with plastic wrap. Make sure the wrap touches the surface. This way you won’t have the “skin
Let it cool down to room temperature. You can refrigerate it until you use it. Just make sure you don’t add it to the dough too cold. It might slow down fermentation times.
NOTE: once it cools down it’ll get harder, but don’t worry, it’s normal!

As always, to make the dough we first activate the yeast in the soy milk (or vegetable milk of your preference). If you want, you can add a bit of sugar from the recipe (about 1 tsp).

Then the yeast mixture is foamy, add it to a bowl, add the sugar, the coconut milk, the
Prepare the emulsion: mix the water and the olive oil until you get a with-ish viscous liquid.
In a separate bowl, sift the flour and the salt, and then add the wet ingredients, the emulsion and mix it with your hands until you don’t see dry flour particles.

Let it rest 20 or 30 minutes so the flour particles can hydrate.
Knead the dough very well, it should pass the “window pane test” and it should be elastic and smooth. Try not to use too much flour if you knead by hand, otherwise, you will change the flour

Lightly oil a container and place the dough in it. Let it rest until It has doubled in size.
Deflate the dough and separate it into 2 equal pieces. This recipe yields 2 loaves.

Take one of the balls, divide it into 4 pieces of equal weight and round each piece into a ball. Cover with a loose plastic wrap or a damped clean towel and let the balls rest 5 or 10 minutes so the gluten can relax a little bit and shaping the loaf can be easier!
Take one of
With a rolling pin, roll the dough into a larger oval. The length should be 20-22 (8-9 in approx.) cm and the width should be the width of your baking pan (My pan is 9.5 x 5 in – 23.9 x 12.6 cm).

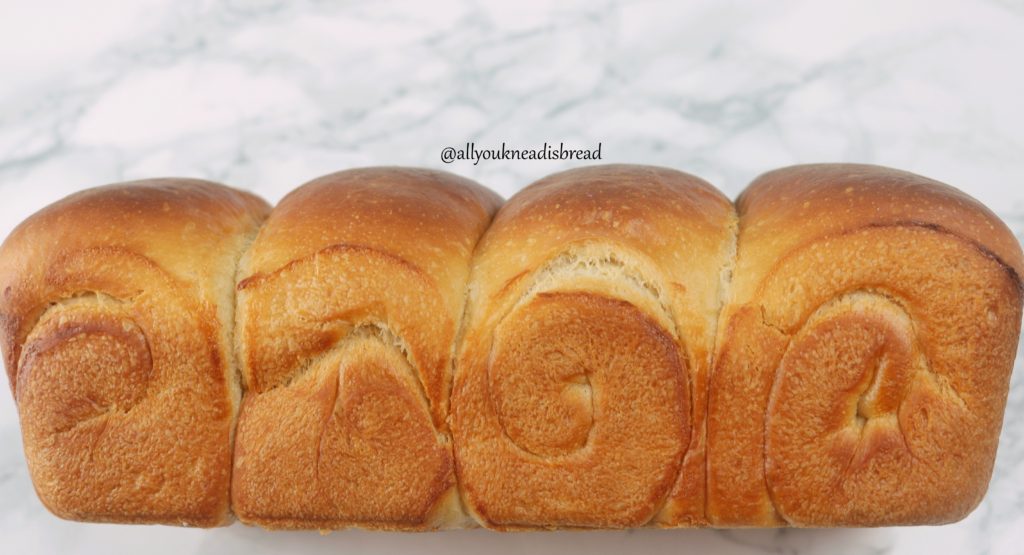
Take the narrower side and start rolling the dough into a log. Place the log in the baking pan.


Do the same with the other 3 pieces of dough and cover the pan.
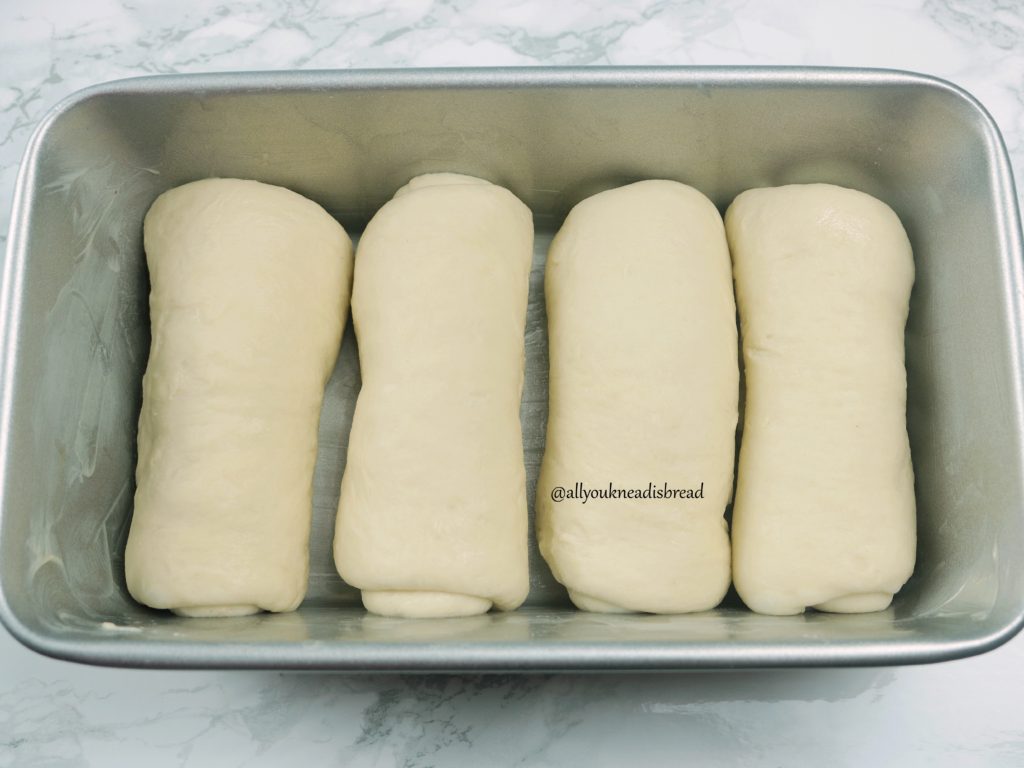
Let the loaf rise until it’s puffy. It doesn’t have to necessarily double in size. Just make sure it did grow and when you touch the dough, it puffs back slowly.

While you’re waiting for the dough to proof, preheat your oven at 350F (177 C).
Before baking, I brushed the dough with coconut milk leftovers. You can use soy milk or vegan butter… Whatever you prefer. I tried coconut milk and I liked the result!
If you see the bread is getting dark too quickly, reduce the temperature to 340F (171C) and cover it with aluminum foil.
Once you finish baking take the pan out of the oven and put it in a cooling rack for 20 mins before you take the bread out. The bread is still finishing up baking inside, if you shake it too much you could destroy the crumb.

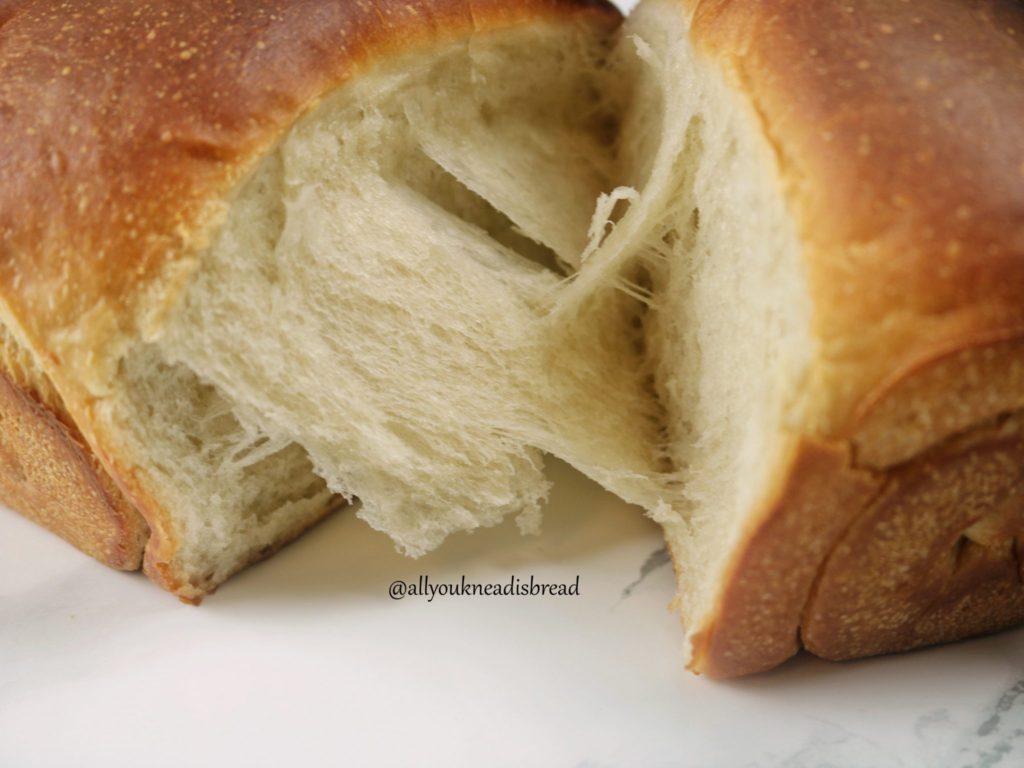
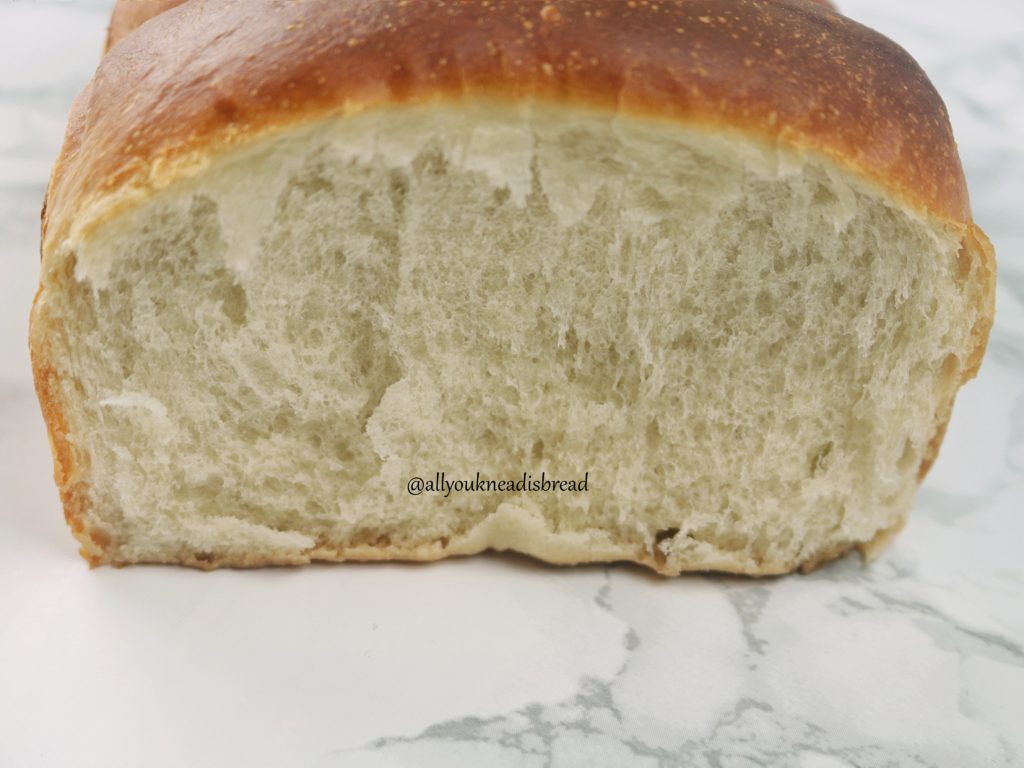
This bread is very tasty! You can definitely taste the coconut, but the flavors are totally balanced. The coconut is not overwhelming. The crumb is very soft and cohesive. Look at how it “peels”!
Once the bread has cooled down to room temperature you can store it in a Ziplock bag.
I baked it in the evening and ate a piece, it was very good. But in my opinion, it was even better the next morning!

Vegan Hokkaido Milk Bread
This is a vegan version of a Hokkaido Milk Bread recipe
Ingredients
Tangzhong
- 30 g bread flour
- 85 g water
- 85 g soy milk
Dough
- 575 g bread flour
- 7 g active dry yeast
- 80 g sugar
- 8 g salt
- 2 tsp vanilla extract
- 25 g water for emulsion
- 25 g olive oil for emulsion
- 200 g full fat coconut milk
- 200 g soy milk
Instructions
Tangzhong
-
Mix the flour, water, and milk very well in a saucepan. You shouldn’t see lumps.
-
Start heating the mixture at medium heat and stir continuously until it thickens and turns into a paste.
-
Once ready, cover it with a plastic wrap and refrigerate it until you need it. You can make the tangzhong the day before.
Dough
-
Mix the soy milk at room temperature with 1 tsp of the total sugar and the yeast and stir until everything dissolves. Wait until it’s foamy.
-
In a separate bowl sift the flour and the salt
-
When the yeast is active add the sugar and the tangzhong and mix it very well
-
Add the coconut milk to the liquid mixture and stir well
-
Mix 25 g of water and 25 g of olive oil and stir until you get a whit-ish yellow-ish viscous liquid
-
Add the wet ingredients to the flour.
-
Add the oil/water emulsion
-
Mix until you don’t see dry flour particles.
-
Let the dough rest 20-30 mins to allow the flour to absorb moisture.
-
Knead the dough very well until you can stretch it into a thin layer without tearing apart. It shouldn’t be very sticky
-
Let the dough rest until it doubles in size
-
Divide the dough into two parts of equal weight.
-
Divide one of the parts into four equal pieces, shape them into a small ball and let them rest for 5 minutes.
-
Take one of the pieces, flatten it with your hand into an oval and with a rolling pin stretch the oval into a larger one. The narrow side should be as wide as the narrow side of your baking pan.
-
Roll the piece of dough into a log and place it in a lightly oiled baking pan.
-
Do the same for the other 3 pieces.
-
Preheat your oven at 340F
-
Let the dough rise until it’s puffy. It might take up to 1h or 1h30mins
-
Bake the loaves until they’re a nice brown color. If you think the inside is not ready and the dough is starting to get too dark cover it with a piece of aluminum foil.
NOTE: With the other half of dough, you can either make another loaf, or dinner rolls, or anything you want. Deflate it very well, shape it the way you like it and let it rise at room temperature. If you want to retard the fermentation, let it rest 30 mins at room temperature first, and then move it to the fridge up to 12-14h. More than that might result in big bubbles that can burn during baking.

What is bread flour?
It’s strong flour, flour suitable for bread with a higher protein content. The content itself varies from country to country and brand to brand.
Damn, that was NOT an easy recipe. 5 hours ago I thought I was experienced with bread. Thank you, it turned out great! Despite all the efforts, I would make this again.
It can be a bit hard to deal with the dough, it’s a bit sticky hehe. If it’s too much trouble to knead, try to do it in batches. Knead for a few minutes, rest a few minutes, knead, rest, knead, rest… That way the gluten relaxes and every time you start kneading the process is more efficient. It takes a bit more time, but less “hands on” time 😉