
Easter is here!
When I was a kid I was always looking forward the next special occasion because I knew my mom and my grandma would cook something good and I’d get to be the official taster 😊 Now, as an adult, I do the same, I look for recipes for every occasion!
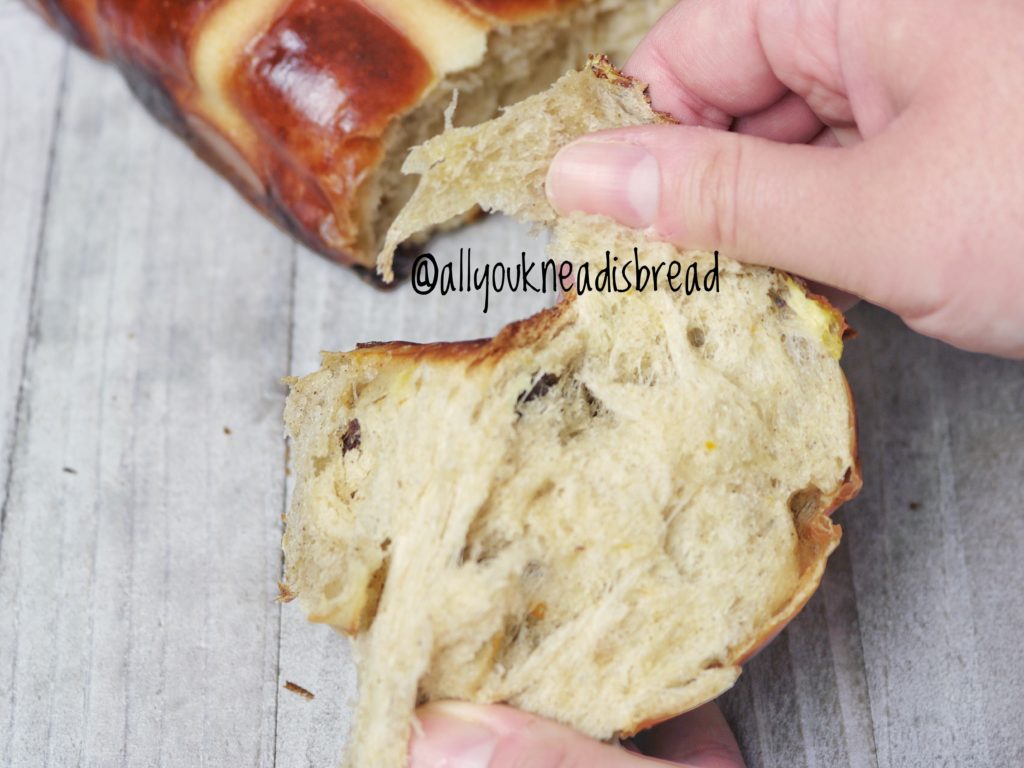
I discovered hot cross buns about 3 years ago. The moment I saw the recipe I was already in love. The combination of spices, the fruits… so aromatic! I LOVE these buns! Bread, sweet fruits and spices all together? Uhmm.. yeah!
I have seen many videos and recipes and I have found a common “problem”, and that’s the lack of a proper gluten network. The tricky part of this recipe, in my opinion, is the kneading process. It takes a bit of time to develop the gluten network, it’s an enriched dough and therefore, not easy. This recipe has a good amount of wet ingredients, I found that increasing the liquid and fat content a little bit can go a long way. It’s a bit of a long process to get the dough ready, but boy! The result is AMAZING! The buns are SUPER SOFT and they last fresh much longer.
HOW SHOULD YOU KNEAD ENRICHED DOUGH?
Well… being patient is a must, with butter, eggs, and sugar in the middle, developing the gluten network is more difficult, so take your time. If you’re using a stand mixer, don’t knead too fast. You can start with the paddle attachment until the dough starts to come off the bowl sides and rolls upon the paddle, then change to the hook attachment. My stand mixer has 10 speeds and I use the paddle attachment at speed 2-3 and then the hook attachment at speed 3-4.
I’d suggest you knead for 10 minutes and then let the dough rest for 3-5 minutes. Then knead again, and rest again. It helps the gluten proteins 😉
WHY DOES GLUTEN NEED TO REST?
Gluten proteins get tired of being kneaded, basically. And it’s difficult for them to keep linking each other. When we knead the dough, we facilitate the interactions between the gluten strands, but at the same time, the long chains get somehow tangled. So, when we let the dough rest, what happens is that these chains reorganize and realign. It’s like a ball of yarn, when it’s tangled you can’t do anything with it, but when it’s properly rolled you can keep taking the yarn out of it.
Enriched doughs need longer kneading times, that means the gluten proteins are going to be under a lot of stress. Let them rest a little and save time in the long run.
WHAT ABOUT THESE BUNS?
Jump to Recipe
Let’s get into this delicious recipe!
NOTE: if you’re using cow milk, boil it for a couple of minutes and let it cool down until it’s lukewarm. Boiling the milk will break down some enzymes that, otherwise, could weaken the gluten network. Boil more milk than the amount in the recipe because some of it will evaporate as it heats up.
As always, dissolve the yeast in the lukewarm milk and let it sit for a few minutes. You can add a pinch of sugar and when the mixture is frothy, the yeast is active!
Add the eggs, sugar, and spices to the yeast mixture and give it a good whisk. I like to add the spices to the liquid ingredients because I think they can infuse more aromas this way. But if you prefer to mix them with the flour it’s fine too.
Then add the sifted flour and combine everything until you don’t see dry flour particles. You should have a sticky mess, a bit runny even.

Cover the dough and let it rest for 20-30 minutes. This step will allow the flour particles to hydrate so the gluten proteins are at full strength when you start kneading.
After the autolysis period, add the salt and start kneading.

When the dough starts being elastic add the softened butter and keep kneading.

When the dough is elastic enough (it should be smooth), add the dry fruits and knead just enough to integrate all the fruits.
Make a ball with the dough and place it in a lightly oiled container. It’s better to use vegetable or canola oil, because they have milder flavors than, for example, olive oil.

NOTE: the dough should pass the windowpane test. Let the dough rest 5 minutes before checking it. If you can see some of the fruits through the dough and it doesn’t tear apart, that’s a good sign of proper gluten development.
HOW TO PREPARE THE FRUITS
Typically, this recipe calls for raisins, but I like to add a bit of everything. You can add candied orange, dry apricots, candied green cherries…
The night before (preferably), or at least a few hours before, mix the raisins (and other very dry fruits you might use) with about ¼ cup of some liquid. You can use tea, freshly squeezed orange juice, or even rum or sherry if you don’t mind the alcohol. Close the container and shake it every now and then to make sure all the fruits get to soak some liquid. Strain the fruits before adding them to the dough. You don’t want to incorporate too much liquid to the dough.

ROOM TEMPERATURE VS. OVERNIGHT FERMENTATION
If you want to bake the buns the same day, let the dough rise at room temperature until it has almost doubled in size, deflate it very well and knead it for 1 minute to get rid of big air pockets.
If you prefer to do a cold fermentation let the dough ferment at room temperature for about 30 minutes and then transfer it to the fridge and let it rise overnight. The next morning take the dough out of the fridge and let it warm up a little bit (30mins to 1h, depending on the temperature of your kitchen), deflate it very well and knead it for 1 minute.

Line a 16x12in (40x30cm) with parchment paper. Divide the dough into 12 pieces of similar weight.
NOTE: I had to use a smaller pan and bake the other 3 buns apart because I forgot my 16×12 pan was in the freezer! 😊

Cover it with plastic wrap and let the buns rise until they look puffy and they increased in size. They don’t need to double in size necessarily, just make sure the dough feels puffy, not hard. The buns should touch each other too.

MAKE THE CROSS AND PREPARE THE BUNS FOR BAKING
***preheat your oven at 375F (190C)***
To prepare the paste just mix the all-purpose flour, icing sugar and milk. It must be a pest. So, it’s better to add the milk little by little until you have the right consistency. The amount of milk depends on the flour you use, play around with the ratio as long as you end up with a paste.

Now that the paste is ready, let’s finish up these buns! Prepare the egg wash, and brush the buns with it BEFORE you pipe the cross. I emphasize before, because I didn’t do it and brushing the buns when the cross was already there was tricky, to say the least!

With a piping bag, make the crosses. Don’t be afraid! I know there’s a lot of pressure but don’t let the piping part intimidate you 😊
Place the buns in the preheated oven and let them bake until they have a nice golden brown color. If your oven doesn’t bake evenly, turn the pan 180 degrees halfway.
When ready, take them out of the oven and let them cool down for 5 minutes before you take them out of the pan.


Enjoy!


Super Soft Hot Cross Buns
Ingredients
Dough
- 500 g bread flour
- 280-320 g lukewarm milk depends on the protein content of your flour. Start with the lesser amount and add more if needed.
- 1 L egg
- 1 L yolk
- 90 g softened butter
- 50 g brown sugar
- 1 tsp salt
- 7 g active dry yeast
- 1 tsp ground cinnamon
- 1 tsp ground allspice
- 1/4 tsp nutmeg optional
- 1 1/2 tsp vanilla extract
- zest of 1 orange
Fruits
- 100 g dark raisins
- 50 g golden raisins
- 50 g glazed green cherries optional
- 2 tbsp dark rum
- 2 tbsp orange syrup
- 1 tbsp water
Cross paste
- 60 g all purpose flour
- 24 g icing sugar
- 80-90 g cold milk amount could vary
Instructions
Dough
-
Combine yeast and lukewarm milk, mix until the yeast is dissolved and let it sit for 10 minutes to activate the yeast.
-
Add the eggs, spices, vanilla extract, orange zest, and salt to the yeast mixture and combine very well.
-
Sift the flour and add it to the wet ingredients. Combine everything until you don’t see dry flour particles. Let it rest for 20-30 minutes
-
Start kneading with the paddle attachment until the dough starts coming off the sides of the bowl.
-
Change to the hook attachment and knead for a few minutes or until you see it’s starting to be elastic and add the butter little by little
-
Keep kneading until the dough is no longer sticky, it comes off the bowl completely and it’s very elastic. It should pass the windowpane test.
-
Add the drained fruits and knead just until they are incorporated into the dough
-
Place the dough into an oiled container, cover and let it ferment until it almost doubles in size.
-
Deflate the dough very well and divide it into 12 portions of equal weight.
-
Roll each portion into a ball an place them into a 16x12in pan lined with parchment paper. Cover and let them rise until they’re puffy and touching each other.
-
Preheat your oven at 375F
-
Brush the buns with egg wash and with a piping bag make the crosses.
-
Bake the buns for about 22 minutes or until they’re golden brown. Keep an eye on them after 20 minutes.
-
Take the buns out of the oven and wait 5 minutes before taking them out of the pan.
Fruits
-
The night before combine the fruits with the rum, syrup, and water in a container. Close it and shake it once in a while to redistribute the liquid
-
Drain the liquid before adding the fruits to the dough
Cross paste
-
Mix the flour and the icing sugar
-
Start adding the milk little by little until you get the right viscous consistency. Whisk the mixture well until there are no lumps.
Recipe Notes
The glazed cherries are completely optional, I like to add them because of their intense color.
The nutmeg is optional too. I like how it can intensify other aromas, but the buns can be perfectly fine without it too.
For best storage wait until the buns cooled down completely and put them into a sealed plastic bag. Keep at room temperature
Vegan Hokkaido Milk Bread
This past January I decided to bake only vegan
For the past 2 years or so I’ve been following a mostly plant-based diet. Not continuously, but I did reduce significantly the
If you read my previous post, you know fiber is important for me, and a vegan diet it’s full of it! To be honest, I think all these benefits I get from eating vegetables are, in part, related to an improvement in my gut microbiota. My lovely gut bugs are having a feast with all this fiber! Plus, I did lose some weight because I am eating healthier.
NOTE: I have been tracking my diet and protein intake with a nutritionist. So, if you want to change your diet, and especially if you have any health condition whatsoever, you should talk to your doctor or a nutritionist first. A vegan diet works for me and I really feel the benefits, but it doesn’t have to be the same for you. With that being said, and regardless of your diet… eat your veggies! 😊
LET’S VEGANIZE A RECIPE!
Or… You can jump to the Recipe!
Since I started flirting with a plant-based diet I’ve been having the same question in the back on my mind: how do you replace eggs in bread baking? You can always switch butter with a non-dairy option, or vegetable oil… but eggs? Then it kicked me, what are eggs but a mixture of fat (yolk) and liquid protein (whites)? All I had to do was replace the yolks with more fat and add a bit more liquid to make up for the whites. An oil and water emulsion should work perfectly!
The first thing that came to my mind was my Hokkaido bread recipe. It uses whipping cream as part of the liquid and it gives it an incredible crumb texture. I just thought that whipping cream can be easily replaced by coconut milk. My recipe only calls for 1 egg so I thought my experiment shouldn’t go too bad…
WHAT MAKES HOKKAIDO BREAD SPECIAL?
Something that defines Hokkaido milk bread is the Tangzhong method. This method is original from Asian countries (although now it’s widely used) and it really makes a difference in enriched doughs. Essentially, it’s a water roux. You cook a small amount of the flour of the recipe with part of the liquid of the recipe. When you start cooking the flour/liquid mixture, it’s just liquid. The more it heats up, the thicker it gets, until you end up with a paste, the
WHAT HAPPENS TO THE STARCH?
The reason the
WHY DOES TANGZHONG IMPROVE THE TEXTURE?
The role of starch in bread making is important because the particles get stuck to the gluten matrix and
But this method goes beyond that! All the starch in the dough will gelatinize at some point during baking, but the pre-gelatinized starch of the
LET’S GO WITH THE RECIPE!
The first thing you need to do is prepare the
Mix the flour, the cold water, and the cold milk in a saucepan and give it a whisk until you don’t see flour lumps. Then start to heat it at medium heat (my stove has 10 levels of heat, I use the 6). Stir the mixture all the time, after a few minutes you’ll start seeing lumps, like custard-like lumps. Keep stirring, at some point I’d say to do it vigorously to be able to have a homogeneous paste. When you stir and start to see the bottom of the pan, pay attention! It’ll take no time to be ready! (I’m sorry, I Prepared it ahead of time and forgot to take a picture of mine).
Once it’s ready, transfer it to a bowl and cover it with plastic wrap. Make sure the wrap touches the surface. This way you won’t have the “skin
Let it cool down to room temperature. You can refrigerate it until you use it. Just make sure you don’t add it to the dough too cold. It might slow down fermentation times.
NOTE: once it cools down it’ll get harder, but don’t worry, it’s normal!

As always, to make the dough we first activate the yeast in the soy milk (or vegetable milk of your preference). If you want, you can add a bit of sugar from the recipe (about 1 tsp).

Then the yeast mixture is foamy, add it to a bowl, add the sugar, the coconut milk, the
Prepare the emulsion: mix the water and the olive oil until you get a with-ish viscous liquid.
In a separate bowl, sift the flour and the salt, and then add the wet ingredients, the emulsion and mix it with your hands until you don’t see dry flour particles.

Let it rest 20 or 30 minutes so the flour particles can hydrate.
Knead the dough very well, it should pass the “window pane test” and it should be elastic and smooth. Try not to use too much flour if you knead by hand, otherwise, you will change the flour

Lightly oil a container and place the dough in it. Let it rest until It has doubled in size.
Deflate the dough and separate it into 2 equal pieces. This recipe yields 2 loaves.

Take one of the balls, divide it into 4 pieces of equal weight and round each piece into a ball. Cover with a loose plastic wrap or a damped clean towel and let the balls rest 5 or 10 minutes so the gluten can relax a little bit and shaping the loaf can be easier!
Take one of
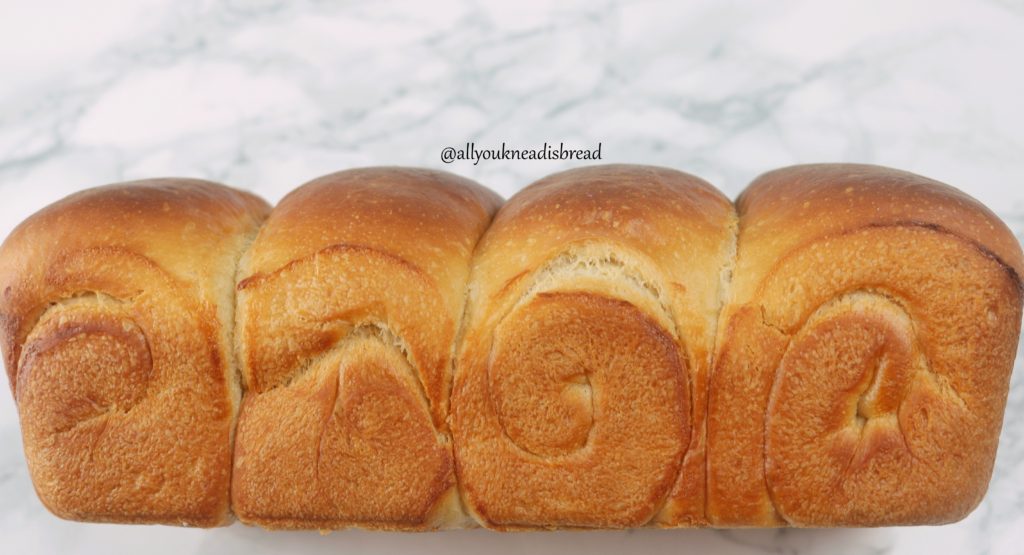
With a rolling pin, roll the dough into a larger oval. The length should be 20-22 (8-9 in approx.) cm and the width should be the width of your baking pan (My pan is 9.5 x 5 in – 23.9 x 12.6 cm).

Take the narrower side and start rolling the dough into a log. Place the log in the baking pan.


Do the same with the other 3 pieces of dough and cover the pan.
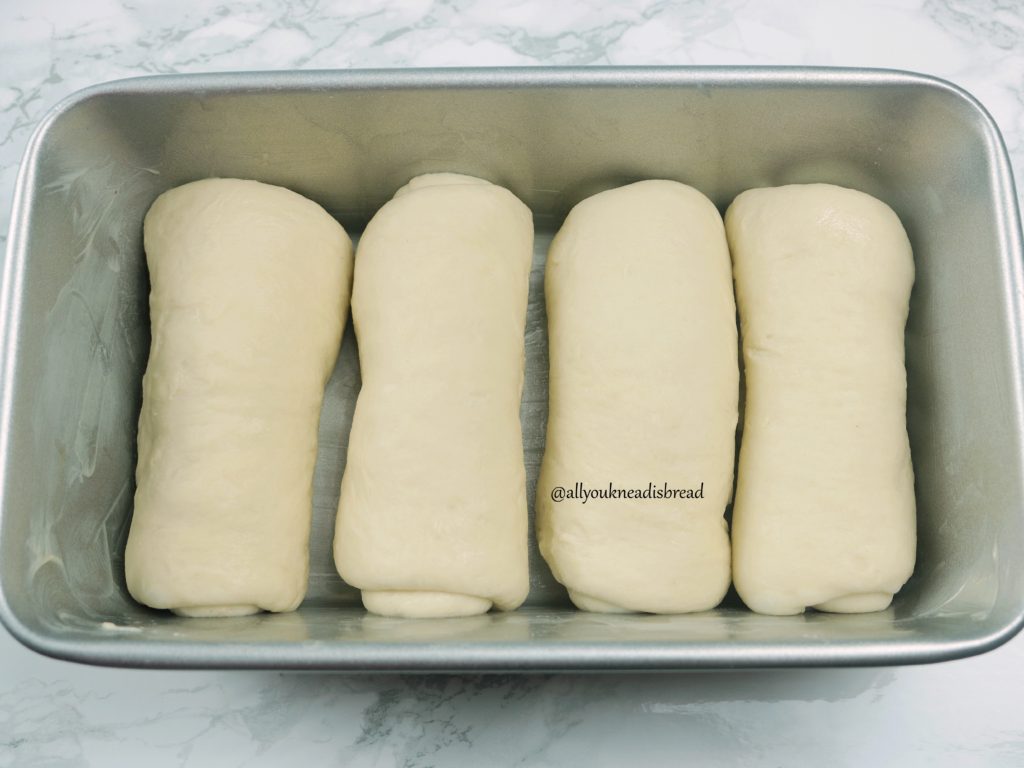
Let the loaf rise until it’s puffy. It doesn’t have to necessarily double in size. Just make sure it did grow and when you touch the dough, it puffs back slowly.

While you’re waiting for the dough to proof, preheat your oven at 350F (177 C).
Before baking, I brushed the dough with coconut milk leftovers. You can use soy milk or vegan butter… Whatever you prefer. I tried coconut milk and I liked the result!
If you see the bread is getting dark too quickly, reduce the temperature to 340F (171C) and cover it with aluminum foil.
Once you finish baking take the pan out of the oven and put it in a cooling rack for 20 mins before you take the bread out. The bread is still finishing up baking inside, if you shake it too much you could destroy the crumb.

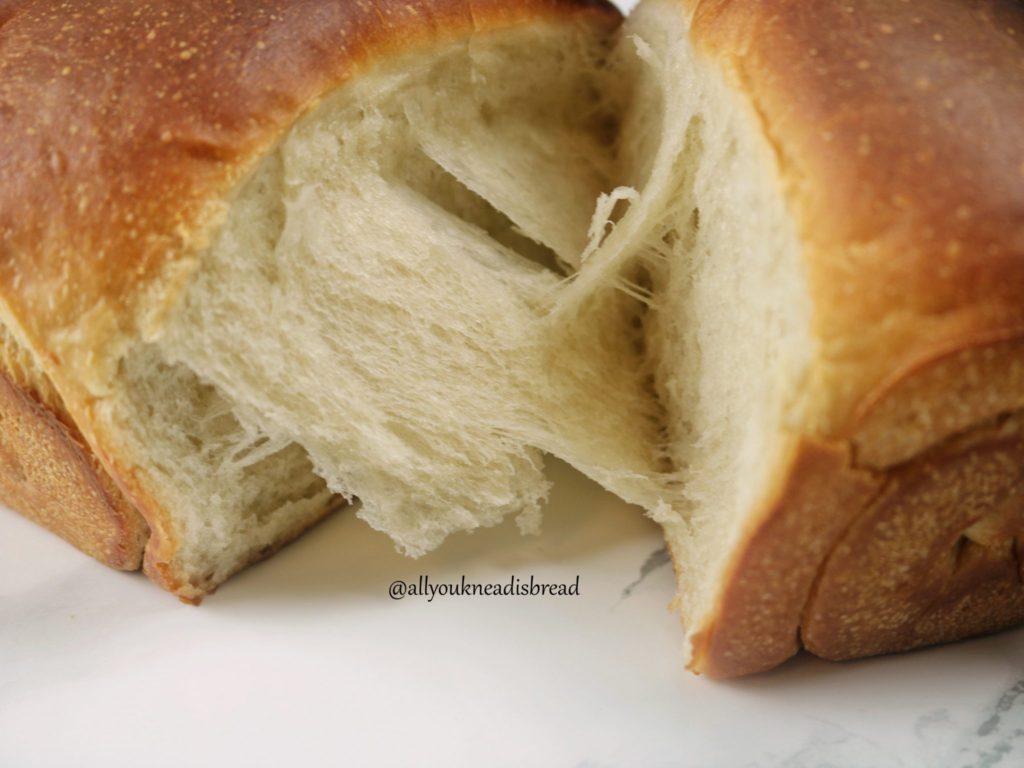
This bread is very tasty! You can definitely taste the coconut, but the flavors are totally balanced. The coconut is not overwhelming. The crumb is very soft and cohesive. Look at how it “peels”!
Once the bread has cooled down to room temperature you can store it in a Ziplock bag.
I baked it in the evening and ate a piece, it was very good. But in my opinion, it was even better the next morning!

Vegan Hokkaido Milk Bread
This is a vegan version of a Hokkaido Milk Bread recipe
Ingredients
Tangzhong
- 30 g bread flour
- 85 g water
- 85 g soy milk
Dough
- 575 g bread flour
- 7 g active dry yeast
- 80 g sugar
- 8 g salt
- 2 tsp vanilla extract
- 25 g water for emulsion
- 25 g olive oil for emulsion
- 200 g full fat coconut milk
- 200 g soy milk
Instructions
Tangzhong
-
Mix the flour, water, and milk very well in a saucepan. You shouldn’t see lumps.
-
Start heating the mixture at medium heat and stir continuously until it thickens and turns into a paste.
-
Once ready, cover it with a plastic wrap and refrigerate it until you need it. You can make the tangzhong the day before.
Dough
-
Mix the soy milk at room temperature with 1 tsp of the total sugar and the yeast and stir until everything dissolves. Wait until it’s foamy.
-
In a separate bowl sift the flour and the salt
-
When the yeast is active add the sugar and the tangzhong and mix it very well
-
Add the coconut milk to the liquid mixture and stir well
-
Mix 25 g of water and 25 g of olive oil and stir until you get a whit-ish yellow-ish viscous liquid
-
Add the wet ingredients to the flour.
-
Add the oil/water emulsion
-
Mix until you don’t see dry flour particles.
-
Let the dough rest 20-30 mins to allow the flour to absorb moisture.
-
Knead the dough very well until you can stretch it into a thin layer without tearing apart. It shouldn’t be very sticky
-
Let the dough rest until it doubles in size
-
Divide the dough into two parts of equal weight.
-
Divide one of the parts into four equal pieces, shape them into a small ball and let them rest for 5 minutes.
-
Take one of the pieces, flatten it with your hand into an oval and with a rolling pin stretch the oval into a larger one. The narrow side should be as wide as the narrow side of your baking pan.
-
Roll the piece of dough into a log and place it in a lightly oiled baking pan.
-
Do the same for the other 3 pieces.
-
Preheat your oven at 340F
-
Let the dough rise until it’s puffy. It might take up to 1h or 1h30mins
-
Bake the loaves until they’re a nice brown color. If you think the inside is not ready and the dough is starting to get too dark cover it with a piece of aluminum foil.
NOTE: With the other half of dough, you can either make another loaf, or dinner rolls, or anything you want. Deflate it very well, shape it the way you like it and let it rise at room temperature. If you want to retard the fermentation, let it rest 30 mins at room temperature first, and then move it to the fridge up to 12-14h. More than that might result in big bubbles that can burn during baking.

Best Basic Challah
Finally! My first post!
I can’t believe it took me this long. Can you imagine that I spent most of the time deciding colors, styles, logos, etc?? It’s the first time for me to design something and let’s say that creativity is not my strength.
Anyways, here we are! Holiday time! A time where I’m sure Pinterest is on fire with people looking for recipes, décor ideas, centerpieces… When setting the table for any event, I like it to be more functional. I don’t like to have things between the people at the table that will make conversations or interactions difficult. I like to make the food be part of the ornaments.
Last week I went to a Friendsgiving dinner, and I was assigned the bread. We all came from different places around the world, many of the guests weren’t used to crusty bread ( as a Spaniard, that would’ve been my first option). So, I decided to make some soft bread. But dinner rolls seemed so not-holiday-worthy. There’s nothing wrong with dinner rolls, but I wanted something different, and tasty but not too sweet either. And I wanted edible decorations! Something to complement the table but that it’ll eventually disappear.
My solution? A nice challah!
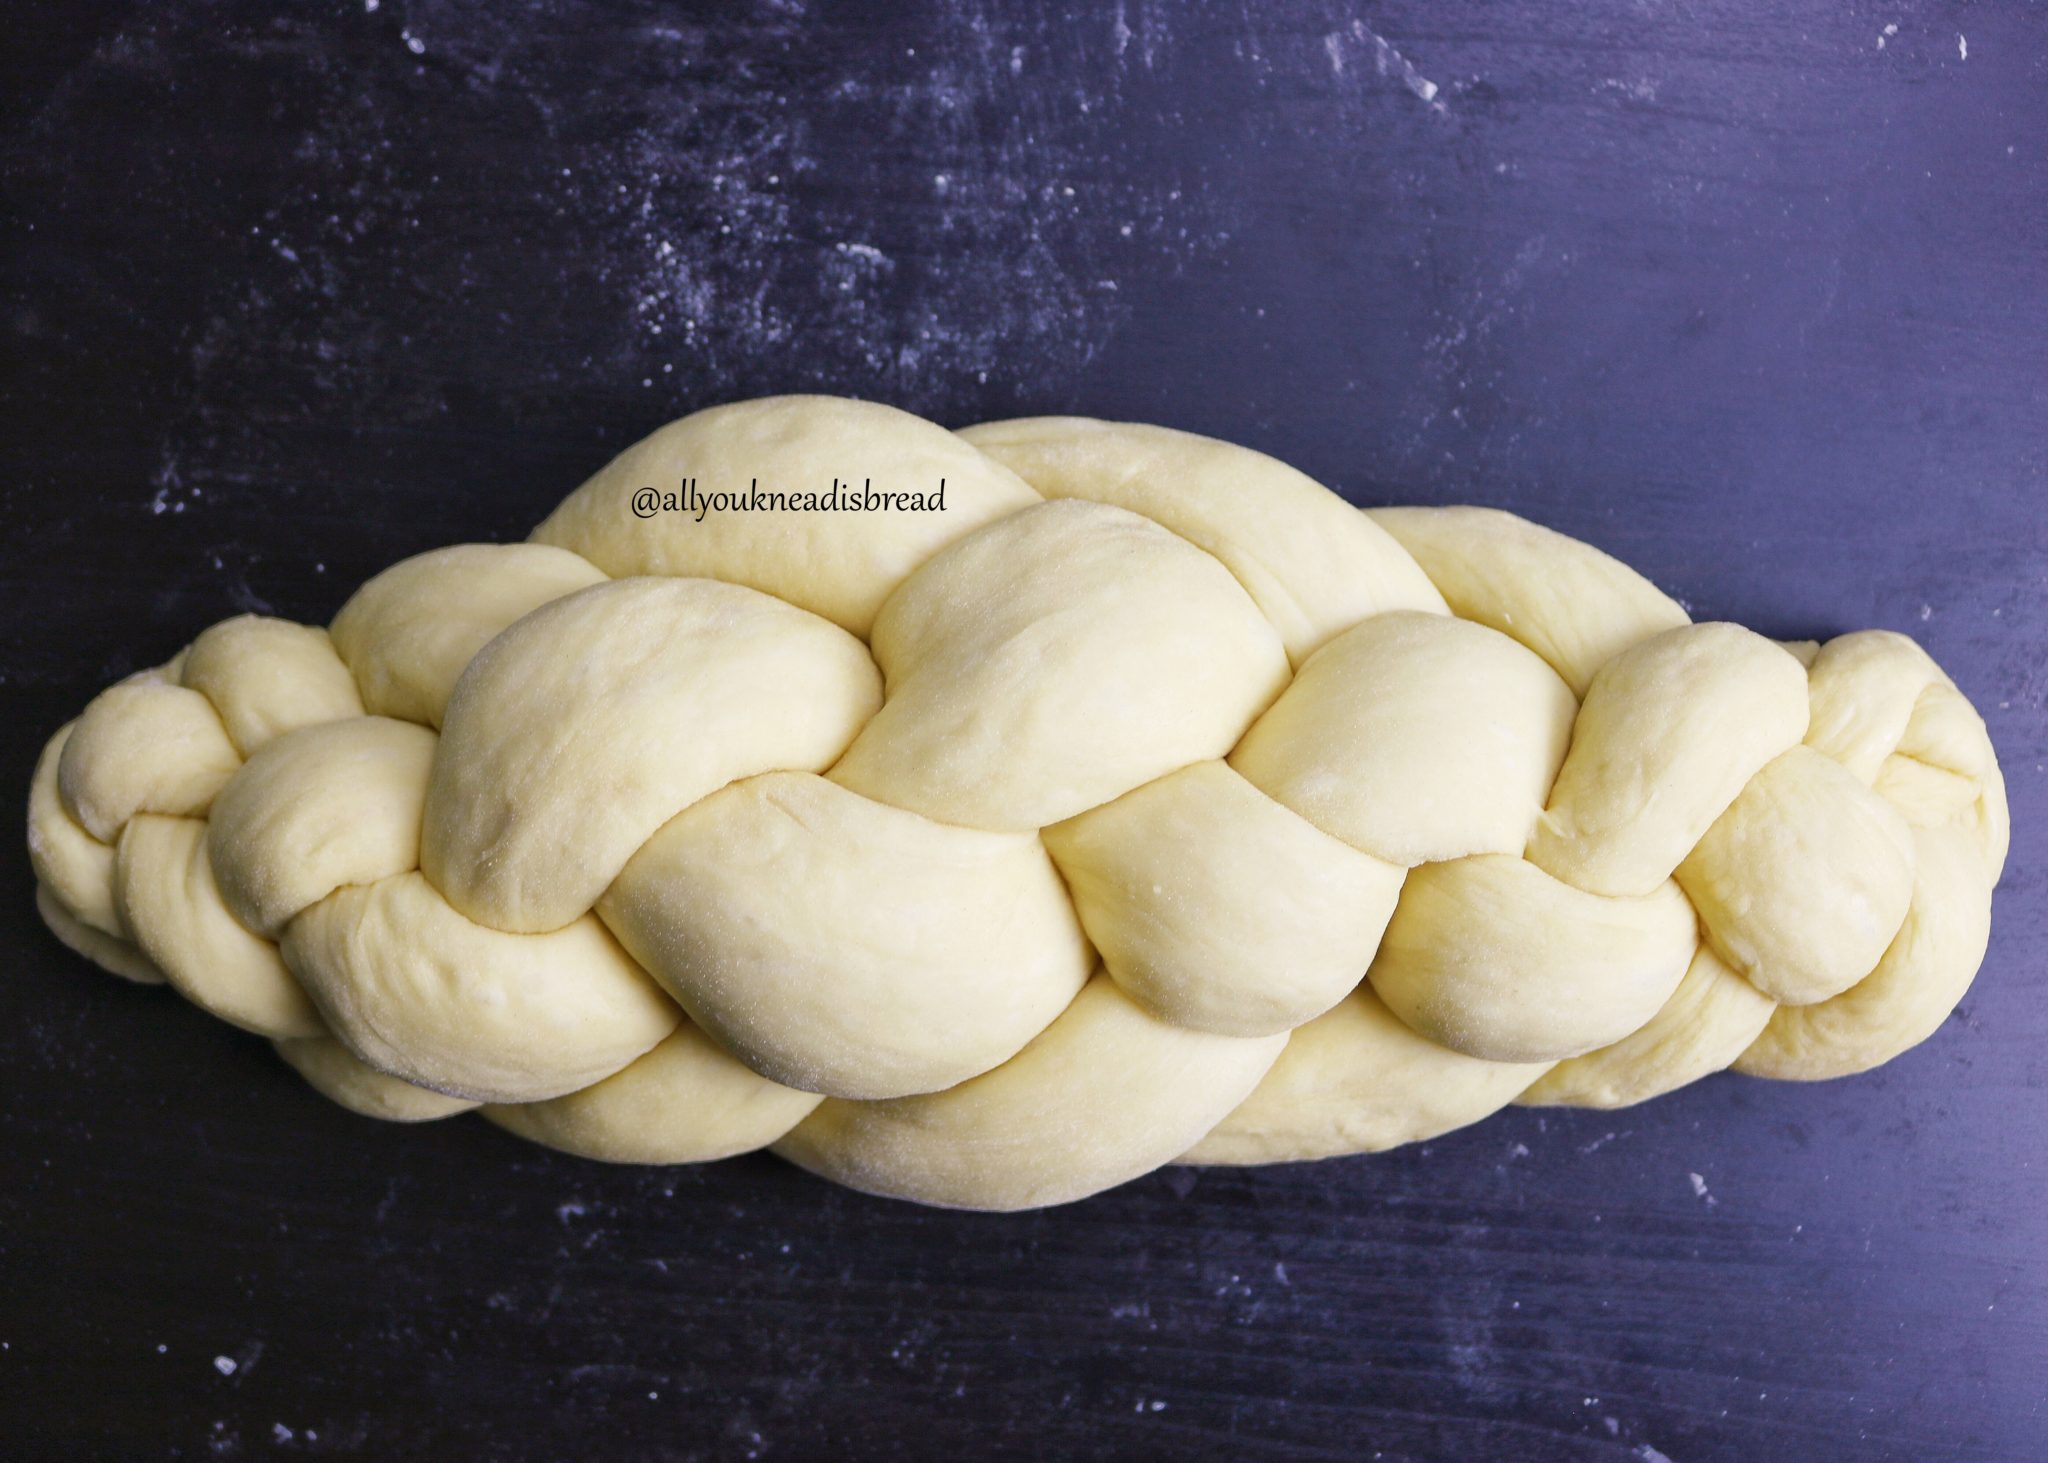
I love challah because with simple ingredients you can make amazing things! I particularly enjoy the shaping. The 6 strand braid is my favorite, I think. It took me a bit to learn because I kept getting lost midway!
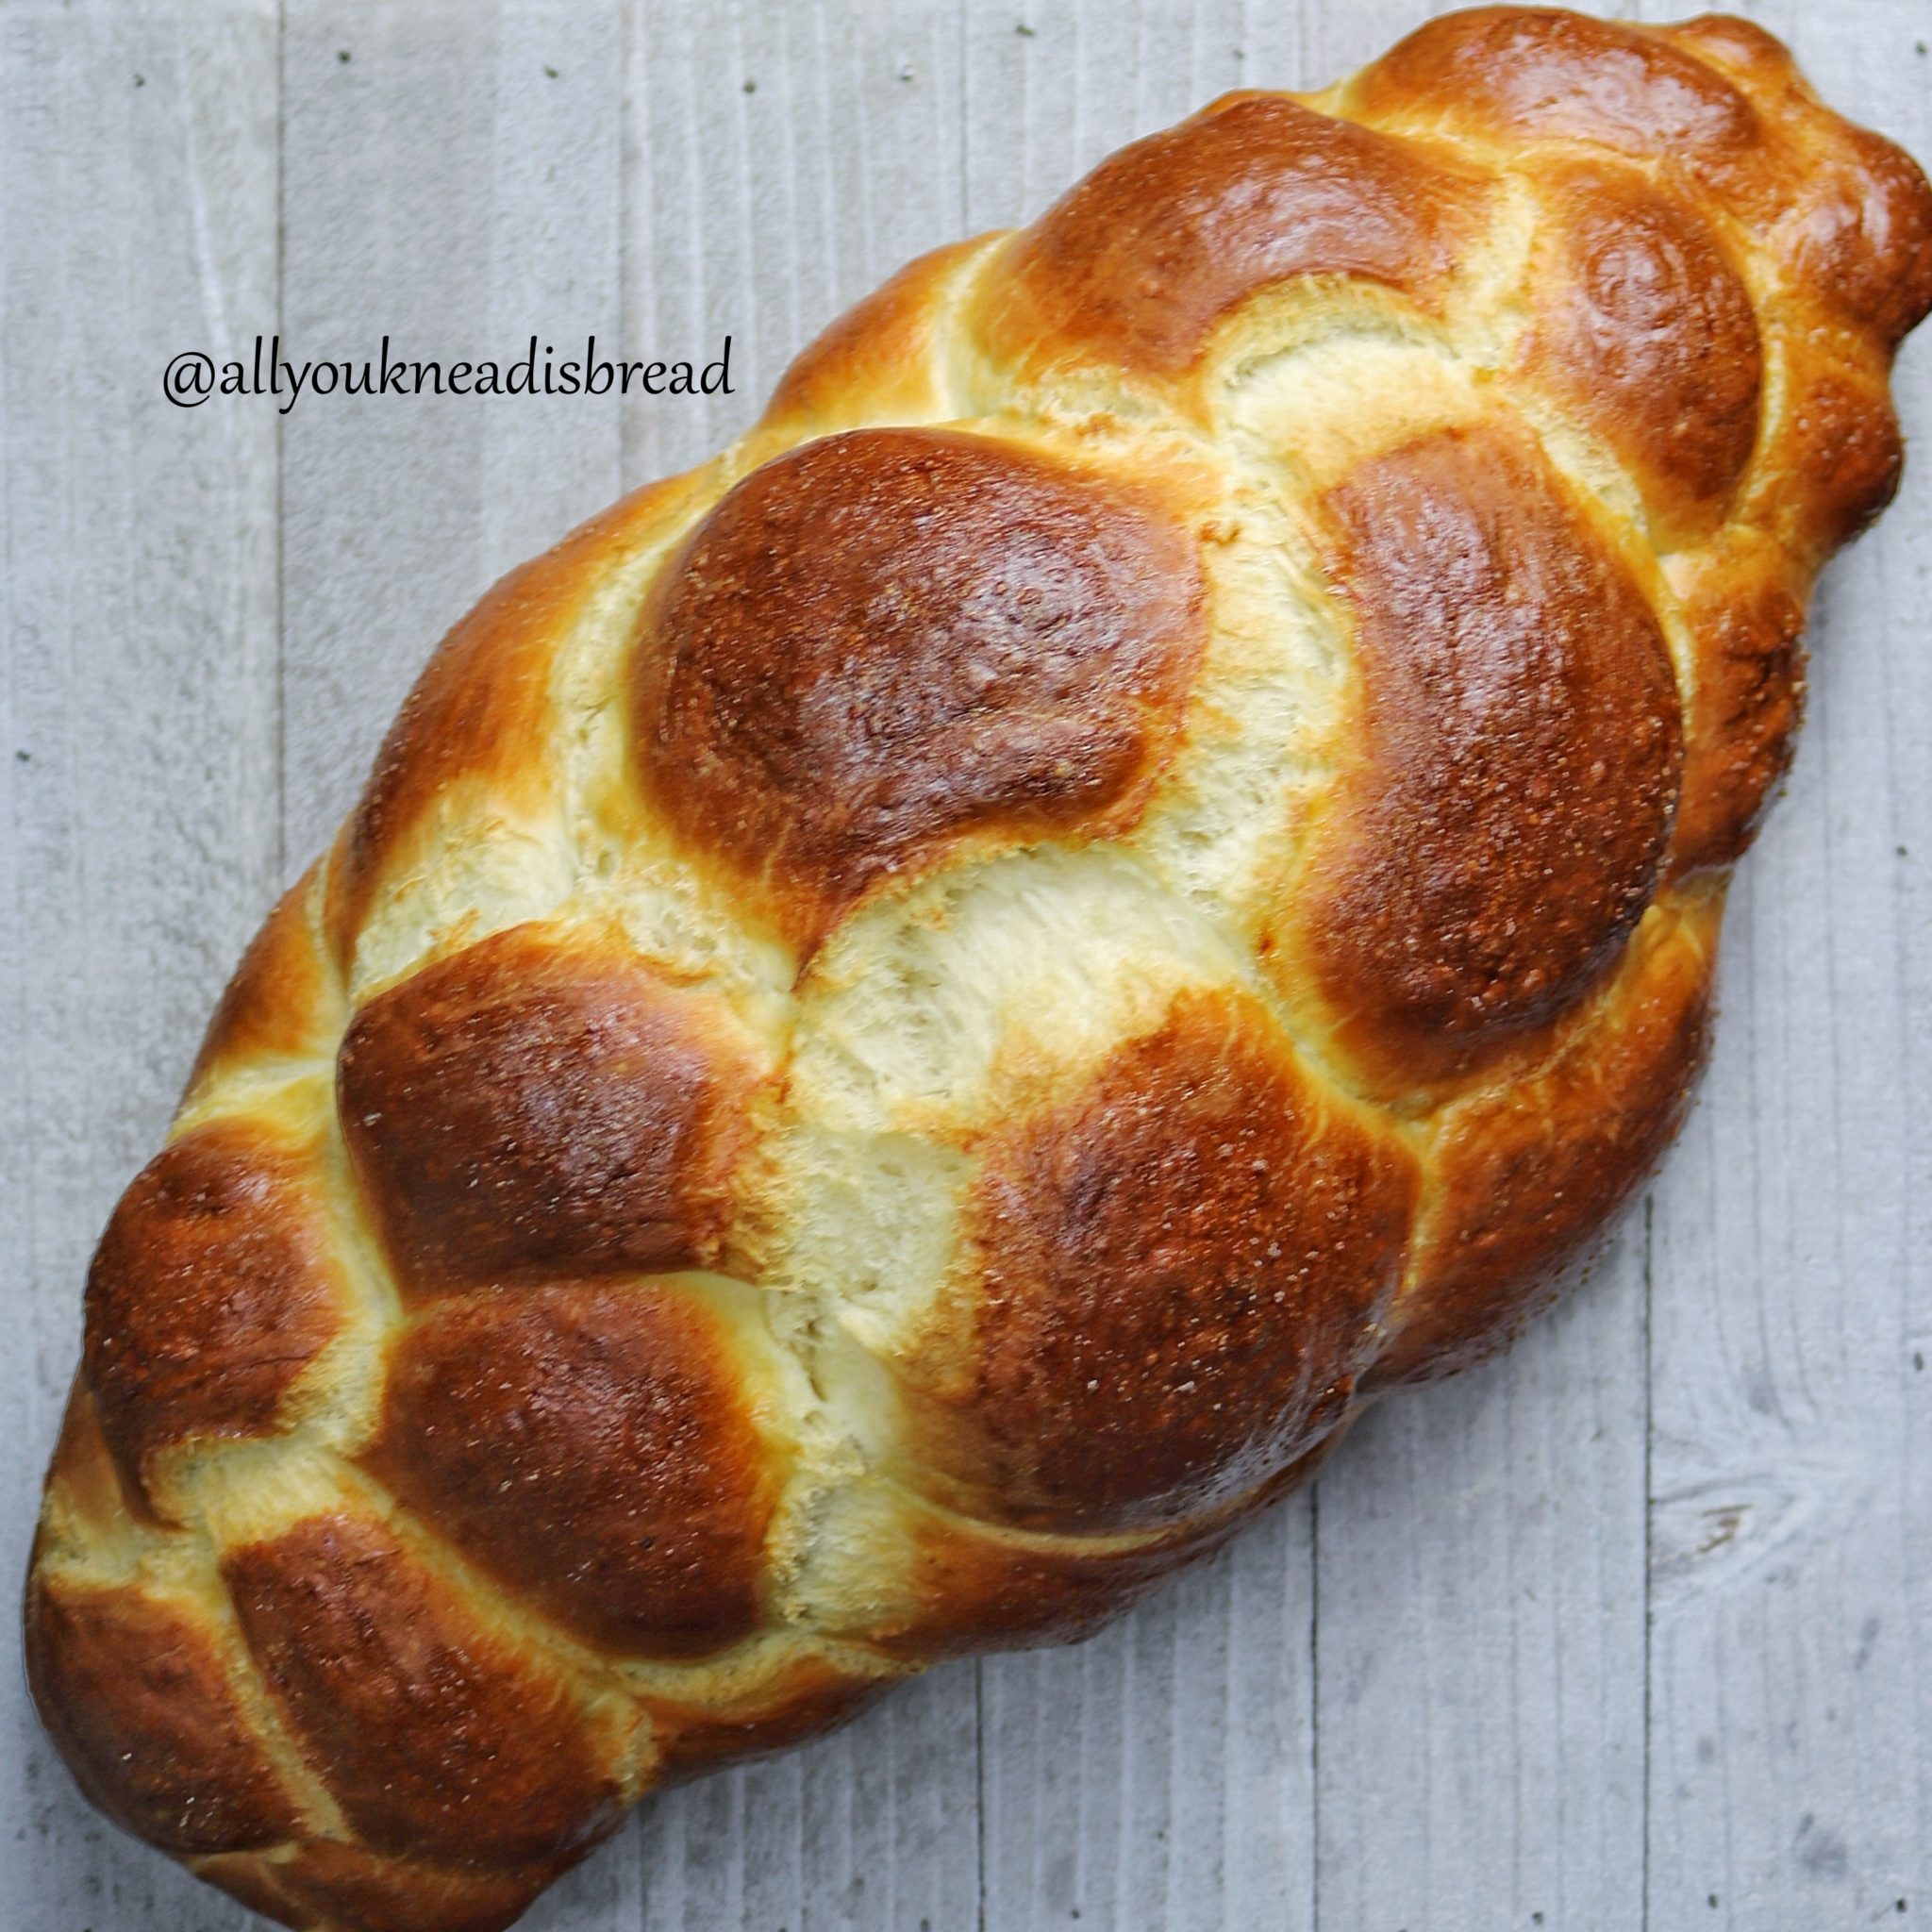
The loaf was a success! Everyone was taking pictures; some people had never heard of challah before and they were pretty impressed. And all that just because of the shape! Of course, when they actually tried the bread, they were even more impressed with the taste!
This recipe is from “The bread baker’s apprentice”, by Peter Reinhart, it’s my go-to challah recipe. I love this book, it has many different recipes, from different parts of the world. The book has great tips and in general, the ingredient lists are simple. I think it’s a great book for beginners and home bakers.
I just changed the type of flour, the original recipe uses all-purpose flour, but I like bread flour better. Enrich doughs have to be strong to be able to “lift” all the eggs, fats, and sugar. And also, I always bake with the same type of flour, and I can anticipate the amount of water I’d need or how the dough will behave.
But this is up to you really. Changing the flour won’t make the bread better or worse, just different! 😊
The original recipe also calls for vegetable oil. I chose olive oil because I love the combination it makes with eggs. I think both ingredients complement each other perfectly! You can use other shortenings, but I wouldn’t recommend butter. The reason is that it has a strong taste, and challah is all about the egg, I don’t want the butter to hinder the taste of eggs. But again, this is my opinion. You can make it the way you enjoy it most!
To make this challah you’re going to need the following ingredients:

- First, you need to activate the yeast. I like to use active dry yeast, but even when I use instant yeast, I activate it as well. Just to make sure it’s working well.
If your kitchen it’s cold, you can use lukewarm water to activate the yeast. If it’s hot, room temperature water works well. You can even add a teaspoon of sugar to the water. The yeast will feed on it, so it won’t add any extra sweetness.
Your yeast will be ready after a few minutes, and you should see some bubbles on top (maybe not as many as in my picture, I like to use a whisk to make sure the yeast dissolves completely, and that adds extra bubbles).
- While you’re waiting for the yeast, you can sift the flour, sugar, and salt into a bowl and stir it well to mix everything.
- Then add the yeast mixture to your dry ingredients
- And incorporate the eggs. You can whisk the eggs into the yeast mixture, or in a separate bowl and pour them into the flour, or like me, add them directly to your flour and yeast mixture.
Now it’s time for one of the most important steps, the autolysis step.
- Mix everything thoroughly, until you don’ see dry flour particles anymore and you have a sticky mess. If you think your dough is dry, you can add a little bit more water. Just 1 tablespoon at a time. Cover your bowl and leave it there for 20-30 minutes.
This step is important because it’ll allow the flour particles to fully hydrate before you start kneading. That means that the flour will work at full strength and the gluten network will be developed much easier.

After the autolysis step, the fun starts! Kneading time!
- Knead the dough in your most comfortable way. By hand or using a stand mixer with the hook attachment. At the beginning the dough will be sticky but don’t add more flour, keep kneading.
The dough is sticky because it has lots of eggs and sugar, So they get between the water molecules and the gluten proteins. So you must keep kneading to ensure all the gluten proteins get to link with each other and form the gluten network.
Regardless of your kneading method, eventually, you should see your dough coming together, getting more elastic, and getting some consistency.
- Now it’s time to add the oil (or any other fat or shortening).
If you’re not very used to adding the fat content midway, I’d suggest you add the oil little by little. One tablespoon at a time if you have to. Otherwise, you might get very frustrated.
Once the gluten network is halfway developed, it’s difficult to add fats, you have to keep kneading and squeezing the dough. It’ll eventually absorb the oil.
I like to squeeze the dough and turn it around and squeeze it again. I found that by doing this the dough absorbs the oil much faster. Also, trying to knead while everything is covered in oil… is not easy!
- After adding all the oil, keep kneading until the dough is not sticky anymore and the surface is covered by small blisters. At this point, the dough should pass the windowpane test. Remember to let the dough rest 5 minutes before you try to stretch it.
It took me around 20-25 minutes to get the dough ready. Your kneading time can be different, don’t worry. Your kitchen temperature, your skills, the stand mixer you use, or even the flour, play a role in the development of the dough. So don’t aim for time, but for dough consistency.
Look at the difference!

- Now you just need to put your dough in a bowl, cover it and let it ferment until it rises enough to be all puffy and about 1.5 times its original size. If your kitchen is cold, you can put the bowl in the oven with a pot with boiling water to create a warm microenvironment. Be careful not to turn the oven on!
- After the fermentation, deflate the dough and let it rest for a few minutes. Cut 6 pieces of equal weight and make small balls with each one.
You can use a little bit of flour for dusting, but try not to incorporate too much flour or your challah might end up dry.
You can shape your challah the way you like the most, a simple braid, 4 strands braid… you name it!
- Let the dough balls rest for 5 minutes. These resting times are important to let the gluten relax. 5 minutes can make a HUGE difference on your dough and it’ll be much easier to shape.
- After 5 minutes, take the first ball, flatten it with your hand, and with the help of a rolling pin, roll it into a 25 cm long oval (10 in approx) and 0.5 cm thick (1/4 in). Now, with the help of your hands, and starting on the widest part, roll it back to form a log. Repeat with each ball.

- Once the logs are ready, you just need to stretch them and make the strands. They should be about 50 cm (20 in) long. Start with the first log you made, since that one should’ve had more time to rest.
If at any point you feel that the strands keep getting back to their original shape, let them rest and come back a few minutes later. Try to make the strands in a way that is thicker in the middle and thinner on the ends. This way, the challah will have a beautiful shape, bigger in the middle and thinner on the ends.
- Time to braid the challah! I did not include a tutorial on the braiding part because I think it’s easier to understand if you see it in a video, rather than if you read it.
To avoid your challah from having a weird oven spring (meaning: end up with a terrible shape), try not to braid it too tight so you leave some room for the strands to rise.
- Put the challah on a baking tray and cover it with lightly oiled plastic wrap.
If you like a crusty challah, you can brush now once with the leftover egg whites, and a second time right before going into the oven. If you prefer it softer, just brush it once before going into the oven.
- Let the challah rise again until it’s puffy. It doesn’t have to double in size.
- Preheat your oven at 350 F (175 C)
- Once the challah has risen enough, put it in the oven and bake for about 20-25 minutes. After that time, turn the baking tray 180 degrees, so it gets to bake homogeneously.
If you think the challah is browning too fast, you can put aluminum foil on top and reduce the heat to 325 F (165 C).
Depending on your oven, you might need a bit more time, it’s okay. Just make sure that the inside it’s completely cooked.
And here it is!
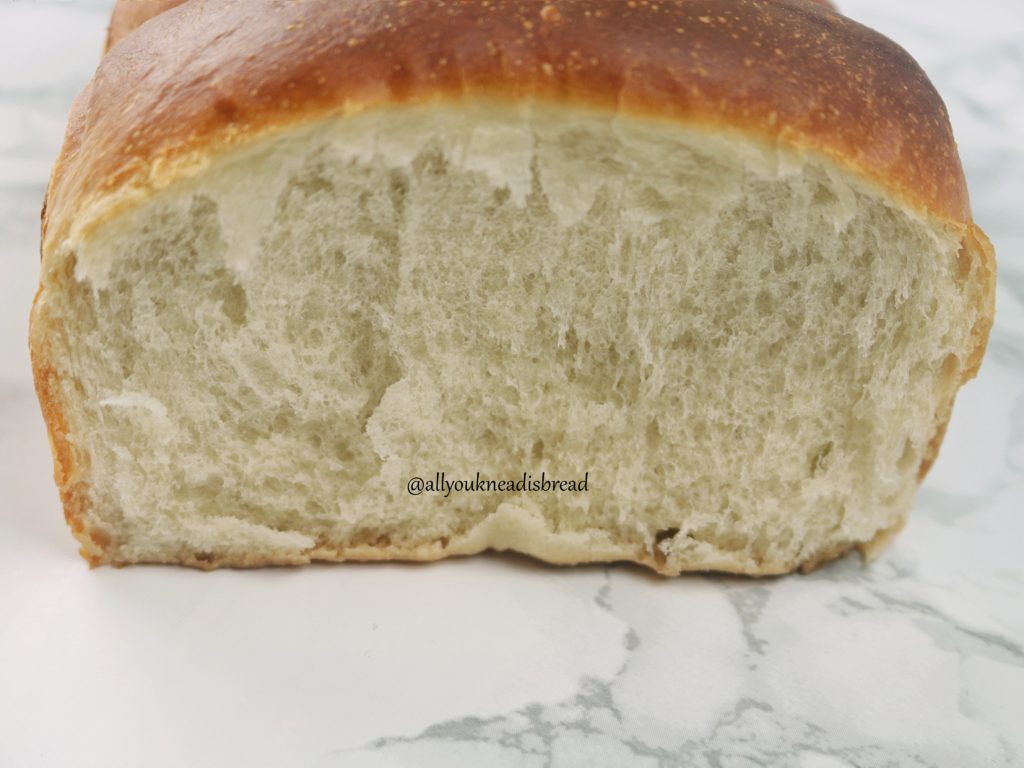
I’m sorry I cannot show you how the crumb looked, but I can tell you it was awesome! Very soft, cohesive, and beautifully yellow!
I hope you enjoy the recipe. Below you can find a printable version with a detailed step-by-step.

Best Basic Challah
Follow this recipe for a foolproof challah.
Ingredients
- 510 g bread flour (mine has 12.7% protein content)
- 30 g sugar
- 7 g salt *
- 4 g active dry yeast
- 30 g olive oil
- 2 large eggs
- 2 large egg yolks
- 215 ml water **
- 2 egg whites
Instructions
-
Add the yeast to the water and mix well. I like to use a wire whisk to make sure there are no lumps. Let it sit 5 mins to activate.
-
While the yeast is activating. Sift the flour into a bowl and add the salt and the sugar. Mix well with a wire whisk.
-
Once the yeast is active (you should see some bubble on top) add it to the flour mixture
-
Add the eggs and the yolks
-
Mix everything very well until you don’t see dry flour particles. If the dough is not cohesive, you might need to add a little bit more water. Do it half tbsp at a time. You don’t want to add too much water.
-
Let the dough rest for 20 minutes for a short autolysis. You can skip this step if you don’t have time, but I strongly recommend it since it’ll make your life easier when you have to knead the dough.
-
Start kneading the dough until it gets some consistency and elasticity.
-
Add the oil little by little until the dough absorbs it all.
-
Keep kneading until the dough is no longer sticky and you see small blisters covering the surface. It should pass the windowpane test.
-
Once the dough is ready, shape it into a ball. Lightly oil a bowl and place the dough inside. Cover the bowl and let the dough ferment for 1h approx. It doesn’t have to duplicate the size.
-
After 1h, deflate the dough, shape it again into a ball and let it ferment again until it’s about 1.5 times in size or until it’s puffy but not over fermented.
-
Remove the dough from the bowl, deflate it and let it rest 5 mins.
-
Divide the dough into 6 equal parts (if you’re doing a 6-strand challah)
-
Shape each part into a ball, cover them with plastic wrap and let them rest 5 mins.
-
Roll each ball into a 50 cm (20 in) log. Start making short logs and let them rest before rolling them to the final length. It’ll give the gluten time to rest and it’ll be easier for you.
-
Shape your Challah the way you’d like, line a baking sheet with parchment paper and place the Challah there.
-
Brush the Challah with the egg whites wash, cover it with lightly oiled plastic wrap and let it rise until it's puffy.
-
Preheat your oven at 350 F (175 C).
-
Once the Challah is ready, carefully remove the plastic wrap and brush again with the egg whites.
-
Bake in the middle rack for about 20-25 minutes and turn the baking sheet 180 degrees. Bake for another 20mins or until it’s golden brown (we turn the baking sheet halfway to ensure an even baking)
Recipe Notes
* You can omit the salt when you mix the dry ingredients and add it after the autolysis.
** You might need to adjust the water. The range should be anywhere between 200-250 ml.
Happy baking!