
Welcome to a new section of my blog: Bread Science Fridays! In this section I will be indulging on my nerd side and talk about the science of many things behind your beautiful bakes. This week’s post is dedicated to our beloved sourdough starters and the science behind them!
Ever since the pandemic started, more and more people jumped into sourdough. So, I thought it could be fun to explain scientifically what happens when you feed your starter (or build your levain).
A sourdough starter it’s just a culture of microorganisms that are alive and perform their own biological activity. These cultures are composed, mostly, by different strains of lactic acid bacteria (LAB), saccharomyces yeasts, and some candida yeasts among others.
In this post, you will learn the phases your starter goes through during a feeding cycle, why using your starter at its peak of activity is important, and the science behind it!
A couple of things about biology
In microbiology, a strain of a certain type of microorganism is like a subtype of named microorganism. For example, the lactic acid bacteria type would be the lactobacillus but there are many subtypes (Strains). Lactobacillus Acidophilus, Lactobacillus Sanfranciscensis, Lactobacillus Reuteri… They’re all LAB but with some differences (from shape to optimum living conditions).
Each strain has its specific optimum living conditions. That is the optimum temperature, water activity, pH… that will make the fermentation rate the fastest. The fact that a microorganism is “happy” at 28C, for example, doesn’t mean that it cannot perform its biological activities at 29C or at 20C. It means that the performance will not be the best. As you know, it slows down at cold temperatures. However, it’s higher temperature that pose a threat to the microorganisms. Too high temperatures will inhibit and eventually kill the bacteria.
The bacterial growth curve
Bacteria, as living organisms, grow, multiply, and die. The reason our sourdough starter is resilient is not because the bacteria are indestructible, its’ because there are millions of them and not all of them are the same age. They are in different growth phases. While maybe most of the bacteria are dying, some might have just been born.
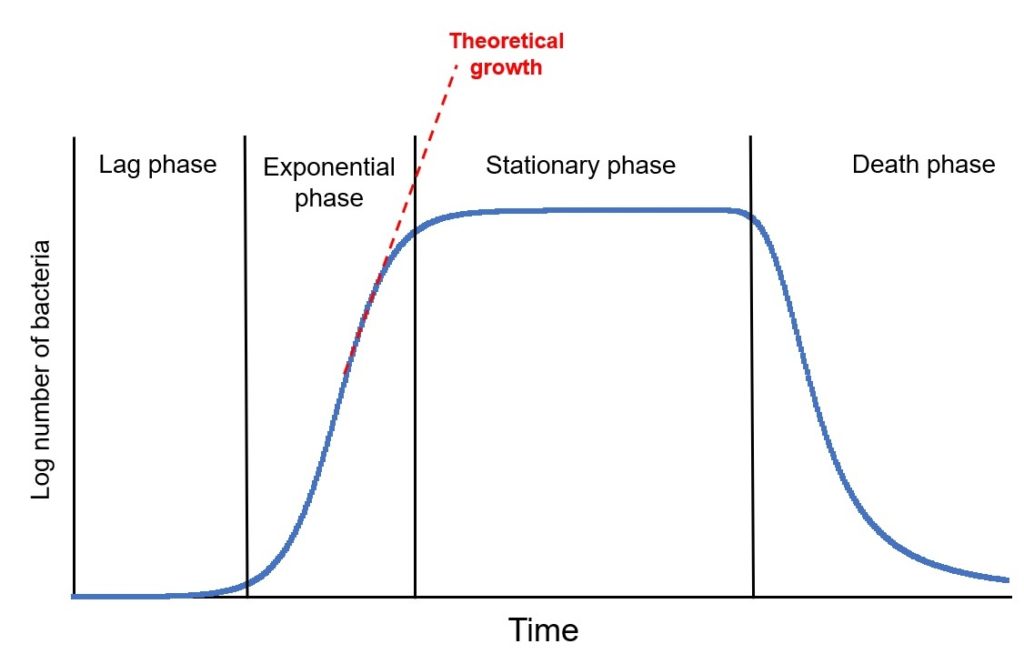
Bacteria and yeast multiply by dividing themselves into two. 1 becomes 2, 2 become 4, 4 become 16, etc. This mechanism is called binary fission. Therefore, their growth is exponential. In microbiology, this growth is depicted using growth curves.
Bacterial growth curves are specific for each strain of bacteria in a specific set of conditions (Changing the temperature will change the curve). In these curves we can see the 4 phases bacteria undergo from the moment they’re born to the moment they die. A generic bacterial growth curve would look similar to this one:
Our starter will follow this growth cycle too. Understanding what happens in each phase will help us understand our starter and when we should use it for baking to prevent a excess of sourness
The phases explained
Phase 1: Lag phase. This is the very beginning of the curve. At this stage, the microorganisms have enough nutrients and are active but they’re still not multiplying. What they’re doing is synthesizing proteins and getting things ready to start the division. It’s also an adaptation period to the culture conditions.
Phase 2: Exponential phase. Once things are ready, the bacteria start multiplying (by binary fission). The metabolic activity on this stage is high and increases as the number of bacteria increases (optimal growth). Some bacteria might die too, but overall, there are more bacteria multiplying than dying.
Phase 3: Stationary phase. This phase is a plateau the bacteria reach because of the depletion of nutrients or accumulation of waste (the acids they produce can inhibit their own activity). Less food means less activity and therefore fewer bacteria dividing. At this point, the growth and death rates are equal, and the overall number of microorganisms remains constant.
Phase 4: Death phase. At this point, nutrients are decreasing and bacteria continue to produce waste from their biological activities (bacterial poop if you may 😉 ). The environment becomes harsh and bacteria start dying (some also go dormant). In this phase, the death rate is faster than the growth rate, so the overall number of microorganisms decreases.
Theoretical growth: it portrays how the curve would continue growing if the bacteria had an endless supply of nutrients.
When you add sourdough starter to your dough, the exponential phase will be much longer because the bacteria:nutrients ratio is much larger. The curve would, to certain extent, follow the theoretical growth because there are lots of nutrients!
How does this apply to your sourdough starter?
Knowing in which phase your starter is, will be very helpful for your baking. The fermentative power of your sourdough will depend on the phase of the cycle it is on, and it is different in each phase.
Although the by-products of the fermentation are essentially the same in each phase, the aromas developed in the bread will be substantially different because every time we take some starter and mix it with flour and water, we’re resetting the growth curve. It starts again in the lag phase.
And depending on the length of the lag phase, more/fewer aromas will build up in the dough. Ideally, we should use the starter at its peak of activity. Which means the lag phase will be shorter.
But, what exactly is the peak of activity and what’s the best way to know it? Let’s dive deeper into this!
The peak of activity and what it means
When it comes to sourdough it’s common to talk about the “peak of activity”; we understand that it represents the optimum conditions of the starter and it will work faster if it’s at the peak.
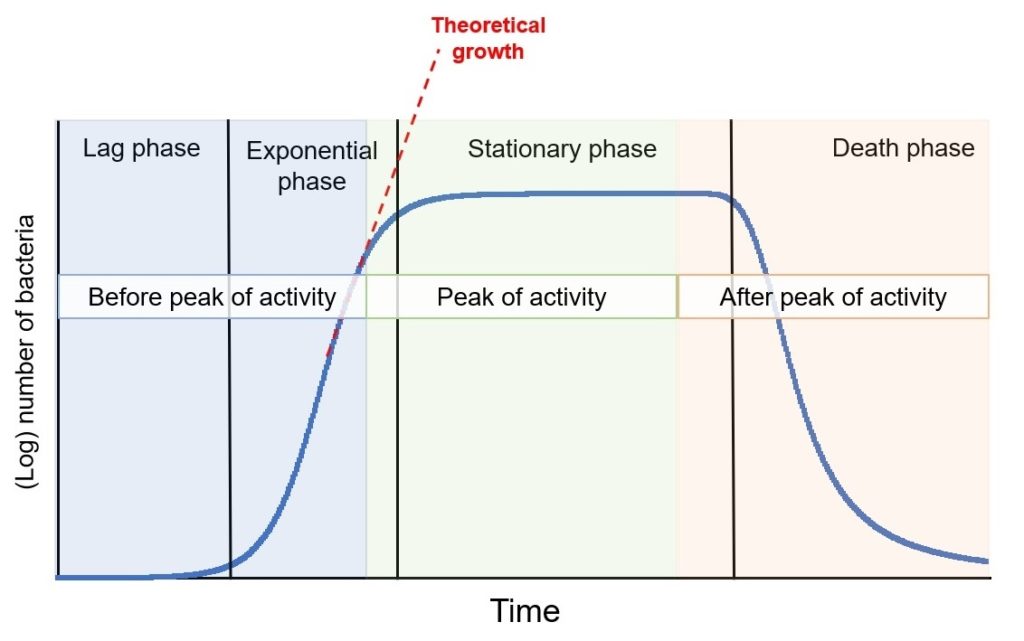
Based on the growth curve I showed you before, it’s easier to see that the peak of activity happens at the end of the exponential phase and throughout the stationary phase. During that time the sourdough starter is very active because 1) the number of alive bacteria is high because they still have lots of nutrients and 2) they’re all used to the environmental conditions, well past the lag phase where they’d be creating “waste” but not multiplying and growing.
Obviously, we are not going to do a bunch of experiments to determine when we should bake. However, once we’re familiar with our starters, we know when they reach the peak of activity (more on this later). We can, then, differentiate 3 stages in our starter:
1.- Before the peak of activity
2.- At the peak of activity
3.- Past the peak of activity
The dough fermentation will definitely be affected by the stage of the starter. Let’s analyze it a bit more how that translates into flavor and aromas of our bread and how it’s related to the growth curve.
The starter has not doubled yet after the last feeding

When we refresh our starter (or when we’re building the levain) what we’re doing is resetting the bacterial growth curve. The microorganisms need to adapt to the new conditions first (lag phase) and then eat and multiply (exponential phase).
If your starter has not even doubled since the last feeding, the microorganisms didn’t have enough time to reproduce; they are at the very beginning of the exponential phase and there is still a low number of them.
Basically, you’d be adding just flour and water with a low number of bacteria.
At this point, the fermentative power of the starter is not high enough because there aren’t enough bacteria to perform the job; which means your dough will need a longer time to ferment. This can be detrimental to your dough because longer fermentation times might lead to a more acidic dough.
Not only that, but you could also risk destroying the gluten network. If the fermentation is much longer than it should, your flour might not be able to resist and the gluten strands will start to deteriorate.
Maybe, flavor-wise, the bread turns out as tangy as you like it, but the structure could be compromised.
The starter has reached or almost reached the peak

People recommend using the starter at its peak of activity, but what many don’t know it’s why exactly this is the best condition for sourdough baking. Spoiler alert: It has nothing to do with your culture being hungry.
At least, not in the literal sense of the word, because the microorganisms eat when they have food, and when they don’t, they just change their metabolism pathway and go into “survival mode” (they become dormant). That’s why they can survive in the fridge for months without being fed, or they can be frozen or dried.
Every time we change the environment of the microorganisms, they need to adapt to the new conditions; so, they have to go through the lag phase again. If the starter has passed the peak or if it’s too early in the feeding cycle, this adaptation period is going to be longer. Either because the microorganisms need to get ready to increase the colony, or because they went into survival mode.
The idea of using the starter at the peak of activity is to reduce the lag phase as much as possible. Because longer lag phases can bring undesired aromas or weaken the gluten network.
The reason the bacteria are very active at this point is that they don’t have to use energy to get ready to multiply, and they’re not getting dormant or dying at a higher rate because there’s still plenty of nutrients.
A change of environment can be anything that makes the new conditions different from the culture. For example, adding salt to your dough, adding more/less water, adding more/less wholemeal flour, adding sugar, adding fats etc.
The starter passed the peak and it’s collapsing

If your starter has reached the peak and has started to collapse, it means that it’s either at the end of the stationary phase or at the beginning of the death phase already, and it already has accumulated a significant amount of fermentation by-products.
Among these by-products, there are several organic acids responsible for the acidity of the sourdough (lactic acid and acetic acid are the most common). If you used this starter, the fermentation would be slower at the beginning because:
1.- There are less alive bacteria, since many might have died already
2.- The acidification of the starter can inhibit the growth of the bacteria, so the fermentative power will be weaker. The extent of this inhibition depends on how acidic the starter became. That’s why when we try to revive a forgotten starter, it might take a couple of feedings until we see some activity.
3.- The bacteria that are still alive need a longer lag phase before they start growing again. During this lag phase they will get ready for the new environmental conditions (your dough) and will fix the pH of the dough that turned too acidic. And remember, during this phase, bacteria keep producing acids but they’re not reproducing.
Basically, if you don’t control de fermentation, your bread can be very sour. Once again, remember that longer fermentation times not only affect flavor, but also the structure.
Contrary to what many people think, though, you can still use a starter that has passed its peak of activity (by just a few hours) and still obtain a bread that has not soured too much, as long as you control the fermentation.
But.. What if I like my bread very tangy?
The sourness of sourdough bread comes from accumulated organic acids in the dough. So, in order to get the tangy flavor, we need to ensure that the dough has accumulated enough of these compounds.
We can do that by using slightly warmer temperatures during the bulk fermentation. Doing this, the bacteria will be closer to their optimum living conditions, and they will perform a faster fermentation. We could push the bulk a little to get that extra sourness.
How do I know my starter is ready to bake?
There are different ways to check when your starter is ready, and the more familiar you are with it, the easier it’ll be. I’m going to tell you my favorite way to check the peak of activity at home: The height test
I don’t know if this is how people know it, but it’s how I call it. The height test is, in my opinion, the most reliable way for the home baker to check their starter.
If you always feed your starter the same ratios of flour and water, or you build your levain in the same way, this test is great for comparisons; it will be very easy for you to know if it’s ready by just looking at how much it grew. It also prevents the “human factor” more than other tests and reduces the chances of making a mistake.
How to perform the maximum height test
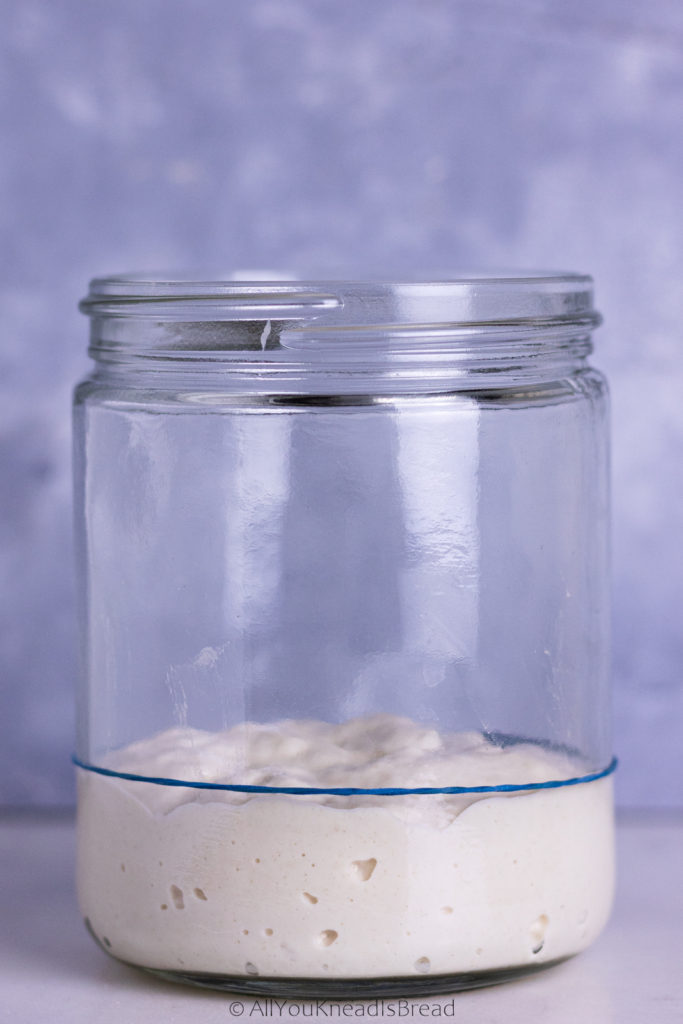
As the name indicates, this test is to see how high the starter can grow (this applies to 100% or less hydration, more liquid starters can’t grow too much, for obvious reasons). The peak of activity coincides with the maximum height.
After reaching the maximum height, the starter will remain at that height for a few hours (stationary phase) before it starts collapsing (beginning of the death phase)
Let’s say you feed your starter with a 1:1:1 starter:water:flour ratio. Then you let it ferment and record the height (taking pictures might be even better!) after it reaches the maximum height you need to pay attention to how long it stays at that height and when it starts collapsing.
Imagine that right after feeding, your starter takes 5 hours to reach the highest height, and then it stays 2 more hours at that height. Those last 2h will be the best period to use your starter.
By doing this simple test, you will see how much your starter grows (double, triple, quadruple?). It’s important to know the temperature when you do this little experiment because in warmer days, your starter will grow faster. However, since you know more or less the highest height it will reach, you just need to keep an eye on it!
Always remember that the time your starter takes to grow will depend on the temperature of your kitchen. Warmer temperatures will make the starter more active because they’re close to their optimum growing temperature. Colder temperatures will make the starter grow slower, because these are far from the optimum conditions.
Let’s wrap this up
I’d like to finish my first Bread Science Fridays by highlighting a few concepts:
1.- Bacterial growth has four phases that can be applied to our sourdough starters. Knowing what happens in each phase will help us understand our starter.
2.- The starter works best when it’s used at its peak of activity because we’re reducing the lag phase and bacteria can use the energy more efficiently.
3.- The maximum height test is an easy experiment to know when a starter reached the peak of activity. It’ll help you understand at which phase your starter is and when it’s best to use.
I hope with today’s post you can understand better your starter and have a better idea of the science behind it! Isn’t the world of sourdough so amazing???
As always, if you ever have any doubts or would like me to talk about the science of something, let me know and I’ll try my best to answer your questions!
You can find me on Instagram or Facebook and you can also subscribe to my Youtube channel.
Happy Bread Science Friday!
Maria
Troubleshooting my lievito madre
The time has come! After several tests and experiments, I can 100% confirm that my lievito madre (or pasta madre, or LM or PM, you’ll see both in this post) is healthy and ready for the “grandi lievitati”!
This is a long post, so buckle up! Get some water, a couple of snacks, and let’s get to it!
In this post, you will find all the problems that I encountered with my pasta madre and how I fixed them one by one. You will also learn how certain factors affect the pasta madre and why from a scientific point of view.

After four months of insanity over the wellness of my lievito madre I have finally brought it back to full strength. It’s been a long journey full of troubleshooting and note-taking. I can now conclude that it wasn’t a single problem that was causing the LM to be weak, but several that I had to fix one by one.
A few pointers and clarifications
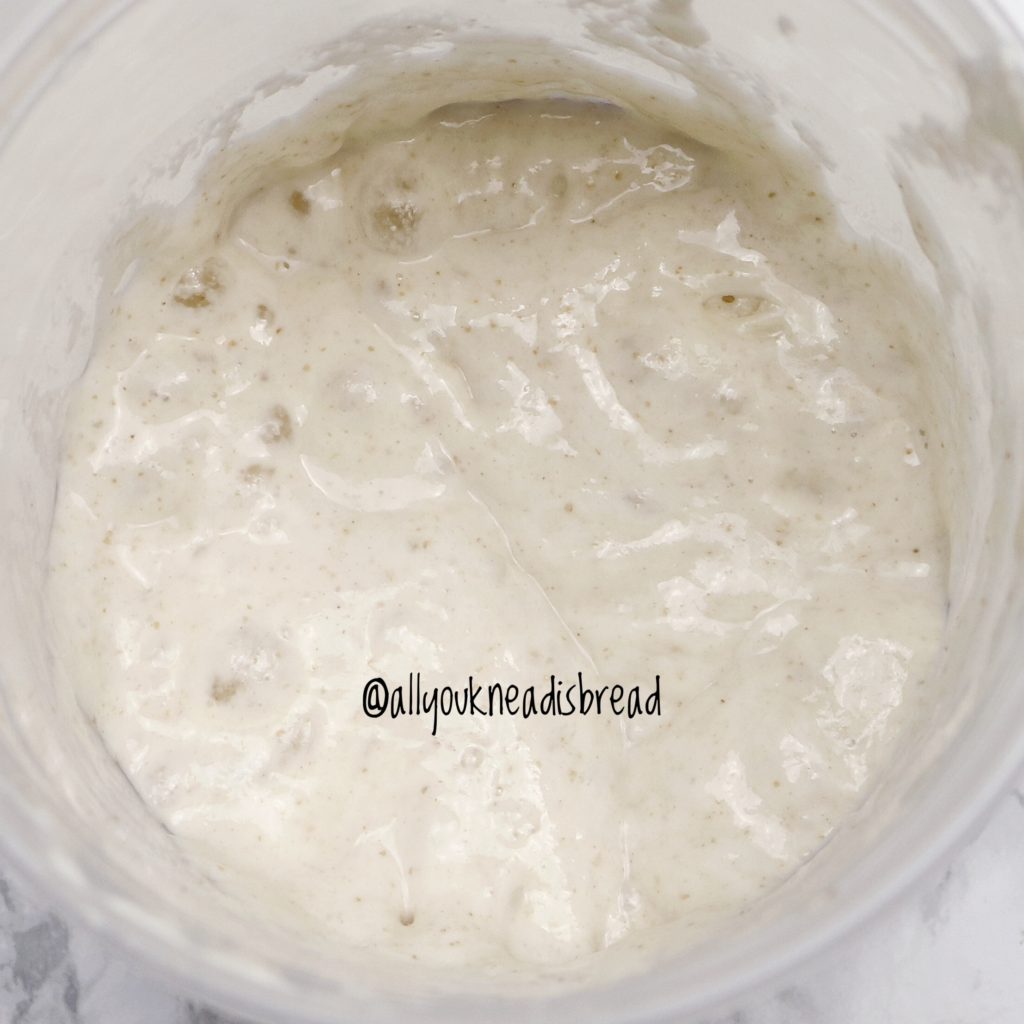
I started the LM with fermented apple water and from there I built a liquid starter (100% hydration). Then I converted it into a 35% hydration starter. You can check this post to see how I did it.
I’d like to remark that Pasta Madre is not just a stiff starter, it’s a low hydration stiff starter with very particular maintenance conditions and a very specific way to prepare it for baking. This method promotes very specific strains of bacteria and yeasts in a very specific ratio to keep a very specific pH.
Pasta Madre has an incredibly strong fermentative power that’s able to ferment dough with an incredibly high amount of sugar, butter, and egg yolk (substances that can inhibit the growth of bacteria and yeast and hinder gluten development)
Panettone, Pandoro, and Colomba di Pasquale are the holy trinity of pasta madre baking. They undergo long fermentations that due to the specific methods designed for pasta madre, the dough does not develop any acidity.
Pasta madre vs stiff starter
For example: If you’re reading this, I’m pretty sure you’re familiar with “the lievito madre must triple in 3-4h at 28C three consecutive times before it’s ready to make panettone”
If your lievito madre can do that, then it’s mature and ready to prepare the primo impasto (the first dough). However, let’s say that you prepare a stiff starter at 60% hydration. If you compare this stiff starter with pasta madre, you put both in a chamber at 28C and let them ferment, I assure you the fermentation speed will be COMPLETELY different.
Therefore, the “triple in three hours” rule for the pasta madre cannot apply to this 60% hydration stiff starter. And the triple in 12h rule for the primo impasto will not apply either because a 60% stiff starter does NOT behave the same as Pasta Madre. Keep in mind that artisan recipes and methods to make Panettone the Italian way are designed to be used with Pasta Madre.
Let’s start from the beginning
When I first started my LM I was using W380-400 Manitoba flour from Molino Caputo, but I ran out if it and I had to buy more. The new flour I received was W400 Manitoba flour from Molino Grassi.
When I changed the flour, the first thing I noticed was that the new flour needed more than 35% of water. It was impossible to incorporate all the flour. So, I started to add a little more water. Until I was using 40% of water. That extra 5% messed the whole bacteria/yeast ratio. Why? Let’s talk about “water activity”.
Water activity and what it means in food
In Food Science, water activity is a very important concept. The FDA defines water activity as “the ratio between the vapor pressure of the food itself, when in a completely undisturbed balance with the surrounding air media, and the vapor pressure of distilled water under identical conditions”.
The water activity of pure water is 1 and it’s the maximum possible value in a 0-1 range.
In essence, water activity is a way to quantify how much water there is in a particular sample, and based on that number we know which microorganisms could grow in that sample. This is particularly important for all fermentation operations, shelf-life studies, etc.
Water activity in my lievito madre
Back to my pasta madre; now you understand why that extra 5% of water I was adding created an unbalance between the Lactic Acid Bacteria (LAB) and the yeasts in the culture. The water activity changed and it either promoted other strains of bacteria to grow or a faster proliferation among yeast strains. Or maybe even both things happened.
What was clear was that the higher water activity wasn’t promoting the best environment for the microorganisms that should be in lievito madre. In a healthier LM this wouldn’t have been such a problem, but there were other factors affecting it.
Problem #1: Alterations in the water activity of the lievito madre
Cause of the problem: impatience while incorporating flour
Solution: patience! I started to let the PM rest for a few minutes after I managed to incorporate the flour. Like a little autolyse. I went from needing 40% of water and struggle to a 35% and no problems.
Effect of flour in my lievito madre
As I mentioned, I had to change the flour I was using because the website I was buying from changed the supplier. The new flour was SO STRONG! Strong flour must be the best for panettone, right? WRONG.
Manitoba flour comes from a type of hard wheat with higher protein content. However, in order to have that high protein content, the flour has to be very refined and stripped off as much bran as possible. But this process also takes some of the nutrients of the flour away. Nutrients that the bacteria need to be able to perform their biological activities… See where I’m going?
It seemed as if my LM wasn’t getting enough nutrients every time I refreshed it, which caused a progressive loss of fermentative power. I was, unknowingly, starving my LM to the point of almost zero strength.
The smell told me there was some fermentation going on, probably from the yeasts, but it barely grew, it didn’t have the crumb-like inner structure, and it didn’t even float in the bath after 24h.
Problem #2: starvation of my LM
Cause of the problem: lack of nutrients in the flour.
Solution: A mix of flours with a less refined flour that would provide more nutrients.
Lack of nutrients in the flour
Talking to my friend Kel (@wonky.loaf.of.sourdough), she pointed out that maybe the flour was, indeed, too refined. And she was right! That night, when I was about to throw away the LM and start from scratch, I decided to do one last experiment. I refreshed the LM and put it in the fridge, and with the discards, I created a sibling, which I fed 80% of Manitoba flour and 20% of King Arthur bread flour.
In about 12h it was floating and showing signs of life. 12h is a long time, but previously, my LM wouldn’t float after 24h. So, this was clearly the 1st win!
Since that moment I always feed my LM a mixture of flours. I tried 15% of bread flour but it showed lower activity, and I tried also 25% of bread flour but after a feeding cycle I lost a lot of LM, it disintegrated very fast. Once I ran out of bread flour, I started to use King Arthur High Protein flour or King Arthur AP flour, whichever I had at the moment.
The second feeding went even better, in 3-4h it was floating and happy. It smelled so well, it was spongy, it was getting healthier! Or so I thought… It was better, but not 100% there. While this was definitely the major problem, there were still lots of things I wasn’t doing right.
Small changes made all the difference
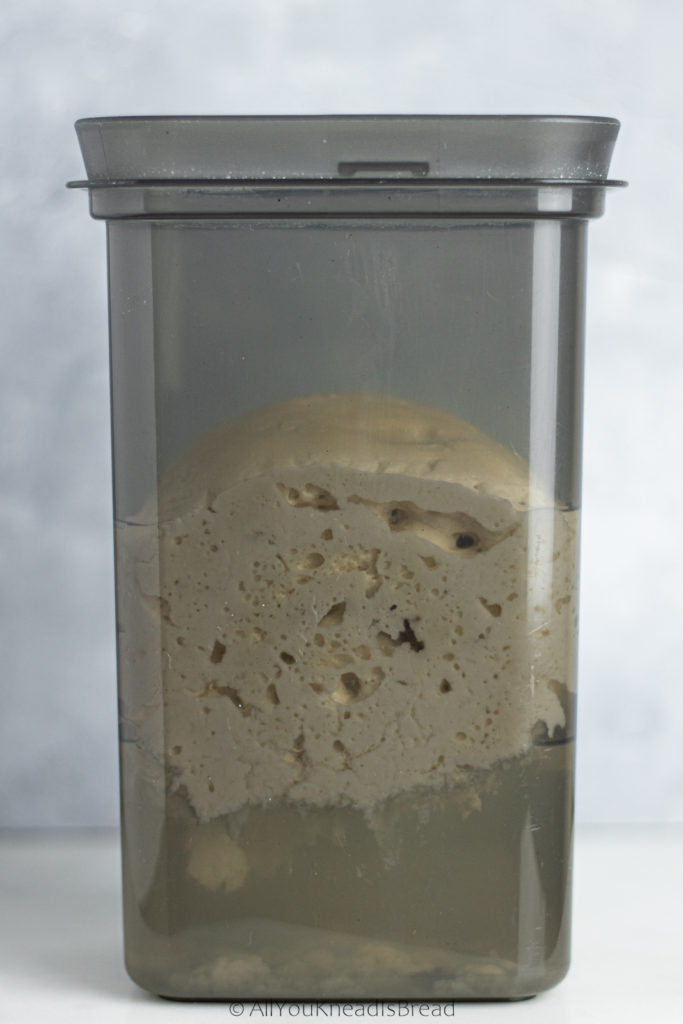
I used the LM to bake a few loaves and it worked well. I tried to make sandwich bread and the dough rose well too. But when I used it to make brioche it was extremely difficult to incorporate all the butter. This is usually a sign that something is not right.
I also noticed that the loaves I made with LM had large lumps that didn’t disappear after baking. The dough wasn’t absorbing the LM and it wasn’t fermenting, because the lumps didn’t puff up while baking.
At this point I was using the 80-20 mix of flours, 35-37% of water and I was rolling the dough with my pasta maker. The temperature of the house was around 66-69F. The temperature was adequate, the flour was adequate, the hydration was adequate…
Again, Kel to the rescue! She suggested that maybe I was rolling the dough too thin and I was working the gluten too much.
The reason I was rolling the dough with the pasta roller was plain laziness! At this point I had been refreshing the PM once a day for several weeks, it became a tedious task. The pasta maker made the process much faster, but I was compromising the gluten.

Effect of gluten in my lievito madre
The temperature, flour mix, and hydration were good, and in the conditions necessary to promote proper fermentation. However, the dough structure also plays a role.
When I started to roll the dough with the pasta maker, I developed to gluten too much. To the point were 1) the dough was too thin and extremely elastic, making it easier to roll it very tight before putting it in the water bath, and 2) the gluten was so developed that after a feeding cycle, the part touching the water was degrading much faster.
I believe that by working the dough with the pasta maker and rolling it too tight, the oxygen availability in the core of the LM was low, which probably led to a proliferation of yeast and a change in the metabolic pathway of the microorganisms; which led to the development of a different aroma profile and higher production of acetic acid. It was making the dough sourer than it should.
Gluten structure vs development of aromas
A tight LM also meant that all the volatile components released during the fermentation didn’t have a place to go, the dough was so tight that they couldn’t move much and they probably were kept in the core of the LM instead of flowing into the water bath. This too increased the acidity of the pasta madre.
The part that was touching the water, disintegrated much faster. The layers were so thin that after a few hours in the water they dissolved. So, the center part was too dry and the outer part too wet.
I learned that rolling the dough too thin and too tight is detrimental to the dough in the long run. At the beginning you might not feel the difference and the smell changes so very slightly that you don’t even realize it’s becoming sourer.
Once I started to roll the dough by hand, the smell started to change, and it got much better in just 2 feeding cycles. The looser structure helped the LM develop a much better crumb-like core.
Problem #3: The dough was still showing signs of weakness and the smell wasn’t great yet
Cause of the problem: machine rolling affected the fermentation by affecting the gluten structure.
Solution: go back to hand rolling
Effect of maintenance temperature
I had spent 4 months like a doctor trying to figure out the disease of the patient. I didn’t know what was happening, so I started to rule things out. At this point I was pretty confident the LM was healthy, and the best way to test how the LM is doing is by trying to make panettone.
Everything was looking right, the hydration, the flour, the rolling method… the house temperature was a bit higher but it shouldn’t be a problem, should it? WRONG but I didn’t know it yet…
One day I woke up early, I had done the bagnetto the night before, and I started to do the 3 refreshments to prepare the LM for panettone. So that day I prepared the primo impasto and let it ferment for 12h at 28C.
At most, the primo impasto should take 14h to triple. But mine barely doubled in 15h
Obviously, my lievito madre was not ready yet. I should have known, as 4h after the last refreshment it wasn’t even floating, it hadn’t tripled in size either, but I was so eager to try to make panettone that I ignored the signs. I didn’t proceed with the secondo impasto, there was no point (I made waffles with the dough, there’s no dough that a waffle maker can’t fix!)
Effect of pH on my lievito madre
After the panettone fail, I decided to taste the LM on each refreshment (I should’ve done it earlier and more often), it was the only thing I hadn’t test yet, the flavor. And OMG! The dough did smell acidic but nothing too weird. But the taste? It was spicy, vinegary… it was super sour!
As it appears, those warmer days, once again, disrupted the equilibrium between bacteria and yeast during the maintenance refreshments. And I believe the warmer temperatures helped in the proliferation of yeasts that led to a drastic increase in the production of acetic acid and a pH unbalance.
pH is one of the factors that affect the survival conditions of the microorganisms. If the pH changes, so will the strains of microorganisms that can grow in that environment.
In need of a deep cleanse
The LM needed to be purified. I decided to do a bagnetto and then I proceeded to do the refreshment as usual. But this time I added 4% of egg yolk to buffer the acidity and help reestablish the microorganism colony. It worked wonders! (This is a technique suggested by Italian Maestros)
I only used egg once, the following days I only use flour and water and I made sure the water bath was at 4C so with the warmer temperature in my house I could keep the LM temperature at bay. The acidic taste got milder and milder until one day I tasted the LM and it was just PERFECT. It had a hint of acid, and a hint of sweetness.
The smell was HEAVENLY. It smelled alcoholic, but with a little bit of acetic acid, and something sweet. Overall it was a very very very pleasant smell. The kind of smell that you just know is right.
Problem #4: a drastic pH change
Cause of the problem: higher temperature during maintenance feeding cycles disrupted the yeast:bacteria ratio again.
Solution: purification step with egg yolk in one refreshment and cold water for the bath to compensate for the warmer temperatures.

Finally: the panettone test
I tried to make panettone again, this time pretty confident because the smell was SO GOOD that I just knew that was how it was supposed to smell (and taste!)
It was just amazing how much better the LM grew during the 3 preparatory refreshments. Even more so when I made the primo impasto. It barely had any lumps of LM in the dough, and the ones it had were very small. The dough absorbed the butter and egg yolk beautifully! (if the pH is not where it has to be, it’s difficult to for the dough to absorb fats). Even the gluten was formed differently. I could tell the pH of the LM was exactly where it had to be.
I finished the primo impasto at 9:30 pm and left it at 28C overnight. Next morning, just 11h later, it had already tripled.

I cannot express the happiness I felt when I saw it. Every time I try to make panettone, the night of the primo impasto I can’t sleep. I’m nervous it won’t rise. But that night I slept well, because I knew the LM was healthy.
It worked! Panettone on the way!
So that day I proceeded with the secondo impasto and made the panettone. And I cannot tell you how amazing the secondo impasto was. The dough was super silky. I can tell it had been my very best gluten development so far. The windowpane test was just incredible (You can see it on my highlights on my Instagram).

After 4 months of frustration, experimentation, speculation, and research. I can finally say that I brought my LM back to its healthiest life. Actually, not back, because it has never been this healthy before.
If anything, working with my pasta madre has been a humbling lesson and a reminder that this is science. Once I started to work with my pasta madre as I would with a project in the lab, things started to change, I started to see the problems and mistakes I was making. And I’ve learned so much!
Acknowledgements
If you’ve made it this far, I’d like to thank you for reading all this. And if you’re struggling with your pasta madre, I hope my experience can help you in your journey.
Also, I’d like to say thank you so much to all of you who followed this journey and gave me ideas or simply asked about my LM. Brainstorming with others is always better! And thank you to my friend Kel. Without her nerdy mind, I probably wouldn’t be here today, with a healthy pasta madre!
#missionpanettone is now stronger than ever!!!
Happy baking!!
Maria
This post contains affiliate links and any sales made through such links will reward me a small commission – at no extra cost for you – that allows me to keep running this blog.
How to make brioche with sourdough discards

Hello friends!
I hope you’re having a wonderful summer! I’m definitely enjoying my well-deserved break! Since I have time, I’m baking almost every day. Nothing makes me happier than having fresh bread on the table!
I’m also taking this time to look for new recipes, try flavor combinations… And also, to look into how bread science can help your baking.
Lately, I’ve seen several brioche recipes and from the pictures, I could tell that the crumb wasn’t what brioche crumb should be. In other words, most likely, the dough wasn’t developed properly.
Why is brioche usually labeled as a “difficult” bread to make? Well, adding solid butter is challenging, and developing dough with that amount of fat takes extra time. So, it’s easy to give up
But let me tell you something, brioche = patience, that’s it. That’s the secret.
Sometimes we’re tempted to melt the butter and make the whole process easier
Or we stop kneading because we’re just tired of waiting for the dough to be ready…
Both butter and kneading, are strongly related when we make brioche.
On this post, I explain why we should use solid butter and how to knead brioche to achieve the PERFECT texture.
I hope that once you understand the science behind, it’ll be easier for you to achieve better results and not to get discouraged when handling enriched dough.
Also, on this recipe, I show you a way to use sourdough discards.
If you’re beginning your brioche journey, this recipe is for you because the butter content is not too high. Practice with this recipe and feel free to increase the amount of butter later on.
This is not a 100% sourdough brioche, it also has commercial yeast. But the sourdough enhances its aroma, and the long fermentation times improve its texture considerably. Speaking of texture….

How to get the best texture in your brioche
First things first. When making brioche we need to have one thing in mind: the fat content is very high, not just because of the butter, but also the eggs, therefore, developing the dough is going to take time and patience.
Although this brioche has a relatively low flour:butter ratio, all the explanations apply to higher butter content brioche and other enriched doughs.
How does fat affect the dough?
The first thing you need to know is that melted butter and softened butter (which is still in solid-state) are two completely different things.
The structure of solid butter is made of little crystals that interact with other ingredients and are essential for developing a nice gluten network. When you melt butter, those crystals are destroyed, so the structure of the butter is different, therefore, the way it interacts with other ingredients it’s also different.
Although the role of solid fats is not fully understood yet, scientists have agreed in a three-parts mechanism to explain what happens when we add butter or shortening to bread dough:
- Wheat proteins have bound phospholipids in their structure which are essential for gluten elasticity. These lipids interact with the crystals found in the butter to create gluten-fat complexes (structures) that strengthen the gluten network and give it more elasticity.
- Butter (or solid fats) can act as a lubricant between the gluten structure and starch matrix, improving the gas retention capacity of the dough. As a result, dough that has a higher content of solid fat has the ability to rise more due to an improved gas retention capacity.
- Solid fat melts during baking and seals pores that are present in the dough through which the gas would, otherwise, scape. CO2 eventually leaves the dough, but the butter retards this process and, again, helps the expansion of the dough during baking, the famous “oven spring”.
You can see that a proper redistribution of the fats within the dough is very important. And the way to achieve it is…. By kneading! Of course 😉
How to knead dough with high-fat content
Developing the gluten network of enriched dough consists of two major steps: One is the development of the gluten-starch matrix the other is the development of the gluten-butter complexes.
First, we need to develop the gluten-starch matrix, so then, the butter has a place to start forming the complexes I mentioned before. That’s why we don’t add the butter at the beginning, we knead the dough a little bit until it has a good consistency.
After that is when we start adding the butter.
Think of it as building a house. First, you need the main structure, then you start building up the walls.
However, how many times have you tried to develop the dough and it looks as it will never come together?
That’s because the long strands of gluten proteins, as they form, they get all tangled. If you force them too much (knead too much) you might end up breaking them, or in other words: over-kneading the dough. There’s a simple solution though… Let the dough rest!
Letting the dough rest while kneading can go a long way and reduce the kneading time. Whenever you have troubles to bring the dough to full development stop for 5-10 minutes so the gluten strands have time to detangle.
What do you achieve with this?
- You avoid over-working the dough having better control over it.
- You can develop a better gluten network, with organized gluten strands that are more elastic. This will improve the cohesiveness and strength of the final product. The crumb of your bread will be AMAZING!
- You avoid increasing the temperature of the dough to the point where the fats will melt. Either if you’re using your hands or a stand mixer.
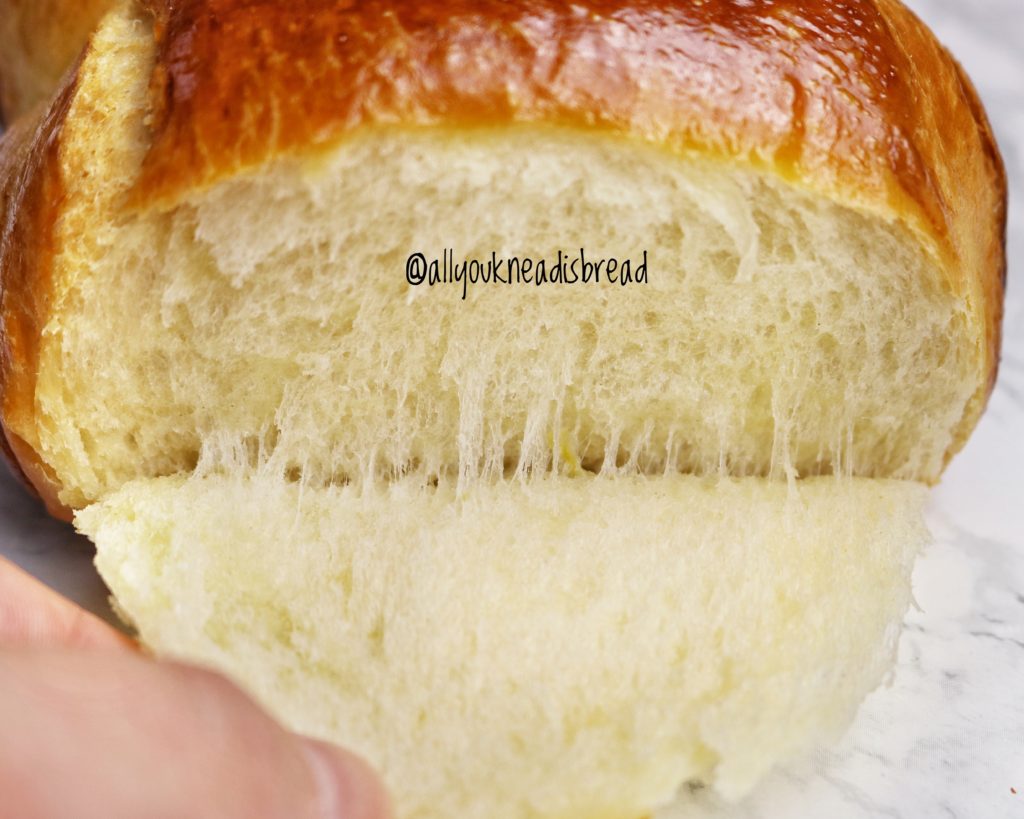
The texture of your brioche should NOT look like cake or banana bread. It should NOT be crumbly. It should be cohesive, soft, spongy and springy. You should be able to pull apart strands of crumb. If not, most likely, the dough wasn’t properly developed
Although there can be many other reasons to explain why the texture didn’t come out right, I believe dough development is, usually, the main cause.
As you can see, breadmaking is pure science. And I hope that by understanding better what goes on when you mix the ingredients, you can succeed and make better and better brioche!
And now… let’s go to the recipe!
For this brioche, I wanted to play with aromas a little bit because one of the loaves was going to be a gift. So I added blossom water, orange syrup, and lemon zest. But feel free to skip these ingredients or add other you like better
POSSIBLE SWAPS
- If you don’t have sourdough starter, just add half of the weight in milk or eggs and the other half in flour. You can also make the day before “pâte fermentée” (also known as old dough).
- If you don’t have orange syrup you can substitute if for honey, molasses, agave… Whatever you have at home.
- If you don’t have lemons, you can add any other type of citric zest.
- If you don’t have orange blossom water, you can add orange juice or brown liquor (rum would give a really nice aroma).
DAY 1 – Late Afternoon
In the morning I fed my starter to bake a sourdough loaf, I always make more than I need just in case! So, I use some for the loaf, some to keep and the rest… I used it in this recipe.
I started mixing my ingredients at 3 pm.
First, I mix all the wet ingredients and the sourdough discards to dissolve them a little. Then add the sugar and the yeast, combine everything well and let it rest a few minutes.

Sift the flour and add it to the wet ingredients along with the salt and lemon zest. Mix everything until you don’t see dry flour particles and let it rest for 20-30 minutes to allow the hydration of the flour.


After the autolysis period, start kneading the dough until it reaches certain consistency.

Start adding butter little by little. It’s better to use it at room temperature (softened butter) so it can be incorporated easier. Otherwise, you might have chunks of butter in the dough and it will be difficult to incorporate it.
I find easier to incorporate the butter by hand, what I do is squeeze the dough and twist it until the butter is absorbed. You can see how I do it on my Belgian waffles video
Then continue kneading the dough at low speed. After 15 minutes stop, cover the bowl and let it rest for 5 minutes. Knead again for another 10 minutes, stop and let it rest for 5 minutes. Continue again for another 10 minutes, stop and let it rest 5 minutes.
At this point your dough should be almost ready, it should start coming up the dough hook of your stand mixer and separating from the sides of the bowl. After this last resting period, keep kneading until the dough is ready, it shouldn’t take much longer.
If you live in a cold and dry environment, you might need more time. So pay attention to your dough, let it tell you what it needs 😊
It took me almost 50 minutes to have the dough fully developed (without resting time).

A fully developed dough should not be sticky, should come out of the bottom of the bowl without tearing and should pass the windowpane test.
To check the windowpane test, let the dough rest a few minutes first. Otherwise, you coul have a “false negative”. The dough could tear because the gluten strands are tangled, not because they’re not ready.
When your dough is ready, let it ferment at room temperature until it almost doubles in size, after that, put in the fridge, and leave it there overnight. Mine was in the fridge for 18 h
Turn the dough onto your work surface and deflate it. Be gentle, but make sure there aren’t big air pockets.
This recipe yields one 9 in (22-23cm) springform pan and one 9.75 x 6 in (25 x 15 cm) loaf pan. If you just want the brioche in the circular pan, multiply all the ingredients by 0.75
Separate 8 pieces of 130-140 g each and shape them into balls and place them into the pans. Then shape the rest of the dough in 4 logs as wide as your pan or 2 longer logs and cut them in half (this is what I did 😉)


And now time to wait! Let the dough rise until it’s puffy; if you poke it with your finger, the dough will spring back but not immediately. That means the dough has enough gas trapped inside. Sometimes, the dough can be ready but does not necessarily double its size.


20 minutes before the brioche is ready, preheat your oven at 350 F (175 C)
Before baking, brush the brioche with egg wash. I like to use an egg yolk and a Tbsp of milk. This egg wash helps soften the crust and the brioche it’s like the one you buy in the store, but better because you made it!

Bake the brioche for 30 – 40 mins, keeping an eye on it. Bake it until it has a nice golden-brown color.


Before you dig into this tasty treat, let the brioche cool down to room temperature. This step is very important because to let the crumb finish baking, set aromas, etc. But after it cools down… oh boy!
If you can see these strands, you worked the dough well. The gluten was properly developed, the fats were successfully incorporated, and the structure of the baked brioche is very cohesive.


Brioche with sourdough discards
Ingredients
Dough
- 500 g bread flour
- 2 eggs large
- 140 g milk
- 160 g 100% hydration SD starter
- 4 g active dry yeast
- 100 g sugar
- 5 tsp orange blossom water
- 2 tbsp orange syrup optional
- zest of 2 lemons
- 10 g salt
- 1 ½ sticks unsalted softened butter
Egg wash
- 1 egg yolk
- 1 tbsp milk
Instructions
Day 1 – late afternoon
-
Add the eggs, milk, sugar, salt, dry yeast, orange blossom water, orange syrup, and the sourdough discards to your stand mixer bowl and give it a good whisk.
-
Sift the flour and add it to the wet ingredients. Combine until there are no dry flour particles.
-
Let the dough rest for 20-30 minutes to allow the flour particles to hydrate.
-
Start kneading the dough at low speed for about 10 minutes or until the dough gets a bit elastic
-
Add the butter in 3 or 4 times, making sure it's completely incorporated before you add more.
-
Knead the dough at medium speed until it's very elastic, shiny, the surface has blisters and it's not sticky. You shouldn't need to add more flour. It should pass the windowpane test
-
Cover the bowl and let the dough rise at room temperature until it doubles in size
-
Place the dough in the fridge for a cold fermentation for at least 15 h. You can leave the dough in the fridge for up to 2 days
Day 2
-
Remove the dough from the fridge and gently deflate it. Cover it and let it rest for 10 minutes
-
For the round pan: take 8 pieces of dough of 130 – 140 g (4 – 5 oz) shape them into balls, and place them into your round baking pan.
-
For the rectangular pan: divide the rest of the dough into 4 equal pieces. Flatten them and roll them into logs as wide as your baking pan.
-
Cover the two pans and let the dough rise unti it's almost at the border of the pans.
-
Preheat your oven at 350 F
-
Before baking, whisk the egg yolk and the milk together and brush the brioche with it.
-
Bake the brioche until it's golden brown or has an internal temperature of at least 96C
-
For best results, let the brioche cool down to room temperature before cutting through it.
Recipe Notes
- Let the dough rest for 5-10 minutes before performing the windowpane test.
- You can shape the brioche in any way you prefer. Just make sure that the dough fills half of the container you use.
Happy baking!

What happens to bread waste?

Hey there! These last few days I’ve been in bed with a terrible cold. Or maybe flu. I feel so much better now. I don’t sound better, but I am lol. I wanted to write something related to bread science, and this afternoon, while I was looking for articles to read I found something that immediately caught my attention:
“Bread crumbs extrudates: A new approach for reducing bread waste”
When I do experiments in the lab I bake lots of bread loaves, I take all the measurements I need and then I have to throw all that bread away. Since we use other chemicals and do other experiments our lab is not considered “safe” to eat the food we make.
Getting rid of all the bread is always very upsetting… And it makes me think about the baking industry. What do they do with all that bread waste they have?
In the baking industry, there are always problems, under and overcooked loaves, deformed loaves, mistakes in the formulation…. That’s bread that cannot be sold.
According to this article a whopping 12.5 MILLION TONS of bread per year are wasted. Just in the baking industry. I mean.. some can be used for bread crumbs but… those are way too many tons to turn into bread crumbs!
But… here comes science to the rescue!
Something that I love from food engineering is that it’s not only focused on developing new products, but also on using raw materials that are otherwise disposed of (Reducing waste and reducing the production of new materials).
This article explores the possibilities of making snacks using extruded bread.
Maybe the word “extruded” makes you cringe but worry not! Extrusion is a very common process in the food industry. Cheetos, macaroni, cheese, plant-based protein, cereals, cookie dough, French fries, and so many other products are examples of what extrusion can do.
The ingredients undergo high pressure and temperature conditions and they get shaped and cooked at somehow the same time.
After the extrusion, the product expands, and it’s usually a good signal when the expansion is relatively high because it makes the product puffy and the texture is just better.
In the video below you can see the type of machine they use. It’s not the same one, but you can have an idea of how it works and how the snack expands when it comes out of the machine.
Minute 2:02 is where you can see all this:
So what’s the deal with the bread?
Long story short, these scientists made a snack like the one on the video using bread that was going to waste. And they found that the expansion and texture of these snacks are better than the control ones made with flour. The fiber content was also higher than the initial ingredients, mostly because the starch of the bread turns into “resistant starch” (starch that cannot be digested and therefore counts as fiber).
This is particularly important because typically, food with high contents of fiber tends to either taste bad or have a poor textural quality.
So this new approach to bread waste also opens the door to many other options. The snacks can be mixed with other ingredients to increase their nutritional value. Different bread can lead to different nutritional profiles. The options are endless! This is just the beginning! And best of all?
1- We could reduce the waste of bread
2- We could have healthier options for our snacks
3- We could have cheaper
And all this while taking care of the environment, our health and our pocket!
In my opinion, this is a very good solution for a problem that’s only going to increase because the food industry keeps increasing, and therefore, the waste that comes along with it. And it’s also a good way to start developing better and healthier snacks!
I was planning on writing something about how important gluten is in bread making, but when I saw this article, I thought it was a very interesting topic and something I’d like to share with you.
Fiber up my friends!
See you soon!
Reference:
Samray, M. N., Masatcioglu, T. M., & Koksel, H. (2018). Bread Crumbs Extrudates: A New Approach for Reducing Bread Waste. Journal of Cereal Science.