

It’s officially cookout season! And we bakers know that’s time for some homemade burger buns. Today I’m showing you how to make sourdough burger buns that don’t fall apart. Tired of your hamburgers buns going soggy and the fixings slipping away? With these sourdough burger buns, you won’t have that problem again!
These hamburger buns have a velvety crumb with a strong exterior to hold your fixings, but they will still melt in your mouth. These buns are designed to last through your last bite! You can also cut them in two and freeze them so you always have sourdough burger buns available for an impromptu hamburger.
Use a ripe sourdough starter
I’ve tried making this recipe with different sourdough starter ratios, at different temperatures, etc. One of the most important things in this recipe is the starter. Some recipes are more forgiving than others and you can get away with a bit of a lazy starter. But these burger buns require you to use your starter at its peak of activity. You can learn more about this in this blog post,
What flour should I use for these sourdough burger buns?
I used King Arthur bread flour with 12.7% of protein. If you have different flour, just keep in mind that the absorption will be different. If your flour has less protein, it will need less liquid to achieve the same consistency. And if your flour has more protein it’ll need more liquid to achieve the same consistency. This is important for you to be able to customize the recipe to your flour and kitchen conditions.
How to prepare the dough
It’s slightly sticky, so that’s why you also need to knead the dough very well. When the gluten is fully developed, the dough is strong enough to pull itself and not leave bits everywhere it touches (like your hands!). Keep in mind that my flour is pretty strong; although you can use low protein flour, you will probably need to reduce the liquids (start with 10-15% less).

Mix everything together minus the butter. Once the dough can form a ball and it is not a shaggy mess, incorporate the butter and keep kneading. If necessary, let the dough rest for a few minutes every now and then so you don’t push the gluten too far. The process shouldn’t take you more than 1h (At the end of the post you will find a baking schedule so you can plan ahead).
I know many recipes call for 3-5 minutes of kneading time, but that’s not even close to fully develop the gluten, especially in enriched dough. So, take your time, and let the dough guide you. The only way to get the best quality in your baked goods is by having a properly developed gluten. That gives the dough enough structure to get a nice fluffy crumb, and enough strength so it doesn’t collapse and you end up with super dense buns.
A note about fermentation
Once the dough passes the windowpane test, place it in a lightly oiled container and let it ferment until the next morning. You can always cut the bulk fermentation and keep the dough in the fridge once it’s doubled. In this case, I’d probably cut the bulk fermentation shorter to avoid the dough from over-proofing in the fridge.

How to shape these sourdough burger buns
Once the bulk fermentation is over, lightly flour your counter and carefully deflate the dough. Make sure you get rid of large air pockets in the dough and divide it into as many buns as you’d like. I like to divide into 8 for a medium-small bun, but if you want larger hamburgers, divide the dough into just 6 or even 4 buns.
PRO TIP: If you think the dough is too sticky and you need lots of flour, oil your counter and your hands instead. That way you avoid the dough from sticking and drying out!
Take one piece of dough and flatten it with your fingers. Then start bringing the edges towards the center to make it into a ball shape. Then turn it upside down so the seam is touching your counter and roll it with your hand to finish shaping the ball and create some tension on the surface. You can use a bit of flour to avoid the dough from sticking to your hand or even some oil.
Do the same with each piece of dough, cover them with floured plastic wrap and let them rest for 15 minutes.
After 15 minutes if you see they are very flat roll them again with your hand to shape them back into a ball. If after 20 minutes they look still plump then transfer them into your baking tray. I find it’s very easy when you use a bench scraper, just slide it under the rolls and carefully place them on the tray.
Cover the buns and let them rest for 2h or until they are puffy. They don’t necessarily need to double in size, but they should feel puffy and if you touch them, the dough should spring back slowly.

How to bake these sourdough burger buns
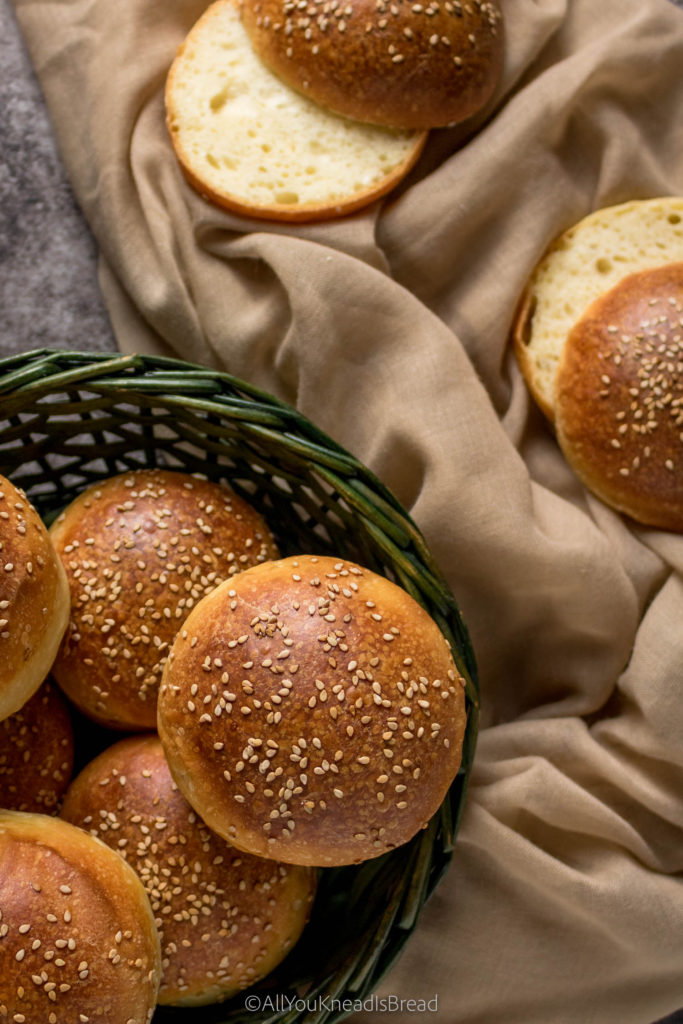
When you think the buns are almost ready, preheat your oven at 375F/ 190C. Once the oven is preheated, use the leftover egg whites to brush the buns. Then sprinkle sesame seeds and off to the oven!
Bake the buns until they have a nice golden-brown color, if your oven doesn’t bake homogenously turn the tray 180 degrees halfway in the bake.
Once the buns are ready transfer them to a cooling rack and let them cool down for at least 30 mins to 1h. If you try to cut them while they’re hot you will destroy the crumb, it’ll get mushy because although the buns are out of the oven, the crumb is still cooking.
In the meanwhile, you can prepare your fixings, the patties… And once the buns are ready cut them in two and enjoy your hamburgers!
PRO TIP: If you want your buns to grow taller rather than spread flat on the tray, you can use these English muffin rings. Put the buns on the tray, butter the rings, and put them around each bun while they proof and until they’re half baked. You can take the rings off when the buns start getting a light golden color. The result will be buns with the exact same shape and very plump. Perfect for a Big Mac copycat!
Baking schedule for a 74F/23C room temperature
If you’re planning hamburgers for lunch my suggested schedule for an environment of 74F is the following
The day before:
- 10 pm: Mix the ingredients and knead the dough
- 11 pm: Start bulk fermentation
The next morning
- 7 or 8 am: deflate and shape
- 7:15 or 8:15 am: Proof
- 10:45 am: Preheat your oven
- 11:15 am: Bake the buns
- 11:50 am: Take the buns out of the oven and cool down before consuming them
- 12:30 pm: Enjoy!!
I’ve tried this recipe on hotter and colder days. At 74F/ 23C it took about 9-10h to rise, at 68F/ 20C it took 11-12h. The dough should at least double or almost double before you divide it. Plan accordingly to your schedule and how early you’re willing to get up the next morning 😉
Do these burger buns have yeast?
No, they do not. They’re made with a 100% sourdough starter. However, if for whatever reason your starter is not ready, or you find yourself with a lot of sourdough discards. You can absolutely turn these buns into “sourdough discards hamburger buns”. Add the same amount of starter, and 5g of active dry yeast. The procedure is the same, only the fermentation times will vary. Instead of starting in the evening, you will have to start in the morning of the same day you’re planning to eat them.
But what if I want to make them using yeast?
If you don’t have sourdough, you can just substitute it with flour and water and use just yeast. If you wanted to replicate a sourdough recipe but using yeast you can prepare the dough using a very little amount of yeast (maybe 1g or even less), but yeast is still much faster than sourdough, so I cannot assure you the dough won’t overproof if you leave it all night fermenting. You might need to experiment a bit to find out a schedule that works for you.
Can I make dairy-free sourdough burger buns?
Absolutely yes! I’ve actually made this recipe with soy milk and plant-based butter and they were amazing too.
If you don’t use soy milk, try to use plant-based milk that has a thicker consistency and it’s a bit creamy. If it’s too watery you will probably need to reduce the amount of total liquid. You can also use no milk and make these with water, but again, be careful. It’s already a slightly sticky dough.
Can I make vegan sourdough burger buns?
Yes again! You just need to do a bit of math. A large egg is about 50g and 1/3 of the egg is the yolk. Egg white is more liquidy and the yolk has some fat. You can substitute 2/3 of an egg with water/plant-based milk, and the other third you can substitute it with some type of fat (vegan butter, olive oil…). This recipe for vegan Hokkaido milk bread can also be shaped into buns and used for hamburgers, although it uses yeast.
Let me know if you make these delicious sourdough burger buns and I hope this year we can start enjoying cookouts and bbq gatherings with friends and family. Don’t forget to tag me on Instagram and use #allyoukneadisbread so I can see what you bake!
If you want to see more bakes you can find me on Instagram, Facebook, and Pinterest, and you can also subscribe to my Youtube channel.
Happy baking!
This post contains affiliate links and any sales made through such links will reward me a small commission – at no extra cost for you – that allows me to keep running this blog.

Perfect Sourdough Burges Buns
These sourdough hamburger buns have a velvety crumb and they melt in your mouth. Designed to last through your last bite!
Ingredients
- 355 g bread flour 12.7% protein
- 100 g active sourdough starter 100% hydration
- 40 g water
- 90 g milk
- 2 L eggs
- 1 L egg yolk
- 25 g sugar
- 8 g salt
- 50 g softened butter
- 1 tbsp sesame seeds (optional)
Instructions
-
Mix the eggs, yolk, water, milk, sugar, and starter in a large bowl (or stand mixer bowl)
-
Add the flour and salt to the wet ingredients and combine until you have a messy dough
-
Cover and let rest for 30 minutes (if your kitchen is too hot, let it rest in the fridge)
-
After 30 minutes start kneading the dough and once it becomes less sticky incorporate the butter
-
Continue kneading until the dough is very elastic and the gluten is properly developed. If necessary, let the dough rest for a few minutes once in a while
-
Shape the dough into a ball and place in a lightly oiled container until it doubles or almost doubles in size *See notes
-
When ready (if you followed my schedule, this step would be the next morning), carefully deflate the dough and divide in 8 equal pieces for medium-size buns, or 6 for larger buns
-
Shape each piece into a little ball and place them on your baking tray. For taller and exact shape buns you can use English muffins rings to proof and bake them
-
Cover the buns with lightly floured plastic wrap and let them rise until they're puffy and have grown in size (they don't necessarily need to double)
-
Preheat your oven a 375F/190C when the buns are almost ready (reduce the temperature a little if you have a convection oven)
-
Brush each bun with the leftover egg white and sprinkle with sesame seeds (optional)
-
Bake for 30-40 minutes or until the buns have a nice golden brown color. Time will vary depending on the oven **See notes
-
Once the buns are the color you like, remove them from the oven and let them cool down in a cooling rack. If you like them a bit more humid, let them cool down covered with a dry cotton cloth
Recipe Notes
* Please refer to the post for a baking schedule and approximate fermentation times
** If you used English muffin rings make sure to oil the inside, you can remove them when the buns are halfway baked