

Well well well… Looks like summer is already here! One of the things I like of the crazy weather we have in NC is the summer storms. I find rain quite relaxing, the trickling sound of the water, the smell of wet soil, the sunset of a stormy day… And baking while raining? That’s a complete spa day!
I guess many of you will go on a vacation this summer, but if for some reason you won’t, I’d like to take you on a little trip without leaving your kitchen! I’d like to take you to the Caucasus region!
This region is well known for their kefir. A fermented milk drink made from kefir grains. These grains are a combination of yeasts and bacteria that you add to milk. The culture ferments overnight, and the next morning you have your fresh fermented drink! The consistency is similar to drinkable yogurt. A little bit sour because of the lactic acid bacteria. While I’m not an expert on homemade kefir, I believe you can control the sourness by controlling the fermentation temperature and times.
Kefir has gained much attention in the last years because it’s a probiotic, so it’s very healthy for your gut microbiota and digestive system. Now you can find it in almost all grocery stores!
I came to realize that almost every country and region have a bread recipe that uses local ingredients or cooking techniques, so in Eastern European countries, kefir is sometimes used to make “батон” (baton) bread. I guess the name comes from the shape of the bread.
I’ve been doing some research on this recipe, I’ve looked for blogs and videos (Thank you Google translate!) and I finally found a recipe that I like, although I’ve made a few changes.
This bread is very easy to make and it the perfect candidate to start kneading by hand. This dough is on the dry side, therefore comes together pretty fast. It’s great to try different kneading techniques and develop your own style. I think making this bread can also be an excellent activity to do with your kids, the recipe it’s simple, they can help you knead, and they won’t make a mess because the dough is not very sticky! 😉
You can eat this kefir bread with savory dishes, or jam, or just plain! And it makes wonderful French toasts too! The flavor is rich and delicate, and the kefir really gives the bread an interesting kick and aroma! The crumb is perfectly fluffy and cohesive, and the crust is not too thick, so you can use this recipe to make homemade subs! The crust will get softer after a few hours. And in my opinion, the aroma of the bread is better after it cooled down completely.

The recipe yields 3 large loaves or 4 medium loaves, so if you’re not going to eat them all you can freeze some and keep the rest in a Ziplock bag for a few days.
Let’s start with the recipe!
As always, activate the yeast in the water and let it sit for a few minutes.
Once the yeast is active, add sugar, salt, kefir and butter and give it a good whisk. Don’t worry if there are chunks of butter.
Then add 1/3 of the flour and combine everything very well until you have a thick paste. By doing this, incorporating the butter will be easier and you don’t have to melt it. Bread usually turns out better if you don’t melt the butter.

Add the paste to the rest of the flour (previously sifted) and combine all the ingredients together until there are no dry flour particles.
Let the dough rest for 20-30 minutes to allow the flour particles to hydrate. This is a pretty dry dough, since the gluten doesn’t have much moisture, it’s important to start working the dough after the gluten proteins had some time to hydrate.
Knead the dough until it’s soft and elastic. Knead it the best way you can with the technique you’re more comfortable with. The dough feels a little hard at the beginning, use the heel of your hand to apply pressure and eventually it’ll become more elastic. Be patient, it’ll take about 15 minutes to have the dough ready.

After autolysis After kneading


You shouldn’t need extra flour to knead the dough, it’s not sticky, but if you do, try not to add too much or your bread will turn out too dry.
When the dough is ready, let it ferment until it doubles in size and it’s puffy. In a warm environment it will take between 1 h and 1 h 30 mins.
After that, deflate the dough very well, we’re not looking for big alveoli in the crumb, but a bun-like crumb.
Divide the dough into 4 equal pieces (or as many as you want! It depends on how large you want the loaves). Shape them into balls and let them rest, covered, for 10 minutes. During this time the gluten strands will relax, and it’ll be easier to shape the loaves.
To shape the loaves, flatten each dough ball with your hand and with a rolling pin roll them into a rectangle as wide as you’d like the loaves. The rectangle should be about 1/3 or 1/4 of an inch (0.5-0.8 cm).

You can use some flour while you shape the loaves to avoid the dough from sticking on the counter.
Once you have the rectangle start rolling the dough from the narrowest side, tugging the ends inside of the log.


Let the loaves rest, covered, until they double in size. Before the proofing time is over, preheat your oven at 375 F (190 C).

Right before baking the loaves, make cuts through them and brush some water. This step is optional, the water will help develop the crust but if you prefer a softer crust, don’t brush it.

Bake the loaves for 25 minutes or until they are golden brown
NOTE: you might need to bake at lower temperature to make sure the loaves are fully cooked. You know your oven better!
When the loaves are ready, let them cool down on a cooling rack. I know it’s tempting but try to wait until the bread is at room temperature so the crumb finish baking and the aromas finish developing.

Enjoy!
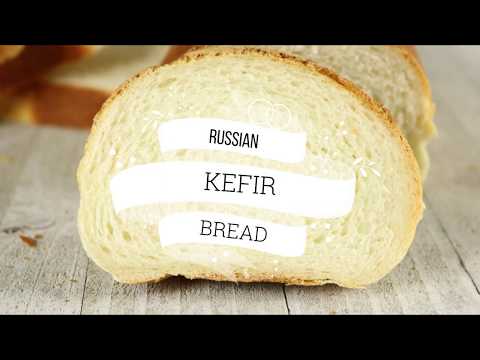

Russian Kefir Bread
A delicious and easy bread recipe
Ingredients
- 600 g bread flour sifted
- 175 g plain kefir
- 175 g water room temperature
- 6 g dry yeast
- 10 g salt
- 30 g white sugar
- 50 g unsalted butter softened
Instructions
-
Dissolve the yeast in the water and let it sit for 10 minutes
-
Add to the yeast mixture the salt, sugar, kefir, butter, and 200 g of flour and combine everything until you get a paste.
-
Add the paste to the leftover flour and incorporate all the ingredients until there are no dry flour particles. Let it sit, covered, for 20 minutes
-
Knead the dough until it's elastic and soft
-
Place the dough on a lightly oiled bowl and let it ferment, covered, until it doubles in size and it's puffy.
-
Deflate the dough and knead it for 1 or 2 minutes to make sure you get rid of big bubbles
-
Divide the dough in 4 equal pieces. Shape them into balls, cover them and let them rest for 10 minutes.
-
With a rolling pin roll the balls into a rectangle and shape the loaves.
-
Let the loaves rest, covered, until they double in size and they are puffy.
-
Make cuts on the loaves, brush them with water (optional) and bake them at 375 F for 25 minutes or until they're golden brown
Pulp crackers – rich in fiber!

Hello guys! I am back!!!
These last few months have been a roller coaster. This is my last semester in my PhD program and I was full time writing. I never realized under how much stress I was until I finally defended my dissertation. It felt as if I took a heavy load off my shoulders. I can’t tell you how much better I’m sleeping now! And my bread-creative mind is starting to function again! I have this “to-bake” list that I carry with me everywhere and every time I have an idea, or I see a bread I want to make, I write it down. Welp… I haven’t written anything down in the last few months (I still have a long list of breads I want to make).
There’s this thing about me, when I’m anxious I crave weird things. And I had been craving horchata for the longest time!
Note: Do not mistake with Mexican horchata, which is a different beverage made with rice and milk.
Spanish horchata is a vegetable milk made from tiger nuts (also known as chufa seeds) typical from the south-east of Spain (Valencia). Chufas are naturally sweet with a very distinct flavor. A cold glass of horchata is one of the best beverages for hot summer days! I bought a small packet on amazon and I made my vegetable milk. It’s very easy to make, the only thing is that the seeds are very hard and dry, so you need to soak them for at least 24h (best results after 48-72h). Then put them in your blender with water and strain the mixture!
I was so happy with my horchata! Plus, tiger nuts are rich in resistant starch, which is a type of starch that is not digested and counts as dietary fiber (yeah!). With ½ pound of seeds, I made about 40 oz of this vegetable milk aaaand I had a bunch of leftover pulp!
Why you should use leftover pulp
The pulp is rich in dietary fiber too, so I didn’t want to throw it away because it’s the healthiest part. Throwing the pulp away (or cereal bran, fruit peel etc.) is like finding a diamond full of dirt, keeping the dirt and throwing the diamond away. Crazy right?! So, I used the pulp to make crackers! I had enough to make lots of crackers and they can last a long time in an airtight container 😊
The reason I am posting this recipe is because all of us, at some point, might have some “edible leftovers” that are packed with nutrients, but we toss them because we don’t know that to do with them. Not only this recipe will help you to use valuable leftovers, but also to reduce food waste.
Let’s make some crackers!
This dough is super easy to make, you don’t have to knead too much, just enough to have a good ball of dough. This might be one of the few cases were developing the gluten network very well its not crucial. You can also add whatever spices or seeds you like to the dough. And, of course, you can adjust this recipe to any type of pulp you have. You can use almond pulp, cashew pulp, okara… Or you can switch it for any cereal bran or fruit peels… Your choice!
In this recipe I use butter because I was looking for that flaky texture but if you don’t want to use butter, substitute it for shortening or any vegetable oil. If you want to make the crackers healthier, you don’t have to use any type of fat, maybe just a bit more water. But the crackers won’t be as flaky.
The only requirement here is to be able to make a nice dough ball. Not too sticky, not too dry. That’s it, that’s my secret

Start by mixing flour and the rest of the dry ingredients and then add the pulp and the butter.
Then blend the butter with the flour and pulp. You can use a pastry blender, a fork or your hands, whatever is more comfortable for you. I did it by hand.
You should have small pieces of solid butter

Then start adding the cold water. Do it little by little, controlling you don’t add too much. We’re not looking for a wet dough.

Knead the dough for a few minutes and with a rolling pin roll it on parchment paper to your desired thickness. My crackers were about 1/5 of an inch (0.5 cm). The thicker the crackers, the longer the baking time, just keep that in mind.

With a knife or a cookie cutter cut the crackers. Trim the edges and roll the dough again on another piece of parchment paper. By doing this you don’t need to transfer the crackers and mess their shape. And remember, you can use parchment paper several times before you discard it. You can do this as well using silicone baking sheets.

With a fork or a toothpick prick the crackers so during baking they won’t puff.

You can brush the crackers with oil or egg if you want, I didn’t. Sprinkle your favorite toppings and bake the crackers!
I like to sprinkle coarse salt or black pepper, but you can use whatever you like.
Baking time: it depends, bake the crackers at 400 F (205 C) and after 5-7 minutes (less time if your crackers are thinner) Check the crackers, if they’re not ready let them bake a bit longer but keep an eye on them. When they start getting some color they’ll be almost ready! Don’t let them bake too long or they will get hard and the taste might not be good.
NOTE: keep in mind that because of how the heat is transferred in your oven and the thickness of the crackers, some might take longer time than others. So don’t worry if you need to take some out of the oven while others are not fully cooked yet.
Now, go make some hummus and enjoy these crackers!


Tiger nuts pulp crackers
An easy way to use leftovers packed with nutrients!
Ingredients
- 300 g bread flour
- 150-200 g finely ground tiger nut pulp (any other pulp works too)
- 75 g butter (optional)
- 100-160 g water
- 2 tsp salt
- 1 tbsp baking powder
- 1/2 tbsp sugar (optional)
- 2 tbsp sesame seeds (optional)
Instructions
-
Preheat your oven at 400 F (205 C)
-
Mix dry ingredients, spices, seeds and pulp
-
Add cold butter and blend it in with your hands or a pastry blender until you have small pieces of butter evenly distributed
-
Start adding cold water little by little until you have a cohesive ball of dough. Not too dry and not too wet
-
Knead the dough a little bit and let it rest 20 mins
-
Roll the dough onto a piece of parchment paper to the desired thickness and with a cookie cutter or a knife cut the crackers.
-
Trim the edges, roll them out again and keep cutting crackers
-
Prick the crackers with a fork or a toothpick and add your toppings (salt, black pepper, dried onion…)
-
Bake for 5-7 minutes keeping an eye on them. After that time take out the crackers that have a nice brown color and keep baking the rest.
-
Enjoy!
Recipe Notes
You can customize this recipe as you wish. Add spices, herbs… Change the tiger nuts pulp for something else.
Keep in mind that the pulp I used was moist and that affects the total water I used. If you use cereal bran you might need more water.

No-knead overnight focaccia
I am back!
These last couple of weeks have been a bit busy. Visits, graduation ceremonies… It’s been difficult to sit down and write, write, write. But still… I’m just so excited the blog is finally live! I can only think about recipes I want to share with you or new things I want to try, or just go on a full essay about my friend “the gluten network”.
One of the biggest challenges of making bread is the time it takes. What if you need to bake something but your schedule is tight? What if your best friend comes all the way from Oregon and you just need to adapt your baking plans? Ahem… 😉
For my second post, I wanted to share a recipe that I developed by myself. Something I could call mine from start to finish. And I also needed a recipe that I could easily modify to retard the fermentation. Baking a focaccia sounded just about right. This bread is in my top 10 because of its versatility. Very customizable, perfect for any occasion, and simple to make!
As you might know, focaccia is an Italian bread, it shares some similarities with pizza, but it has fewer toppings, and instead of a round shape, focaccias are typically rectangular, which doesn’t mean that you must do it that way. You can use whatever baking tray you have! Previously I had used Italian herbs and garlic, olives… But I wanted to try something different, something like…caramelized onion and goat cheese, maybe?
Yes!
The beauty of food is that everyday ingredients can go from “okay” to “omg-this-is-so-good” with just a bit of patience and some heat. That’s the case for caramelized onions. They can turn any dish upside down!
I typically use biga to enrich my focaccia. Biga is a preferment that has flour, water and a very small amount of yeast. It ferments for several hours (and up to a few days) and accumulates aromas that will make the bread dough much richer. But since I was going to do a cold fermentation, I skipped this stage.
I was a bit worried the dough could over ferment, but it didn’t! It worked and the focaccia came out beautiful and with a very intense flavor.
Thanks to the high water content, it had very nice holes and a soft crumb. It stayed fresh for at least 2 days, probably more but I can’t tell you exactly because we finished it within 2 days.
Oh well!
I started to make the dough on Saturday evening. Somewhere around 9 pm. First I activated the yeast, then I mixed all the ingredients except the salt and let the dough rest for 30 mins (Autolysis).

After the autolysis, I added the salt and started with the stretch and fold method, every 30-40 minutes, a total of 4 times.
This is a very easy method. You can do stretch and folds (S&F) while you’re watching a movie. Or in our case, while we surfed Netflix trying to find a movie to watch lol
It’s amazing how the dough develops with so little work!
Look!

Once you’re done with S&F just cover the container and put it in the fridge until next day! Mine was in the fridge for about 18h, I had enough time to go to the airport to pick my friend up, go visit her family, have a girls day with another friend and come back home to a bubbly dough!
Look at how lovely it is!

I took the focaccia out of the fridge and turned the dough onto the tray. I caramelized the onion at the same time I stretched the dough to fill the baking tray. My dough was snapping back quickly so I had to do it little by little. Make sure you use your fingertips to leave those characteristic holes.

When the onion was ready I let it cool down to room temperature and spread it evenly with the cheese.
TIP* don’t caramelize the onion completely or it’ll burn while you bake the focaccia. I know it because that’s what I did haha!

I also found a trick that I think helps improve the final result: I used an olive oil and water emulsion instead of just drizzling olive oil. The oil will be absorbed by the dough or leak to the bottom and help make the bottom crunchy.
To prepare the emulsion whisk the oil and the water very well until you get a thick mixture and drizzle it on top of the focaccia.
Now put the focaccia in the oven and wait until is baked!
Just… look!
Let me know if you make this focaccia and what you think!

Caramelized onion and goat cheese no-knead focaccia
Ingredients
Focaccia dough
- 600 g bread flour
- 480 g water
- 15 g sugar
- 3 g active dry yeast
- 12 g salt
- 50 g olive oil extra virgin
Oil & water emulsion
- 2 tbsp water
- 2 tbsp olive oil extra virgin
Toppings
- 1/2 yellow onion large
- 2 oz goat cheese plain
- olive oil for cooking the onion
Instructions
-
Dissolve sugar and yeast in the water and let it sit for 15 minutes
-
When the yeast is activated add the oil and mix well
-
Sift the flour in a bowl and add the water/yeast/oil mixture
-
Mix everything well until you don't see any dry flour particle and let it rest 30 mins (autolysis)
-
After the autolysis period add the salt and do the first set of stretch and folds.
-
Repeat the stretch and folds 3 more times, every 30-40 minutes
-
Cover the container and place the dough in the fridge until the next day
-
Take the dough out of the fridge
-
Line a 46 x 33 cm baking tray (18 x 13 in) with parchment paper and brush it with olive oil
-
Turn the dough onto the baking tray and little by little stretch it to fill the whole tray.
-
Slice the onion thinly and cook it at medium-low heat until is soft and brown-ish. Don't caramelize it completely. When done, set aside and let it cool down until is warm.
-
When the onion is warm and the dough is good to go, spread the onion and goat cheese evenly on top of the dough
-
Preheat your oven at 450 F
-
Mix 2 tbsp of water and 2 tbsp of olive oil and whisk it until you have a thick mixture. It might take a few minutes but it'll eventually come together.
-
Drizzle the emulsion around the focaccia, you don't have to add all of it, just as much as you'd like.
-
Bake on a preheated oven for 20-25 minutes or until golden brown.
Happy baking!