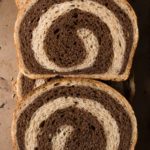
Sourdough Marble Rye Bread
Delicious and aromatic sourdough marble rye bread, perfect for sandwiches and toasts!
Ingredients
Light Dough
- 85 g rye flour
- 165 g bread flour
- 55 g mature sourdough starter
- 130 g water
- 5 g salt
- 15 g butter
- 10 g honey
- 1 tsp caraway seeds
Dark Dough
- 85 g rye flour
- 165 g bread flour
- 55 g mature sourdough starter
- 130 g water
- 5 g salt
- 15 g butter softened
- 10 g molasses
- ½ tsp cocoa powder (use dark cocoa powder for a darker color)
- 1 tsp caraway seeds
Instructions
Light Dough
-
Dissolve the sourdough starter in the water to break it down a little
-
Add all the other ingredients except the butter and mix them until you can't see dry flour particles. Cover and let it rest while you mix the dark dough
-
After a few minutes of rest start kneading the dough with your hands and incorporate the butter. Continue kneading until the dough is not sticky and is smooth
-
Lightly oil a container, place the dough inside, and let it ferment until is about twice the size (8-9h at 69F/20C or about 4-6h in a warm place, don't exceed 79F/26C) *See notes
Dark dough
-
Dissolve the cocoa powder in 50g of water until you don't have lumps
-
Dissolve the sourdough starter in the remaining 80g of water
-
Add the cocoa mixture and the rest of the ingredients, except for butter, to the dissolve sourdough. Mix the ingredients until you don't see dry flour particles. Cover and let it rest while you knead the light dough
-
Once the light dough is done and fermenting, start kneading the dark dough with your hands and incorporate the butter. Continue kneading until the dough is not sticky and is smooth
-
Once ready, lightly oil a container and place the dark dough inside to ferment (8-9h at 69F/20C or about 4-6h in a warmer place, don't exceed 79F/26C) *See notes
Shaping & Proofing
-
Once both doughs are ready, lightly flour your counter, and with a rolling pin roll both doughs separately to 1/2 in thick and as wide as your baking pan is. The thicker you roll the dough the thicker will be the spiral pattern inside, feel free to change the thickness to your taste.
-
Try to roll both doughs into a rectangle of similar size (Mine was about 9x17 in/22x40 cm). Once ready with a fork prick both doughs to make sure there aren't large air bubbles trapped between the layers later on.
-
Lightly brush the light dough with water (you can also use a spray bottle) and place the dark dough on top. You don't need too much water, just enough for both doughs to join together.
-
Carefully press both doughs with your hands to make sure there's contact everywhere and starting with the shorter side roll the dough into a log and pinch the edges together
-
Place the dough into a lightly oiled baking pan and cover it with plastic wrap, or a shower cap
-
Let the loaf ferment until the center is about the height of the pan or even a little bit more. The dough should feel puffy but still have good structure. My loaf at 73F took about 4h to rise **See notes
-
About 20 minutes before the dough is ready preheat the oven to 350F
-
When the dough is ready brush it with milk or egg wash (whichever you prefer) and bake for 35-45 minutes (until inside temperature reads at least 204F/96C)
-
Once the bread is ready take it out of the oven and let it cool down for 10 minutes before you take it out of the pan to finish cooling on a rack
Recipe Notes
* If your kitchen is cold and you need to leave the dough fermenting for a longer time, it's better to do so during the bulk fermentation. I don't recommend doing a cold-proof after the loave is shaped, it might not rise enough and end up under proofed. Also, do not use too warm temperature, as it could weaken the gluten network.
**It's important you use a proper baking pan, otherwise, if it's too wide, by the time the dough reaches that height it'll be over-proofed.